It is easy to make a toy boat out of a simple sheet of paper and set sail on a stream and across the expanses of the bath. You just need to remember a simple instruction on how to make a boat out of paper, how to fold it in order to get a water-resistant structure. This is a simple but very exciting affair.
Parents can make paper toys for small children, older children can learn this simple art themselves. A series of video tutorials offers master classes after watching which you can superbly build entire flotillas of paper boats yourself. They soak over time, but you will have time to make new ones.
The following steps are detailed in the video tutorial:
- bend A4 sheet in half, then again in half;
- fold the corners of the sheet to the center;
- bend one of the remaining strips up and bend the corners, the same thing on the other side.
Next, open the resulting square and fold along the other axis. We bend corners to the center, but not to the end. If the points to which the bend is made are arranged at different heights, the bow and stern of the boat will have different heights, which will be interesting to look at. Then again the square is folded along another diagonal. It remains to open the structure by pulling the fingers at the opposite ends and slightly level the resulting boat.
It can be put on the table, it will be stable. With the same success, he will be able to stay on the water. Now you know how to make a paper boat.
Video lesson:

To make a boat out of paper with your own hands, you must:
- take a sheet of paper measuring 20 x 20 cm and fold it diagonally, then on another diagonal and unfold it;
- bend one of the corners of the sheet to the center;
- fold the sheet several times along the diagonals.
Next, several small triangles are bent, and a series of bends is made, during which the boat's pipe and its other elements are formed. To do everything right, you must strictly follow the instructions in the video tutorial. The feed of the boat is folded, and its halves are fixed with glue. This is the only place where the structure is not held by the bends of the paper, but requires the use of glue.
The boat resembles a modern pleasure boat in shape, has a swift look and is very stable both on a hard surface of the table and on the surface of the water.
Video lesson:

The proposed step-by-step instruction on the video tells how to make a neat pleasure boat with fast-moving outlines from paper. On sheet A4, the bend of two diagonals marks the correct square with diagonal bends.
The strip of paper remaining after the formation of the square is folded in half, the corners are folded on it. The marked square also folds in half, and its sides are tucked inward. Instead of a rectangle, a triangle is obtained. The whole structure is bent in half, the fold lines are neatly ironed.
This is followed by a whole series of sheet additions that are easy to reproduce by watching a video tutorial. In the end, the paper structure is inverted, forming a neat cutter with a flat bottom, very stable both on water and on a solid surface.
Video lesson:

Making an origami paper ship is easy. It is enough to take a square sheet of paper, bend it diagonally. Then one of the sides of the resulting triangle is bent as shown in detail in the video. The fold lines are well ironed. Then the square unfolds and all the fold lines fold in the opposite direction.
Actually, on this the manufacture of the boat ends. She has no bottom, there are only beautiful sides in the shape of the bow of a boat. The free edge of the paper triangle depicts a sail floating over the boat. Such a sailing boat, of course, will not sail, but if its rear edges are glued together, it can become a beautiful silhouette that can be placed on a table or suspended on a string.
For origami, not functionality is important, but figurative similarity.
Video lesson:

From a sheet of A4 paper, you can make a small roomy boat that is quite capable of floating on water and even transporting some kind of cargo. A square sheet of paper, obtained from A4 format, is folded into a rectangle, then each of the halves is folded several times, while the corners that form the profile of the paper ship are folded.
Outlines of the bow and stern are formed by different folds; in the end, a punt with high sides is obtained. In children's games on the water, such a boat can serve as a good vehicle. It does not soak for a long time and does not disappoint young sailors.
Video lesson:
Hello everybody! Spring is coming soon, and there is summer too. The most beautiful and warm time will begin, streams will run and we will all go on hikes and on a picnic. Children will launch boats, launch into the sky, and we will fry
By the way, a paper boat is excellent, and on May 9th. Therefore, if you are still in doubt, then you can use this particular toy and you will have an original idea for a small souvenir.
As a child, I loved such games in nature, and when I grew up I began to sit and fold various figures from paper, I really liked this lesson. Now we often make such creations with my beloved little rascals.
Do you really know the answer to this question? After all, it is not difficult in principle to add such a figure, the main thing is then to somehow decorate and decorate it in a special way.

The simplest is the origami technique, I will start with it.
1. Take a rectangular sheet, such as A4. Place it horizontally in front of you.

2. Then fold in half as shown here.


4. And then open to the starting position, but the line will be visible.

5. Draw a line with a pencil.

6. Now you need to make a triangle on top.
7. That's what happened. Do everything carefully and symmetrically.

8. Now, the ends that formed bend.

9. After this, iron your hands.

10. The resulting corners you need to bend from two sides.

11. Then begin to open the intended stencil.

12. You get such a square.

13. Bend the lower corner.

17. And close as shown here, in this figure.

18. On the other hand, also bend.

19. Start revealing the craft.

20. Pull the two ends.

21. So it turned out white handsome.

Simple paper boat folding patterns
Now you can use another guide to make a bunch of other and brand new models.
1. Take a square sheet and roll it like this.

2. Turn obliquely from each corner to make a triangle.

3. You get such a figure.

4. Do the following.

5. And then collapse and iron the corners on both sides to the center line.

6. Almost everything is ready, it remains the case for small. Namely, expand the figure.

7. With your fingers open and gently press everything against the walls of the boat.

8. Such an interesting and funny toy turned out, the children will be delighted. Put your favorite cartoon characters in it and play with your child's health.

If in short, yes, or in general you have already learned how to make such a boat, but at some point you have forgotten, I am ready to offer you such a small scheme, according to which you must remember everything, copy it to your desktop so as not to forget))).

You can also make such a boat, it also resembles a closed boat. The diagram needs to be read from left to right. She perfectly floats on a stream and does not sink.

I think that even if a storm occurs, such a toy will cope with it.

DIY step-by-step instructions
Do you like the Scarlet Sails fairy tale? There, such a beautiful and graceful ship sailed with such magnificent sails. If you are looking for just such an option, then you can watch this video here:
And if you prefer to do something simpler, then this instruction will just come to your aid and will be helpful.
1. Make a square out of a regular sheet and fold it in half to make a triangle.

2. Then unfold it to its original position, and bend the sheet in half.

3. These lines will turn out, one diagonal and the second horizontal.

4. Fold the leaf again in half.

5. And where the diagonal is, bend the ends to this line to make triangles with equal sides.

6. Now bend the sheet of paper in half in the opposite direction.

7. Bend again to its original position and follow the further directions.

8. Take the corner on the left and attach to the center.

9. And then fold in half, and the left corner will have to be bent inward.

10. Do the same with the right corner.

11. After that, you have to bend the lowest corner of the paper, you get a base, which hide inward.

12. Here is such a fun toy that will certainly please your mischievous baby or baby.

We make a ship that does not sink in the water
I offer you quite interesting models that are made of cardboard. And you can come up with such a miracle yourself. The main thing you need to find quality cardboard and that it was glossy on the other hand. This is usually not sold in a store; all kinds of souvenirs are packed in it.

Then ask the child to make decorations or decorate him. In general, make it irresistibly beautiful.

Can be made from ordinary plastic cups or plates.

And, you can, hee hee of course this is a joke and swim on such a creation on the lake itself).

It is also a good idea to take a bag of milk or yogurt, i.e. tetrapack and make such an artwork from it. Do not forget about the checkbox.

A great option to use a plastic bottle in action, it will never drown and such a boat will serve you for a very long time.

Incidentally, they also make foam structures and other improvised means.

Phase master class paper boat for beginners
Well, I want to touch on the topic and show the smallest kids one more option that can be used for kindergarten.
1. Take a square-shaped sheet of paper, you can take the usual white or color.

2. Fold it in half to make a triangle.

3. Bend the bottom end to the top as shown in this picture.

4. Now, where you got the fold line, drag the bottom corner up, as if twisting.

5. Here, the fold line is marked, if suddenly you do not understand.

6. And that's what will come out.

7. You can trim or hide the tip. Here is such a weird and cool creation turned out.

Origami boat from sheet A4
Now consider another scheme, for example, how to make yourself a real and easy paper steamer yourself.
There is such a scheme, for beginners it seems to me it will be complicated, but still I show it.

I tried to fold it myself, and here's what happened, great and in my opinion it’s easy.

The kids decorated it.

Here's another look at the steamer that we did before, only its design is a little different. It turned out two pipes, tu-tu.
By the way, even an ordinary boat can be interestingly designed, take a look, this is the first option.


You can build a boat in two places. How? But with which, see the step-by-step instructions and repeat. Isn't that brilliant?

The first was with a sailboat, and the second without it.

Another such option caught my eye.

Well, that's all my good and beloved friends! Make a bunch of such creations, play with your children and smile more often. I wish you all creative success and see you soon! Bye Bye!
Sincerely, Ekaterina Mantsurova
Grandparents did not know about the Japanese origami technique, but without knowing it, they easily made at least three such crafts with their own hands. Origami is the art of making a variety of craft figures by hand, by folding it out of paper without using scissors and glue. Using the modular principle in origami technique, when figures are assembled from a variety of separately assembled paper parts, oriental masters do anything from small birds to huge dragons.
- The Japanese make them out of special paper, and our parents took any piece of paper that came to hand for these most popular origami crafts in Russia and folded a plane or boat for the children. This skill is in demand today.
- In the spring, when the first streams and puddles delight children, in winter, when any basin of a house can be turned into a reservoir, not to mention summer and autumn, a paper boat will help entertain the baby, turn slush into a fairy tale. The child is willing to learn from mom and dad to make a simple boat out of paper with their own hands in one lesson. This skill develops fine motor skills of hands, spatial thinking, and the ability to read patterns is also always useful to him.
- Beginners are better off making a simple origami paper boat for children, especially since the step-by-step instructions for the scheme will be in front of you below. When you master this option, you can learn how to make an origami boat out of paper with pipes or under sail from photo lessons, diagrams, and videos on the Internet. Such a paper ship is easy to put in your pocket when you go for a walk.
Easy Origami. A boat made of paper for beginners.
This classic paper boat under the guidance of parents will be able to master the child of the older group of kindergarten. To create a classic simple paper boat, any paper is suitable, but if you want your child to easily bend it, you should not take it too thick, like cardboard for crafts. At the same time, if the paper is too thin, then your ship will soften too quickly and fail, so it is better to take a sheet of medium density.
Typically, the craftsmanship is made of A4 paper, but if your child wants to have a LARGE ship at the exit, then choose a larger format, the main thing is that the sheet is rectangular, and the steps according to the scheme will be the same as in the instructions below.
So, look at the photo and start the lesson.:
 The lower corners of our rhombus again bend each upward for its own part, transforming it into a new triangle.
 Carefully iron the folds of the resulting rhombus and get ready to move on to the next transformation.
Now we take these corners and bring them together, as a result of getting a new figure - a rhombus.
 We bend the corners of the wrapped strips from each edge in the direction of each other so that the workpiece of the craft finally takes the form of a triangle.
 The bottom edges of the strip below the resulting triangle are bent upward each to its side.
 Take the edges along the fold line and bend them down to the center, so that a triangle appears at the top.
We take a sheet in A4 format and fold it in half.
 We repeat the method from step 4: holding the opposite edges, bring them together, again, as in a fairy tale, turning the triangle into a rhombus.
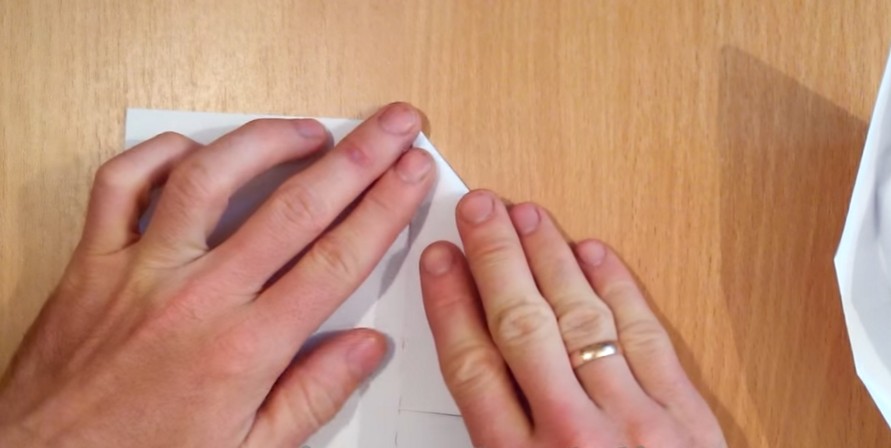
 The most crucial moment in our fairy tale comes. We take our hands over the upper corners and slowly open the rhombus, turning it into a boat.

If you want the boat to be beautiful and unique, you can make it out of colored paper or paint it with wax crayons.

You can add a flag to the center, but any additions to the ship should be light so that it does not lose stability. On the Web you can see a lot of photos of the boats collected according to this scheme, thanks to interesting paper and small additions that have become a real decoration of the children's room.
If you want the ship to last longer and not be afraid of water, dip it in molten paraffin. And it is possible for a child to make a postcard with congratulations for dad or grandfather on his own hands from this beautiful paper boat.
Simple paper boat assembly diagram
Now that you have mastered the assembly of a simple classic origami boat, you can try to make a steamboat according to the scheme of instructions.
Look at the photo below, follow the instructions for bending indicated by arrows, and you can do it yourself.

It’s easy to find video tutorials on creating two-pipe boats on the Web, so that having mastered the video instructions, a child can build a whole fleet of single-pipe ships, two-pipe, simple boats and sailboats.
Sophisticated sailing pattern
To create a sailboat, as in the diagram below, you will need a special paper for origami, or just cut out a square from A4 format, otherwise nothing will work.

Do-it-yourself colorful paper boat origami. Instructions in verses for children!
Children always love to do origami, they are ready to sit all day and make some origami crafts and show them to relatives. Any child would like to learn new origami crafts, for example, make the simplest paper boats with their own hands. Below in our master class we will teach how to make this lightweight as well as complicated paper sailboat with our own hands.
1. The most common version of a boat made of paper do-it-yourself
For the lightest boat we need, of course, only 1 sheet of A4 format. The following ten steps show how to make origami.
You can also try to make another origami, a boat of paper according to a slightly complicated scheme. We, as always, will need a regular piece of A4 paper.
2. Scheme of a sailing boat.
First we take our blank and bend it in half with a “little book” (picture 1). Then both sides, we also fold them in half (fig. 2).Mentally divide the folded sheet into 4 parts (you can use a gray pencil), then fold the upper and lower half to the middle (picture 3).Then turn back to the previous step (fig. 5),the result was a blank with three fold lines. Then you need to unscrew the second half and bend along the fold lines as on the template (fig. 5). And then roll up the bottom half of the paper (fig. 7). Do the same with the top half of the crafts (image 8). After expanding up the first folded part (number 9),must
look like the image (fig. 10). Then turn the product upside down, in front of you is a large square and four small triangles (fig. 11). Then fold the square with opposite corners from top to bottom (numbered 11). So we collected a beautiful sailboat (fig. 12).
3. Step by step instructions for origami sailboat

4. Scheme for the manufacture of paper steamer
A simple way to make a boat, an easy option in 10 minutes. 
How to make a boat out of paper detailed photo instruction
For the manufacture of the boat we need a thin sheet of A4 paper.
1. Find the middle of the workpiece. Bend it in half.

2. On the resulting rectangle, we bend one corner to the middle.


4. We turn off the remaining parts of the craft up, first the front part.

5. Then, similarly to step 4, we roll up another piece of paper.

6. Turn the corners on top of the rolled blank.

7. We also precisely tuck the remaining corners on top.

8.
Next, we take the lower corners of the triangle and connect with each other together. We got a big rhombus .

9.
You should have a big rhombus .

10. 3 then we bend the lower corner of the front side of the rhombus to the upper corner, and similarly with the back side.

11.
You should get three triangles.
12.
Then we connect the lower lateral corners to each other (origami folds into a small rhombus with equal sides).
13.
We take on different sides (the upper corners of the triangle) and begin to push them apart.
And now you have a beautiful boat with a large deck. Gather a collection of different vessels on your table made according to various schemes. 
Each boy in his childhood folded paper boats and planes. Now these boys have grown up and they have their own children, to whom someone should also explain. Unfortunately, not every parent will be able to remember so easily how to make this spring craft in a matter of minutes, so you will have to brush up on your origami skills.
We make a boat out of paper with our own hands
Fans of making paper crafts are well aware that it is easiest to make such products from special paper, it can be colored, patterned or even foil. To make a boat, it is better to use thick paper, which does not absorb moisture well. If it was not at the right time, you can increase the stability of the boat with beeswax or paraffin. One has only to dip the craft into one of these compositions, and the boat will stay afloat longer.
How to make an ordinary boat out of paper and how to decorate it? You can decorate the ship using improvised means, the main thing is not to upset the balance. Jewelry should be as light as possible, quickly set and hold tight. The most popular decor option is a sail made of toothpicks and textiles, colorful napkins, plain paper.
Now let's move on to the main thing - instructions on how to make a boat out of paper. The first method is more simple and familiar to you from childhood. For him, you need only a sheet of A4 paper.
Ordinary ship
- Put a sheet in front of you, fold it in half, then bend again in half;

- Press the bend line well, then flatten the sheet;

- Lay the right corner in the middle of the sheet, to the bend line;

- Repeat step 3 with the other side;

- The lower part of the sheet consists of two layers. First fold up so that its edges extend beyond the triangle;

- Fold the edges of the top rectangle so that they cover the sides of the triangle;

- Turn the boat over and also fold the lower edge up;

- Open the product, properly straighten it;

- Squeeze the product to make a diamond. Iron the sides well;

- Measure 1 cm from the top edge of the rhombus (possible by eye), put a mark with a pencil. Bend the lower edge to the intended point;

- Turn the product over, just bend the bottom edge, as in the previous step;

- Open the product again as shown below;

- Hold the product with two fingers on the sidewalls;

- And spread it, stretching out the side wings;

- Align the craft (especially the bottom). Now you know how to make an ordinary boat out of paper in just a few minutes. The finished product can be seen below.

The example shows a white, unremarkable boat, make your model more original, paint it or put a colored sail.
Paper boat
How to make paper boats more or less clear, but what about more complex models? In origami, nothing is impossible, and now you will see this. To create a boat you need to take a regular sheet of paper 20x20 cm and glue.
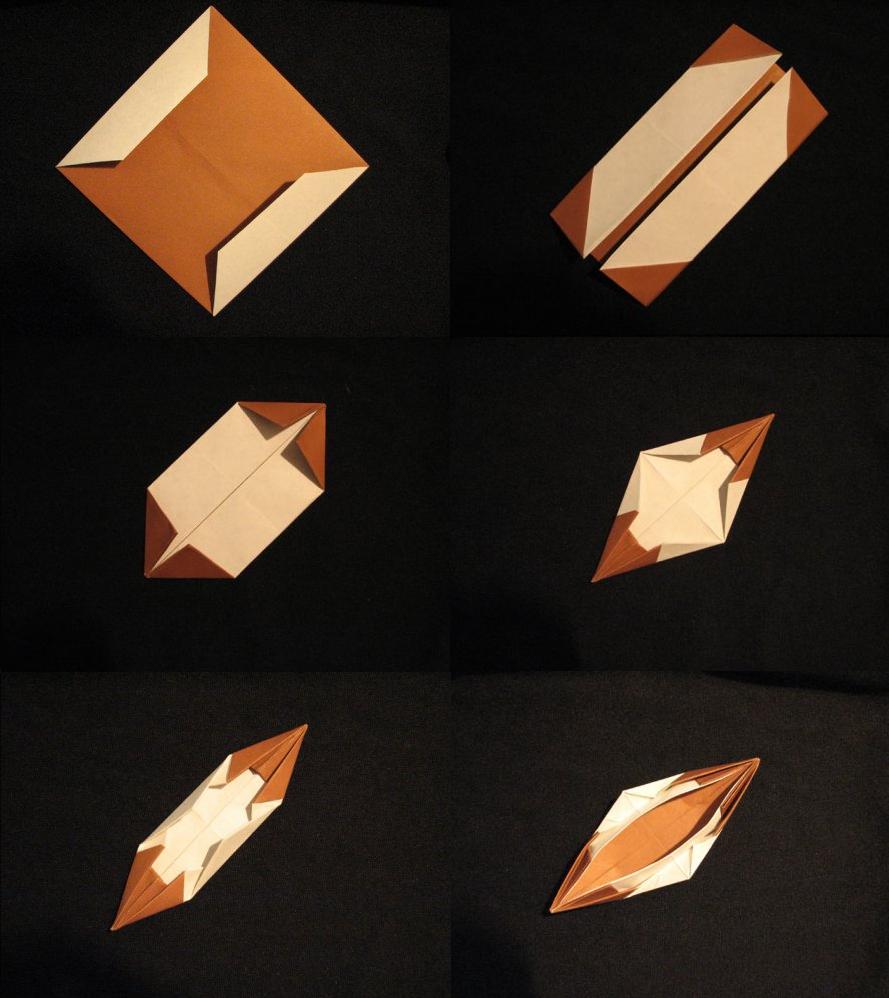
- Put a sheet in front of you, bend it diagonally. Flatten the sheet and bend again diagonally so that inside it is divided into four equal parts;

- Flatten the sheet and bend one corner to its center, as shown below;

- Fold the sheet in half (diagonally);

- Fold the sheet in half as shown below to make a triangle;

- Expand the resulting pocket;

- Press it to get a square;

- The triangle on top has two layers. First fold down, do the same with the other side;

- Fold both sides at once, a small triangle should form at the top, bend it well in both directions to get clear bending lines;

- Spread the product and bend its upper corner down literally by 0.5 cm;

- Reassemble the model as shown below. It will be the pipe of the boat;

- Fold the second layer of paper to the bend line, bend and do the same step with the other side;

- Flatten the sheet, bend the left edge to the bend line formed from step 11. Do this on the other side;

- Lift the entire structure, and lay it on the table;

- Fold the lower part up, iron the edges of the product well;

- Flip the figure over, bend the bottom edge down and fold it up, iron the edges well with your hands;

- Expand the structure, turn the bottom edges up;

- Align the edges well;

- Turn the product over, fold the small rectangles down (do this with two sides);

- You should get such a model;

- Glue the two parts together with ordinary glue or double-sided tape;

- Hold the paper well, wait for the parts to stick together;

- Ready boat looks like this. Now you have figured out how to make paper boats in literally 10 minutes.

Learning to make paper crafts is simple, the origami technique is available to everyone. A daily origami session helps increase concentration, develops hand motility, an eye, constructive thinking and a child’s creativity. Origami technique will reveal many secrets, thanks to which you will learn how to make paper boats, airplanes, tanks, wild animals and much more.
Mastering the origami technique is possible not only for children. Adults can also develop and improve qualities such as perseverance and determination. Every adult knows how to make a boat out of paper, but more complicated crafts require more time and effort. Diversify your leisure time, get to know closer the art of origami, and this activity will definitely captivate you.


