Many people go to the forest to pick mushrooms, and needlewomen go to the forest to pick up pine cones. It turns out that this natural material produces very original crafts. Children can work with cones of different ages, so teachers often use them in labor lessons in kindergartens. In this article we invite you to look ideas for crafts made from pine cones and use them for creativity.
Crafts from pine cones and plasticine

If you don't find acorns, use wooden beads for the head. It is convenient to make clothes for your crafts from felt, since this material does not require additional processing. To fasten parts in crafts made from pine cones, it is not necessary to use plasticine; a glue gun is also ideal.

Hare made of cones and plasticine
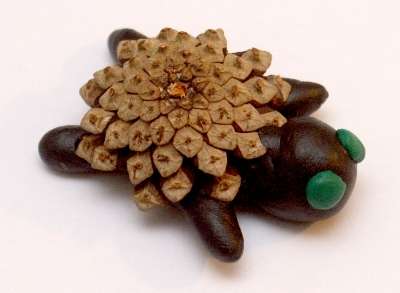
Turtle made of cones and plasticine

Swan made of cones

Crocodile made of cones and plasticine
DIY hedgehog made from pine cones
You can make a hedgehog from pine cones different ways, for example, from pine needles and cones. To do this, collect pine needles. It is advisable that they be dry. Form bunches of needles and secure them with plasticine. Insert the resulting needles into the cones and then trim. If the needles are left long, you will get a porcupine. Don't forget to form the hedgehog's face.


If you use plastic bottle, then the hedgehog can turn out to be of different sizes.
We invite you to look at a photo selection of what else you can make from pine cones:

Cone flowers

Spruce and Pine cones useful for making interesting crafts. If you find yourself in the forest, do not forget to take with you several pine and spruce fruits. From the cones different trees you can make very beautiful birds. Today you will learn how to create a swan, crow, ostrich and eagle owl. Crafts made from bird cones will also require additional materials.
To work you will need the following components:
- awl;
- toothpicks;
- plasticine;
- acorns with caps;
- alder cones;
- pine and spruce cones;
- heat gun.
Swan
A swan - a bird made from cones - is quite simple to make, you just need to know the order of work. To make it, take a large semi-closed pine cone and white, black and red plasticine.

Use white plasticine to sculpt an oblong neck with a head, red for the beak, and black for the eyes.

Attach the plasticine blank to the blunt end of the pine cone.

The swan is ready!

If desired, the wings and tail can be made from dry grass or real feathers. To sculpt a black swan, you need to use black plasticine instead of white.
Crow
To create this bird, you need to take 2 small pine cones, acorn caps and plasticine in three shades (yellow, white and black).

Connect the cones together as shown in the photo.

Make legs from acorn caps. Natural material can be fixed using a heat gun.

Instead of hot glue, you can also try holding the pine cones together with plasticine.
Make a beak from yellow plasticine. Black and white plasticine is needed to make eyes. And pieces of black material are suitable for forming bird wings.

This is such a funny crow!


It can be placed on a branch that will imitate a tree.
Ostrich
Another version of a bird made from cones and plasticine is the ostrich. To get this big bird, you need to get a fir cone. You will also need plasticine (black and brown), toothpicks and a couple of acorns.

Using an awl, make holes in the cone and insert toothpicks into them. These will be the legs of the ostrich.
Stick the acorn to an oval blank made of brown plasticine.

Fix the neck with the acorn on the upper edge of the cone. Attach the acorn caps to the ends of the toothpicks, after making holes in them using an awl.

All that remains is to sculpt the beak and eyes from black and white plasticine.

A tuft made from a miniature alder cone, which can be attached to the acorn using a heat gun, will look very good.

This is what a finished ostrich looks like!

You can decorate the edge of the cone with feathers or inflorescences of dry plants.
Owl
To make it you will need a long fir cone. You also need 2 acorn caps and plasticine in black, brown and yellow.

This bird has very expressive eyes, which can be easily made from the caps of acorns. To make them even more expressive, you can stick a black pupil on a yellow background on top of each one. For this, plasticine of the appropriate color is used.
From brown material it is necessary to fashion feathers that will be located above the eyes.
You've probably already walked through nearby parks and forest plantations several times and collected countless beautiful bouquets from multi-colored autumn leaves, dragged home a couple of bags with shiny chestnuts and did not forget to grab several dozen beautiful, dense, even cones - “fresh”, from this year’s harvest. Great! The leaves, so be it, over time, when they start to crumble, we’ll throw them in the trash, the children will play with the chestnuts in the store, but what to do with the cones? It's a pity for them, beauties! I would like them to find interesting uses. Crafts from pine cones, of course, will be of more interest to children, however, it is worth choosing projects that both parties will like - and then you and your children will be guaranteed a couple of hours of joint creativity. The result is triple: the big shots are in business, the children are happy, and the time spent together will bring pleasure to both parties. Crafts from pine cones- one of the most burning topics this season, don't miss it!
DIY crafts from pine cones - 5 fun ideas:
1. Pine cone spider
Have you heard that the Darwin spider (Caerostris darwini) produces a thread for its webs that is 10 times stronger than Kevlar? Just think about it, the material actively used in the defense industry to create body armor and other especially strong military gizmos is inferior to.... cobwebs! This is worth thinking about. And at the same time - make a couple of Darwin's spiders from pine cones.
2. Owl made of cones
Did you know that what we call owl ears are not ears at all? Their real ears are hidden in the plumage, located lower and, by the way, completely asymmetrical - in order to better capture sounds, they are turned in different directions. But the beautiful “tassels” on the head are just “tassels” - feathers, beautiful and attractive. Is it really worth making an owl out of pine cones and telling your child this interesting fact?
3. Bat from cones
Do you know that due to the design of the body and wings, bats have great difficulty flying from the ground, and sometimes cannot take off at all? It is for this reason that they choose places for rest from which, if necessary, they can take off and throw themselves headfirst. Tell your children about this - they will probably be interested. Well, at the same time make a couple of bats from pine cones.
4. Turkey from pine cones
Do you know that the characteristic clucking sounds that turkeys make are actually made only by their females, while males are silent and prefer not to express their emotions through sounds? Do you know that the red “beard” and crest that these birds can boast of are actually red not because of the coloring pigment, which is mistakenly believed to be found in the skin of turkeys in these places, but due to the blood capillaries, which are in Are there so many of these areas that the skin acquires such a characteristic color? In general, turkeys are very curious birds, be sure to make them out of pine cones!
Toys made from cones are always original appearance. Sometimes the resemblance of a craft to the original surprises and pleases at the same time. In the previous article we did owl, and today’s article will tell you how other birds are made from cones. Waiting for you again step-by-step master class on creating a simple bird that you can easily make with your own hands. Let’s not delay the introduction and rather start getting creative.
White birds made from pine cones
With a little effort we can turn our pine cones into some beautiful white birds. They are a lot of fun and pretty easy to make. We will need painted pine cones, wooden beads or a ball and some felt. We have already talked in one of the articles about how to paint pine cones, so in this moment We will not focus on this.
Draw a template on paper for the wings and tail depending on the size of the bumps present. Then transfer the selected dimensions onto the felt and cut out the blanks. Using a glue gun, glue the felt parts of the bird to the pine cone. Make a small beak by folding construction paper into a tiny triangle and using a black marker draw two dots to represent the eyes. If you want to make a bird from a pine cone Christmas tree decoration, as in the photo, then attach a loop of the required length to the upper part of the bird’s back.


