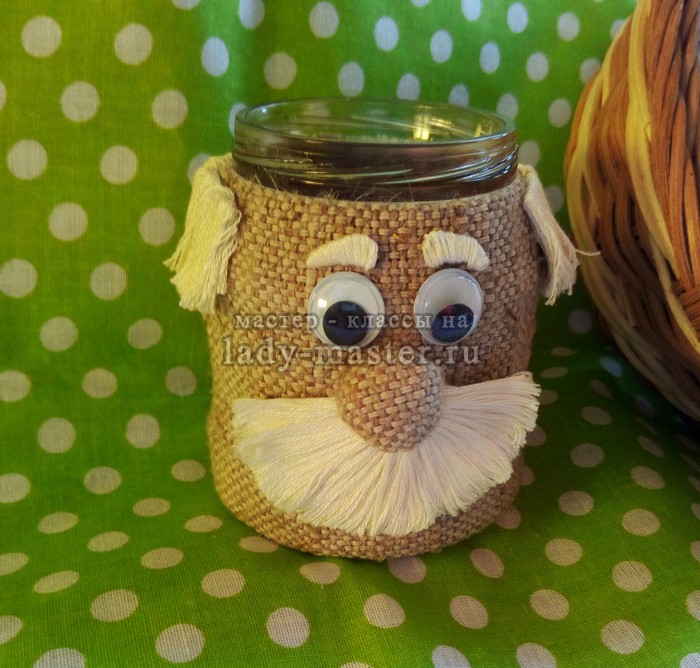
Each young mother will probably have a large number of baby food jars. Many simply throw them away, but these jars can be reused. For example, make a salt shaker, sugar bowl or container for spices. And not just a jar, but a whole craft. I got such a wonderful little house.
The main materials for the craft: baby food jar, burlap, jute thread, felt, groats, white cardboard, various decorations (decorative fruits, beads, artificial leaves and flowers, insect figures for needlework, etc.). Of course, when working, you can’t do without such "assistants" of the needlewoman as threads, scissors, super-glue, a ruler and a simple pencil.
For the brownie, I took the smallest can of baby food. Here she is:

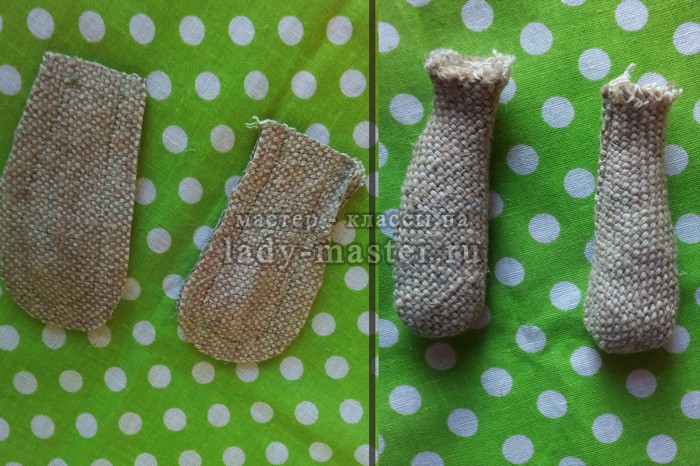
She measured her circumference and height and cut a rectangle from burlap. I mark the width and length with a margin, since the fabric will have to be tucked.


I put super-glue on the bottom and under the neck of the jar.

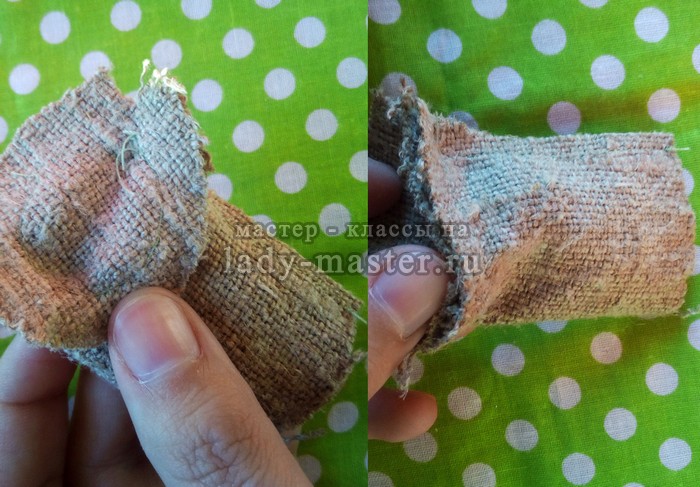
I wrap the jar in burlap, bending the edges inward at the fabric.

With the joint you need to be careful so that it turns out to be smooth and not very noticeable. Additionally, I still sew the joint with thread.

I make a nose out of a piece of burlap 2x2 cm in size. I pick it up with a needle along the edge, stuff it with padding polyester and sew it up. My nose is right in the middle.
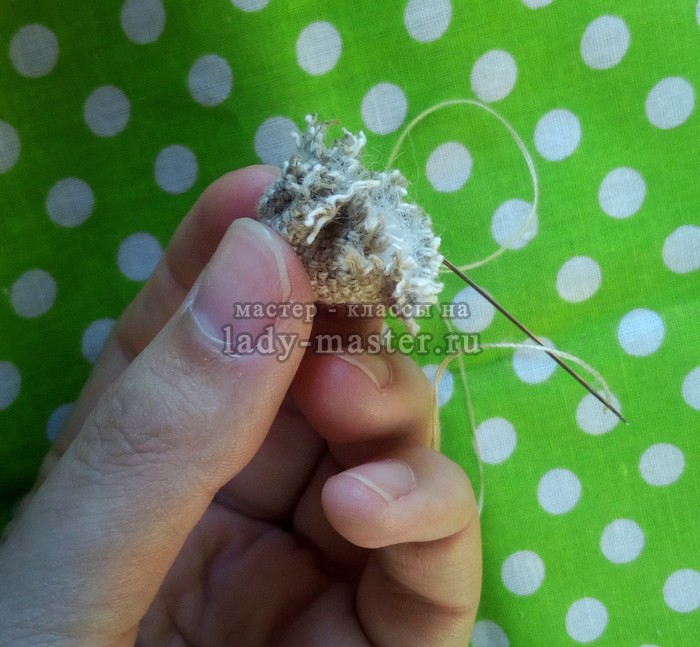

Now proceed to the manufacture of mustaches, hair and eyebrows. I make them from white thread floss. As a basis, you need white cardboard. I cut out here such a detail with a "hole" for the nose.

I put super-glue on a cardboard semicircle. However, I leave the bottom of the part dry, as I will cut it off later. Now I wind a floss on a semicircle.

I cut the threads from the bottom, and cut the cardboard a little.

In the same way I do hair. For eyebrows, just wrap the floss on a cardboard template.

Glue my hair, eyebrows and mustache. My eyes are purchased. I just stick them.
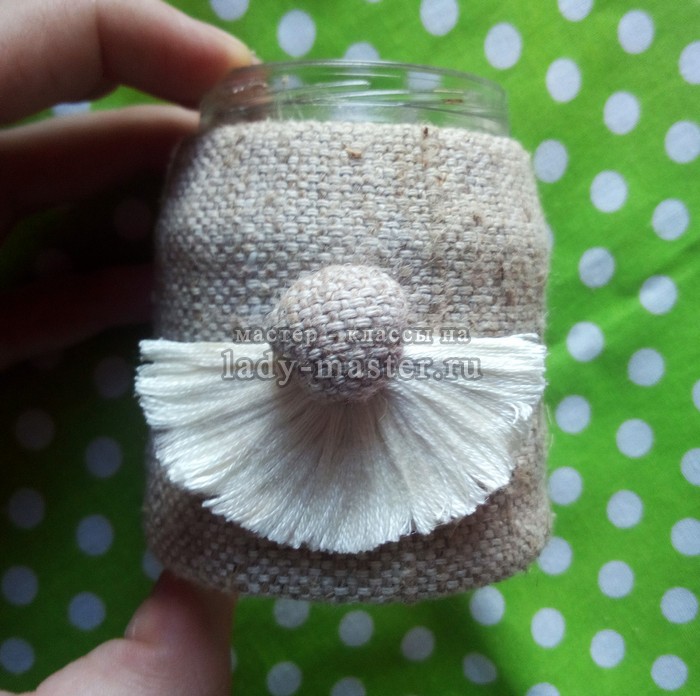
I made a hat out of ordinary white cardboard and jute thread in the color of burlap. First I put a jar on the cardboard and mark the circumference of the neck. There are two such circles - the top and bottom of the hat.

The circle that will be the top of the hat can be cut smaller. But around the second circle I draw the fields of the hat and cut a hole in the circle, but less than the circle itself. In this backlog I make incisions and bend them. The neckline of the hat should be such that the neck of the jar easily passes into it.
These are the following two details:

Now the fields of the hat and top need to be fastened. To do this, cut out a rectangle whose length is equal to the circumference of the cut circle. The height of the rectangle is 2-3 cm. I also make cuts from above. Now I fasten all three parts with super-glue.


And let the hat turn out not very neat, because the housekeepers - they are so slightly disheveled, slightly sloppy. Now I take a jute thread and twisting a small "snail".
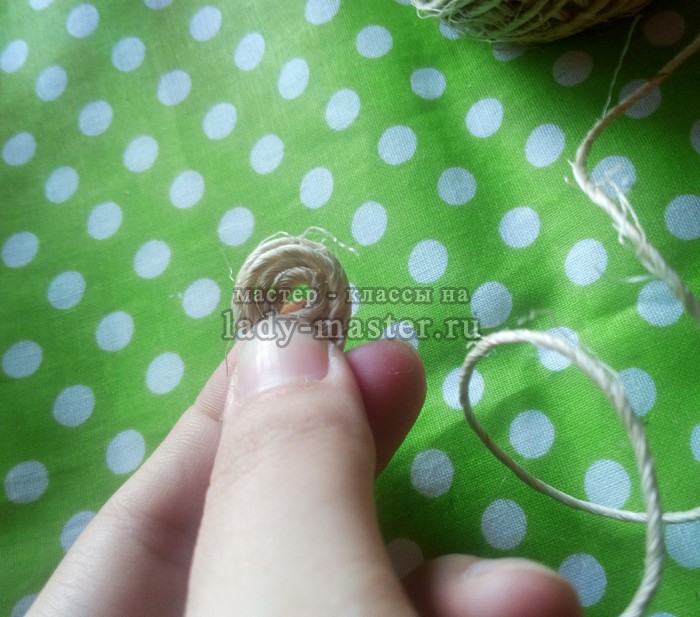
Lubricate it with glue. I also apply super glue to the top of the hat. I glue the workpiece right in the middle, and then around it I start to wind the thread.

So I move to the fields of the hat. I paste over the fields with jute thread on both the upper and lower sides. If something turned out carelessly, do not worry, then it can be masked with decorations.

Inside the hat is primed with white acrylic paint so that joints and pencil markings are not visible. If there are no acrylics, then simple gouache is also suitable for these purposes.
Now I proceed to the most interesting stage - decorating the hat. Everything that is at hand will fit here.


I used ready-made decorative leaves. Also, I cut some leaves and flowers from felt. Mushrooms and berries are also made of felt. Pumpkin and green grass - finished plastic. I also used beads and dry grass.
It remains to stitch the hands for the house. I make them from burlap according to the pattern. Sew on a typewriter and twist. I am stuffing with a synthetic winterizer.
I carefully sew on the sides.


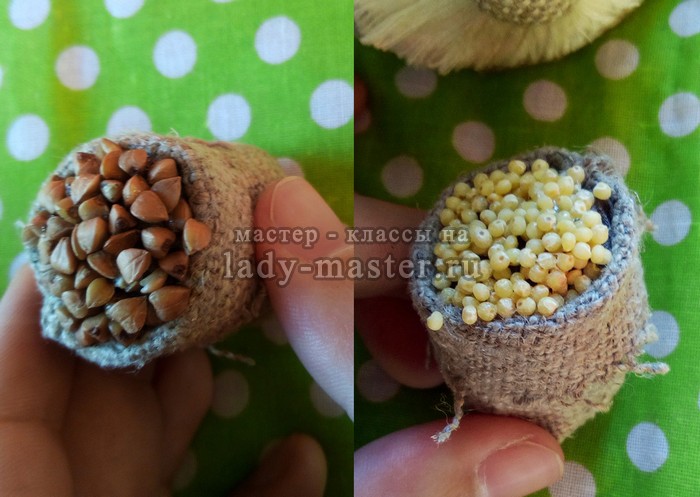
In the hands of a little house holds bags of groats. I sew the bags from two parts - a circle (the bottom of the bag) and a rectangle. The following bags are obtained:
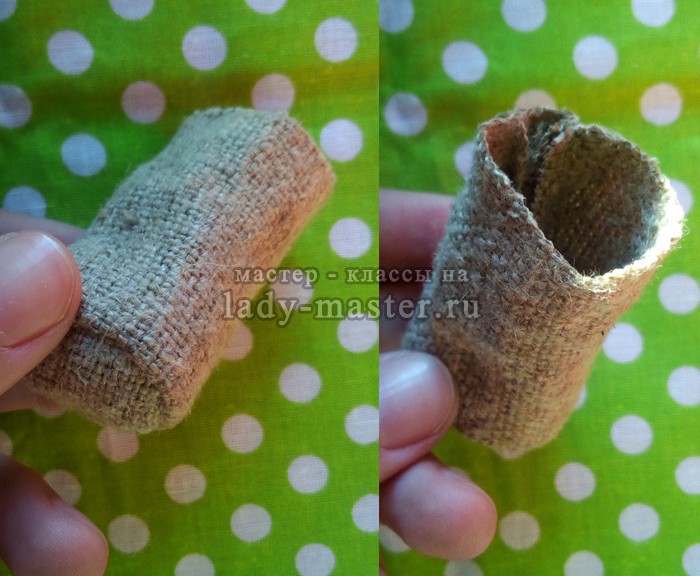
I fill them to half with synthetic winterizer. Then I cut out a piece of any fabric, stuff it with a padding polyester and fold it. Above the fabric, I am abundantly lubricated with super-glue and lowered into the grain. Grains should stick to the fabric.


I put the fabric in the bag.
Sew the bags to the house. After them, you can also decorate a little.

We put on a hat. The salt shaker in the form of a dome is ready. And so that the hat can be removed, a small handle can be made of thin wire. Pour salt or spices into a jar.
You can make a house-builder with your own hands from improvised materials. The finished product can be given as a gift to relatives or left to protect the house.
[Hide]
The value of a houseboy in a house
In Slavic legends there are many references to the spirit of the house. The “master”, “father” or simply the house-keeper defended the house and household, made sure that the food did not spoil, the hostess did not burn food.
The brownie is perceived not just as an otherworldly being, but as a full member of the family. They left him offerings and gifts, left food at the common table. The Slavs believed that one of the ancestors became a brownie to protect their descendants even after death, therefore they turned to the spirit with exceptional reverence, were afraid to be angry. A home made talisman charm will become not just a beautiful souvenir of a house, but a protection from damage and evil influence from outside.
Brownie made of cloth or burlap
One of the easiest ways to make a house-hold with your own hands can be considered a way to make a talisman from fabric or burlap.
Patterns are not needed, to make a charm you will need such materials:
- a piece of burlap measuring 50 by 50 centimeters;
- a piece of jute twine to decorate the house;
- eyes (to make the brownie prettier you can buy in any hardware store);
- stuffing materials (synthetic winterizer, cotton wool or synthetic winterizer are suitable);
- scissors;
- matching thread and needle;
- adhesive thermal gun;
- corrugated cardboard;
- at your discretion, you can choose jewelry for the doll.
- Cut a rectangle according to the size of the toy from 20 to 45 centimeters from burlap.
- Pull out the horizontal threads to get a fringe of about five to seven centimeters on each side. Threads do not need to be thrown away.
- The resulting workpiece must be folded in half and stitched, stepping back one and a half centimeters from the edge. The lower corners - round off.
- A “bag” with a fringe along the edges should come out, which needs to be turned out.
- Draw a basting stitch along the top of the workpiece.
- Fill the “bag” with suitable material.
- Pull the thread, and you get the foundation of the future housekeeper.
- The base of the feet can be made of thick corrugated cardboard. For this, it is necessary to cut out several blanks that are suitable for the legs of the future talisman, put them on top of each other, glue the base of the legs together with the wrong side to each other and glue them with a piece of burlap. The resulting “shoes” can be decorated with twine bows.
- The threads drawn from the burlap must be tied in the middle to make a beard of a house-mate, and then, walking in a circle, draw a nose.
- Part of the bundle of threads should be put on the amulet hair.
- Glue the resulting beard and eyes with hot glue.
- Decorate.
You can learn how to create a house-house yourself using the video provided by the channel Elena Epifantseva.
Doll domovenka from tights
Instead of burlap, you can use old nylon tights, stockings or even footsteps, they will serve as good material to create a nice craft.
To create it you will need:
- plastic eyes, as in the previous master class;
- nylon tights or stocking;
- string of twine;
- adhesive thermal gun;
- synthetic winterizer or cotton wool for stuffing;
- copper wire;
- trimmings of bright fabric and burlap on the outfit of a little house;
- tow or linen;
- decorations for brownie;
- knitting hook.
Step by step, consider the process of creating a talisman:
- Fill the kapron footprint with cotton or synthetic winterizer, sew it and form, securing the mouth, nose and cheeks of the toy with thread.
- Stick house beard, eyes and hair.
- Twist the wire to get the frame of the body with legs and arms.
- Put on top of the capron stuffed with cotton, form the trunk and limbs.
- Now dress the little house. First, cut a shirt from the fabric and glue it to the body. Stitching it is optional.
- Then we cut out and glue the cloak from the burlap.
- Fasten all parts of the house to each other.
- From twine, you can knit bast shoes or buy in the same hardware store.
- Sew the bast shoes and head to the trunk to the base.
- The little house is ready.
Brownie decorations have a special meaning. If you hand a broom to a figurine, it will attract prosperity. Upward will bring money, downward will bring peace to the family.
Thread Brownie
To create a brownie from the threads, you can attract a child. The method is simple, so you can enjoy doing fun four-handed work.
To start making a brownie, you will need to prepare:
- floss or woolen threads;
- adhesive thermal gun;
- burlap;
- a piece of twine or hard thread;
- eyes and mouth can be cut out of thick cardboard, cut out from a photo card or bought accessories ready-made at the store;
- decorations.
Let's start creating a brownie:
- From multi-colored threads we braid a thick pigtail 25-30 centimeters long.
- We make another brush from twine, wrap the base with a “ball” - this will be the face, nose and beard of the brownie.
- From the burlap we sew the hat to the house.
- Glue the face onto the thread, decorate with a hat, glue eyes and mouth
- Decorate.
A simple brownie made of cones
A brownie from a cone will delight the eye with its simplicity and originality. By creating this image, you can give free rein to a flight of fantasy. Decorate the brownie with leaves and twigs, attach a beard of wool yarn. Decide if you want him to look more like a person or an outlandish spirit.
To make homemade from cones you will need:
- colored paper;
- eyes;
- bumps;
- nuts
- acorns;
- peppercorns;
- glue-moment;
- twigs.
The process of creating a brownie is easy:
- Glue the acorn head to the bump-body.
- You can make a brownie hat from half a walnut shell.
- We attach the arms and legs of the twig.
- Glue the eyes and nose out of pepper.
- We make of colored paper and paste the mouth.
Instead of glue, when creating a brownie, you can use clay of different colors. From plasticine, if desired, eyes and a mouth for amulets are easily formed.
Where is the best place to stay
There is not much difference where to place the brownie. In any case, he will protect the house, but there are several accommodation options where the action of the amulet is enhanced.
You can place the mascot in the corner of the hallway, not far from the door. So the spirit of the house will protect the inhabitants from ill-wishers and will not let evil into the house. If you leave a brownie in the kitchen, it will enhance harmony in the house, smooth out conflicts, and bring comfort. In the bedroom, it is better to place the brownie in a corner away from the bed. Then the little house will promote mutual understanding in the family.
DIY homemade crafts
The art of hand-made is constantly evolving, so it becomes not just a way to spend leisure needlewomen, but also a means to create your own business. Toys made with their own hands do not emit toxic substances, so parents increasingly purchase them for their children or for interior decoration. In this article, you will learn how to make funny old people with a burlap beard - craftsmanship
Materials:
- burlap;
- scissors;
- threads;
- a needle;
- filler (cotton wool or synthetic winterizer);
- wire;
- cardboard;
- kapron tights;
- details from old toys;
- accessories for decoration.
Workshop crafts from burlap homemade
2. Fold the fabric in half and sew the sides.

3. In the upper part, you need to carefully stretch the threads that will replace the hair and beard.
4. For the beard, tie the elongated threads in the upper part, and for the mustache - in the center.
5. Proceed to the manufacture of the nozzle. To do this, cut out a double circle from old kapron tights, stitch it in a circle, fill it with sintepon and tighten it.

6. We return to our torso. From the rectangle made in paragraphs 1 and 2, we get the head and body of the doll. Roughly outline the distance for these parts on the fabric and sew (but not right through) a notched seam.

7. Now we fill the body with filler and tighten the threads.
8. Near the stretched hair, also sew a prominent seam. Fill your head now and pull it off.
10. Glue the eyes to the head, as well as the mustache and beard. It is convenient to do this with a glue gun.

11. Proceed to the manufacture of the old man's pens. From the wire, make a frame that will maintain the shape of the handles.
12. Wrap each finger with sintepon or cotton, and then cover the handle with a capron. Pull the fingers with a thread.


14. Shoes for the old man cut out of cardboard and sheathe burlap. You should get two identical blanks, one of which is filled with padding polyester. The details are stitched and the finished shoes are attached to the body.

The little house is ready and will be a good gift for friends and relatives. Show your imagination when making the old man’s face, giving him a gloomy or funny facial expression, as well as when sewing clothes.
People believe that peace and happiness in the house, whether it is a city apartment or a country estate, protects the house. No one has ever seen him, no one knows exactly what he looks like and in what hidden corners he hides. But everyone understands that if you respect and love the brownie, he will take care of the well-being of each member of the family. In order for the brownie to understand that they love him, people create amulets in the form of dolls-domov.
Do-it-yourself Brownie Kuzya: master class
For many people, such a doll is associated with the Dominique Kuzey from the beloved cartoon. Cartoon Kuzya became so popular that the production of toys and amulets of this doll was established. But, to buy a standard multi-run toy and make it with your own hands are two big differences. Only the little house which you made yourself, in which you put your soul, thoughts and feelings can become both a favorite toy of children and a charm of the house.
 DIY Kuzya
 The master class that we offer you is not the easiest: a rather complicated pattern is used, to draw a face you need to have basic skills in fine art, and to make paws, you need to knit. However, the result is worth it, and such a little house Kuzya will surprise you and your loved ones with its originality.
 The unwashed housekeeper Kuzya
 The Kuzya Brownie: materials and devices that are needed
You probably already realized that this Kuzya little house is sewn from fabric. For sewing, it is better to choose beige cotton fabric . If you take the fabric stretching, it will not puff at the seams. Cotton is better than synthetics, because it is better for the colors and blush that are needed to draw a face. So, to make a brownie with your own hands you will need:
- Beige fabric
- Motley shirt fabric and dark trouser fabric
- Sintepon or sintepuh for stuffing
- Twine rope to knit marigolds and knitting needles
- Yarn for hair
- Acrylic paints and brush
- Colored crayons or blush with shadows to give the face
paints - Big shirt button
- Spoon, key or other accessories as you wish
- Threads, needles and other standard sewing accessories
 Materials and accessories that are needed to sew Kuzyu’s house
 The pattern for the Kuzi domino is shown in the figure below. Using a printer, it can be transferred to paper.
- The head will be sewn from wedges, so it will turn out voluminous
- The patterns of the remaining parts are simple, without grooves.
- Transfer the pattern to the fabric, cut and sew the blanks
- We turn the blanks open and stuff with padding polyester
- Now on the head you can draw eyes and mouth, sew on hair
- The ball-shaped nose is sewn after the paint has dried
- Sew all parts of the doll, dress in a shirt, pants and bast shoes
- Kuzya is ready!
 Pattern housekeeper Kuzya
  Pattern shirt and pants Kuzi Domen
 - To sew clothes for the housekeeper we need one more pattern
- We also print it and cut it out with scissors.
- The shirt and pants will sit freely, so they are slightly larger in size than the housekeeper
- In the cartoon, Kuzya appears in unwashed and pure form. You can make either one or the other version of the toy
 Dirty brownie Kuzya do it yourself
 The doll preserved the brownie with a do-it-yourself brownie from a burlap: pattern
Handmade burlap dolls, despite their seeming unpretentiousness and simplicity, invariably evoke a sense of admiration. They invisibly connect our present with the distant past. In this past, bread is manually mowed with a scythe, on hot noon they drink cool bread kvass, and children are fed with fresh milk.

There, in this past, children play with rag dolls, which mothers could make in a couple of minutes by folding several pieces of cloth. Perhaps that is why our genetic memory brings us back to simple burlap toys. You can make a brownie doll by the principle of sewing small parts on a bag, symbolizing the head and body.

The burlap brownie pattern is very simple:
- You need to make a rectangle that will be the head and body
- Then cut the details for the hat and legs
- Beard and mustache are made of thread. We sew them last

There are a lot of options that you can sew with the help of this pattern. We will describe in detail how to make such a brownie, as in the photo below, with nylon handles and frowning eyebrows. And you, depending on your wishes, can add or remove small details yourself.

So, to make such a brownie you will need:
- A new bag or piece of burlap
- Padding pad for padding
- A small piece of cardboard to make the legs stiff
- Nylon stockings for pens
- Thin copper wire that bends easily to make a hand frame
- White plastic, as well as blue and black paper to make eyes
- Motley shirt fabric
So, let's start sewing toys:
- We cut a piece of burlap of the right size, for this brownie took a cut of 20 by 85 cm, but the size can be different, the main thing is to observe a proportion of about 1 to 4
- Fold the burlap in half and sew on the sides, round off the lower corners
- Dissolve the upper edge, from the threads that remained on the workpiece, you will get hair, and from the threads that we pulled you can make mustaches and eyebrows

- To make a beard, mustache and eyebrows we bind bundles of threads in the middle, and then trim the edges with scissors.
- In order to make a nose, cut a circle from kapron pantyhose and thread it around the edge, then put a piece of padding polyester in the middle and tighten the thread.

Again, we take up the manufacture of the head and body:
- With a strong thread, we sew the edge with loose threads so that it does not open further
- We make one more seam to separate the head from the body

- We fill the workpiece with synthetic winterizer and tighten the threads

- For peephole, we cut blanks from plastic and colored paper
- Glue them together with glue
- Making a frame for pens from wire

- We carefully wrap wire blanks for pens with synthetic winterizer
- Then cut out two rectangles from kapron
- We tighten the brush with a capron and fix the fabric, tying it with a thread on the wrist
- We take a thread with a needle and sew the joints between the fingers
- After that, we make the rest of the handles: wrap a little synthetic winterizer on the wire and sew up the nylon

This is how the blanks for our burlap brownie at this stage will look like:

- For legs, cut 2 blanks from cardboard
- We cut out two of the same details from burlap, a slightly larger size. One of them simply sticks to the cardboard, the second is filled with padding polyester and sticks to the cardboard only after that
- Then the two parts are stitched together
- The seam, if desired, can be decorated with a braid woven from threads
- Legs are attached to the body with good glue.

- Now all the basic elements of our brownie are ready and you can begin to manufacture clothes and accessories
- In our case, the brownie has a shirt and a hat

- We fasten all the parts together with glue and enjoy the result

If it is difficult for you to work with kapron, then the homemade handles can be made of burlap threads braided into pigtails, and the nose is made of a piece of wood.

The doll protected the brownie with his own hands from nylon tights
Dolls from kapron tights are very similar to people and therefore even a little scare with their realism. Those who are not afraid to put such a doll at home can make it with their own hands. The principle of manufacturing a doll in stuffing nylon blanks with synthetic winterizer and stitching by hand with puffs on the doll’s face, arms and legs.

To make a brownie from stockings you will need:
- Nylon stockings, tights or socks
- Padding pad for padding
- Wire to make doll handles
- Round pliers
- Sackcloth
- Yarn for hair
- Spikelets and artificial flowers for decoration

Let's start making the doll by making pens. For them we need:
- Wire
- Two square pieces of nylon
- Synthetic winterizer
- Bend the wire with your hands so that you get five fingers.
- With pliers, the bends can be made more even.

- After that, we press the fingers with the pliers so that they turn out not too thick
- Then the free ends of the wire are twisted together and cut to the desired length

- Wrap each finger with synthetic winterizer

- We tighten the workpiece with capron and fix the fabric with a thread on the wrist
- Fingers are separated by seams.

You can learn more about how to make hands for nylon dolls from the video below.
VIDEO: How to make hands for kapron dolls - mini master class
Now that your hands are ready, you can begin to make a brownie head:
- We tear off several pieces of synthetic winterizer: one the largest for the head, two smaller for the cheeks, one for the nose and the smallest for sponges
- Take a piece of padding polyester designed for the head, give it the shape of a ball and tightly fit a capron
- Then insert the lumps intended for the cheeks, nose and sponges into place
- With the help of puffs we form the nose, cheeks, lips and eyes

VIDEO: How to make a brownie from nylon tights?
Make the body for the doll from fabric:
- Fold a rectangular piece of cloth face inward, sew it on the sides, turn it over and fill it with padding polyester
- The head, legs and hands are sewn to the body manually
- Clothes for a brownie can be made in the form of a frock coat
- Measure your doll’s chest circumference, divide the result by 2 and add a seam allowance. So you get the size of the workpiece for the coat on the chest line

How to make a brownie of thread and cardboard with your own hands?
- If you sew eyes, ears, arms and legs to a pompom made of thread for knitting, you can get an original toy-domovenka
- Any thread is suitable: plain, multi-colored or colorful
- Eyes can be styled with buttons, and handles and legs can be cut out of colored cardboard or plastic bottles.

If you take a lot of threads, then the brownie will turn out to be voluminous, and it can be put as an independent toy. If you wrap long threads in 2-3 layers on cardboard, you get a fairly flat brownie, which will need to be glued to the cardboard base. A detailed master class on how to make an application with a brownie in the video below.
VIDEO: How to make a brownie from threads and cardboard?
Brownie from the cone: crafts to school, kindergarten
To make a brownie from cones, you can use dried leaves, twigs, acorns and other natural materials.
- The hair of such a brownie can be wood shavings.
- Headgear - Acorn Hat
- A beard is a piece of fur

You can make a brownie from a cone as shown in the figure:

The fields of the hat are made of paper, the basket is also paper.
A brownie made of cones can look very realistic and harmoniously fit into the natural landscape.

Do it yourself salty dough brownie
Salt dough figures are sculpted in much the same way as clay figures. The difference is that dried figures from salt dough are subsequently painted manually with paints. The dough for modeling is prepared from water, salt and flour.
Half a glass of medium-sized salt will need a glass of water and flour. Mix salt and flour and knead elastic dough
If the brownie will be voluminous, begin work with the details that are at the base of the picture.
VIDEO: How to make a picture of salt dough?
- Small features, the shape of the eyes, details of clothing can not be sculpted, but cut with a thin knife. Since this is done when carving
- After the molding is finished, the product must be dried and painted with paints
- When the paint dries, give the figure shine by coating it with a colorless varnish

VIDEO: Brownie from burlap do it yourself
How to sew or make a brownie from fabric, burlap, stockings, pompoms or cones. Detailed master classes with photos.
People believe that peace and happiness in the house, whether it is a city apartment or a country estate, protects the house. No one has ever seen him, no one knows exactly what he looks like and in what hidden corners he hides. But everyone understands that if you respect and love the brownie, he will take care of the well-being of each member of the family. In order for the brownie to understand that they love him, people create amulets in the form of dolls-domov.
Do-it-yourself Brownie Kuzya: master class
For many people, such a doll is associated with the Dominique Kuzey from the beloved cartoon. Cartoon Kuzya became so popular that the production of toys and amulets of this doll was established. But, to buy a standard multi-run toy and make it with your own hands are two big differences. Only the little house which you made yourself, in which you put your soul, thoughts and feelings can become both a favorite toy of children and a charm of the house.
DIY Kuzya
The master class that we offer you is not the easiest: a rather complicated pattern is used, to draw a face you need to have basic skills in fine art, and to make paws, you need to knit. However, the result is worth it, and such a little house Kuzya will surprise you and your loved ones with its originality.
 The unwashed housekeeper Kuzya
 The Kuzya Brownie: materials and devices that are needed
You probably already realized that this Kuzya little house is sewn from fabric. For sewing, it is better to choose beige cotton fabric . If you take the fabric stretching, it will not puff at the seams. Cotton is better than synthetics, because it is better for the colors and blush that are needed to draw a face. So, to make a brownie with your own hands you will need:
- Beige fabric
- Motley shirt fabric and dark trouser fabric
- Sintepon or sintepuh for stuffing
- Twine rope to knit marigolds and knitting needles
- Yarn for hair
- Acrylic paints and brush
- Colored crayons or blush with shadows to give the face
paints - Big shirt button
- Spoon, key or other accessories as you wish
- Threads, needles and other standard sewing accessories

 Materials and accessories that are needed to sew Kuzyu’s house
 The pattern for the Kuzi domino is shown in the figure below. Using a printer, it can be transferred to paper.
- The head will be sewn from wedges, so it will turn out voluminous
- The patterns of the remaining parts are simple, without grooves.
- Transfer the pattern to the fabric, cut and sew the blanks
- We turn the blanks open and stuff with padding polyester
- Now on the head you can draw eyes and mouth, sew on hair
- The ball-shaped nose is sewn after the paint has dried
- Sew all parts of the doll, dress in a shirt, pants and bast shoes
- Kuzya is ready!

 Pattern housekeeper Kuzya
 Pattern shirt and pants Kuzi Domen
 - To sew clothes for the housekeeper we need one more pattern
- We also print it and cut it out with scissors.
- The shirt and pants will sit freely, so they are slightly larger in size than the housekeeper
- In the cartoon, Kuzya appears in unwashed and pure form. You can make either one or the other version of the toy
 Dirty brownie Kuzya do it yourself
 The doll preserved the brownie with a do-it-yourself brownie from a burlap: pattern
Handmade burlap dolls, despite their seeming unpretentiousness and simplicity, invariably evoke a sense of admiration. They invisibly connect our present with the distant past. In this past, bread is manually mowed with a scythe, on hot noon they drink cool bread kvass, and children are fed with fresh milk.

There, in this past, children play with rag dolls, which mothers could make in a couple of minutes by folding several pieces of cloth. Perhaps that is why our genetic memory brings us back to simple burlap toys. You can make a brownie doll by the principle of sewing small parts on a bag, symbolizing the head and body.


The burlap brownie pattern is very simple:
- You need to make a rectangle that will be the head and body
- Then cut the details for the hat and legs
- Beard and mustache are made of thread. We sew them last


There are a lot of options that you can sew with the help of this pattern. We will describe in detail how to make such a brownie, as in the photo below, with nylon handles and frowning eyebrows. And you, depending on your wishes, can add or remove small details yourself.

So, to make such a brownie you will need:
- A new bag or piece of burlap
- Padding pad for padding
- A small piece of cardboard to make the legs stiff
- Nylon stockings for pens
- Thin copper wire that bends easily to make a hand frame
- White plastic, as well as blue and black paper to make eyes
- Motley shirt fabric
So, let's start sewing toys:
- We cut a piece of burlap of the right size, for this brownie took a cut of 20 by 85 cm, but the size can be different, the main thing is to observe a proportion of about 1 to 4
- Fold the burlap in half and sew on the sides, round off the lower corners
- Dissolve the upper edge, from the threads that remained on the workpiece, you will get hair, and from the threads that we pulled you can make mustaches and eyebrows


- To make a beard, mustache and eyebrows we bind bundles of threads in the middle, and then trim the edges with scissors.
- In order to make a nose, cut a circle from kapron pantyhose and thread it around the edge, then put a piece of padding polyester in the middle and tighten the thread.


Again, we take up the manufacture of the head and body:
- With a strong thread, we sew the edge with loose threads so that it does not open further
- We make one more seam to separate the head from the body


- We fill the workpiece with synthetic winterizer and tighten the threads


- For peephole, we cut blanks from plastic and colored paper
- Glue them together with glue
- Making a frame for pens from wire


- We carefully wrap wire blanks for pens with synthetic winterizer
- Then cut out two rectangles from kapron
- We tighten the brush with a capron and fix the fabric, tying it with a thread on the wrist
- We take a thread with a needle and sew the joints between the fingers
- After that, we make the rest of the handles: wrap a little synthetic winterizer on the wire and sew up the nylon


This is how the blanks for our burlap brownie at this stage will look like:


- For legs, cut 2 blanks from cardboard
- We cut out two of the same details from burlap, a slightly larger size. One of them simply sticks to the cardboard, the second is filled with padding polyester and sticks to the cardboard only after that
- Then the two parts are stitched together
- The seam, if desired, can be decorated with a braid woven from threads
- Legs are attached to the body with good glue.

- Now all the basic elements of our brownie are ready and you can begin to manufacture clothes and accessories
- In our case, the brownie has a shirt and a hat

- We fasten all the parts together with glue and enjoy the result

If it is difficult for you to work with kapron, then the homemade handles can be made of burlap threads braided into pigtails, and the nose is made of a piece of wood.


The doll protected the brownie with his own hands from nylon tights
Dolls from kapron tights are very similar to people and therefore even a little scare with their realism. Those who are not afraid to put such a doll at home can make it with their own hands. The principle of manufacturing a doll in stuffing nylon blanks with synthetic winterizer and stitching by hand with puffs on the doll’s face, arms and legs.

To make a brownie from stockings you will need:
- Nylon stockings, tights or socks
- Padding pad for padding
- Wire to make doll handles
- Round pliers
- Sackcloth
- Yarn for hair
- Spikelets and artificial flowers for decoration


Let's start making the doll by making pens. For them we need:
- Wire
- Two square pieces of nylon
- Synthetic winterizer
- Bend the wire with your hands so that you get five fingers.
- With pliers, the bends can be made more even.

- After that, we press the fingers with the pliers so that they turn out not too thick
- Then the free ends of the wire are twisted together and cut to the desired length


- Wrap each finger with synthetic winterizer

- We tighten the workpiece with capron and fix the fabric with a thread on the wrist
- Fingers are separated by seams.


You can learn more about how to make hands for nylon dolls from the video below.
VIDEO: How to make hands for kapron dolls - mini master class
Now that your hands are ready, you can begin to make a brownie head:
- We tear off several pieces of synthetic winterizer: one the largest for the head, two smaller for the cheeks, one for the nose and the smallest for sponges
- Take a piece of padding polyester designed for the head, give it the shape of a ball and tightly fit a capron
- Then insert the lumps intended for the cheeks, nose and sponges into place
- With the help of puffs we form the nose, cheeks, lips and eyes

VIDEO: How to make a brownie from nylon tights?
Make the body for the doll from fabric:
- Fold a rectangular piece of cloth face inward, sew it on the sides, turn it over and fill it with padding polyester
- The head, legs and hands are sewn to the body manually
- Clothes for a brownie can be made in the form of a frock coat
- Measure your doll’s chest circumference, divide the result by 2 and add a seam allowance. So you get the size of the workpiece for the coat on the chest line

How to make a brownie of thread and cardboard with your own hands?
- If you sew eyes, ears, arms and legs to a pompom made of thread for knitting - you can get an original toy-domovenka
- Any thread is suitable: plain, multi-colored or colorful
- Eyes can be styled with buttons, and handles and legs can be cut out of colored cardboard or plastic bottles.


If you take a lot of threads, then the brownie will turn out to be voluminous, and it can be put as an independent toy. If you wrap long threads in 2-3 layers on cardboard, you get a fairly flat brownie, which will need to be glued to the cardboard base. A detailed master class on how to make an application with a brownie in the video below.
VIDEO: How to make a brownie from threads and cardboard?
Brownie from the cone: crafts to school, kindergarten
To make a brownie from cones, you can use dried leaves, twigs, acorns and other natural materials.
- The hair of such a brownie can be wood shavings.
- Headgear - Acorn Hat
- A beard is a piece of fur


You can make a brownie from a cone as shown in the figure:


The fields of the hat are made of paper, the basket is also paper.
A brownie made of cones can look very realistic and harmoniously fit into the natural landscape.


Do it yourself salty dough brownie
Salt dough figures are sculpted in much the same way as clay figures. The difference is that dried figures from salt dough are subsequently painted manually with paints. The dough for modeling is prepared from water, salt and flour.
Half a glass of medium-sized salt will need a glass of water and flour. Mix salt and flour and knead elastic dough
If the brownie will be voluminous, begin work with the details that are at the base of the picture.
VIDEO: How to make a picture of salt dough?
- Small features, the shape of the eyes, details of clothing can not be sculpted, but cut with a thin knife. Since this is done when carving
- After the molding is finished, the product must be dried and painted with paints
- When the paint dries, give the figure shine by coating it with a colorless varnish


VIDEO: Brownie from burlap do it yourself


