It is unlikely that there will be someone who would remain indifferent to the white birch. This amazing tree evokes different associations - someone has a feeling of tenderness, someone has sadness, those who are away from their native land have a feeling of nostalgia, but everyone who saw this tree once will fall in love with it forever. Well, let’s try to reproduce the masterpiece created by nature in his work - we will do the weaving of birches from beads with our own hands.
Bead Birch for Beginners
In the master class, we will consider weaving a bright summer birch from beads 25 cm high. If you want to make a bigger tree, prepare just more materials, the weaving pattern will remain the same.
So, to make a birch from beads for beginners, we need this:
- bright light green small beads of the same size;
- bead wire;
- copper wire for weaving a birch trunk from beads;
- green mouline thread;
- pVA glue;
- a piece of drywall for the stand;
- primer;
- gypsum or putty;
- black and white paint;
- beads for decoration - green, pink, yellow.
Having prepared everything you need, we can get to work.
How to make a birch from beads?
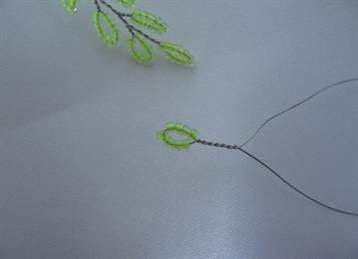
- Let's start the work with weaving bead branches of a birch. To do this, we need wire cuts from 25 to 40 cm long, depending on the size of the desired branch, and for the tree to look realistic, the branches do not have to be the same. So, we take a length of wire 40 cm long and collect 8 beads on it.
- Twist the beads in a loop.
- Next, at one of the ends again we collect 8 beads.
- We twist it into a loop, then connect it to the second end.
- Now do the same at the second end of the wire cut.
- And so we continue until we reach the desired number of leaves, or until the length of the wire comes to an end.
- Having made the required number of leaves on the branch, twist the wire cuts and lay the branch aside.
- Next weave the next twig, etc. In the master class, we made a birch from beads, consisting of 33 branches (their number must be a multiple of three, this is a necessary condition), but if you have the opportunity to do more, better take the time, the birch will come out more magnificent and more realistic.
- When all the branches are ready, take them in three and twist together.
- Now we take three triple twigs and also twist together, forming larger branches.
- First of all, we made such a tip for our bead birch.
- Now we need a piece of thicker copper wire. Fold it in half and weave it to the ends of the wire branches.
- Gently twist it along and get the basis for the birch trunk.
- Now we take one of the remaining triple branches and braid a piece of copper wire to it.
- And carefully we wind it to the trunk of a birch. We try to attach it as close to the top as possible so that the tree turns out to be quite lush, without "bald spots".
- We will form another top of three triple branches.
- The resulting second top is attached to the trunk just below the first.
- Now make a twig of five small thin branches.
- We attach it to the trunk a little lower than the previous branches.
- Thus, we continue to collect and fix all the remaining branches, and on this the weaving of the base for the birch from beads is over.
- Next, we need a green floss thread. Gently grease PVA glue with the wire of the tree branches and wrap them tightly with thread.
- Now we’ll deal with a stand for birch from beads. To do this, we cut out the shape we need from drywall and carefully ground it.
- Let's try a tree on a stand.
- Now put plaster or putty on the stand.
- Next, carefully and evenly plant the roots of the tree in putty.
- Then we finish the top of the stand with putty or gypsum.
- Here we finally collected a birch from beads, it remains to refine the trunk and decorate the tree.
- Now we will make a gypsum solution with PVA glue in the proportions 1: 1 and add some water. From the resulting material we form a tree trunk.
- Then we wait until the solution has dried, after which we take the black paint and apply it with a thin layer on the birch trunk.
- After that, apply a thin layer of white paint.
- We get such a realistic game of colors.
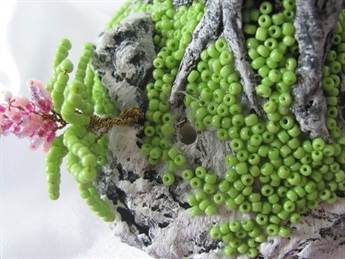
- After the paint dries, apply a thin layer of glue and sprinkle the stand with green beads, making a clearing.
- Now let's deal with the flowers. Weave bead multicolored flowers.
- We leave the stem root for the flower to attach it to the stand.
- Notice with a thin drill we make a hole in the stand, pour glue there and plant our flower.
- Thus, we plant all the flowers.


Now our birch, woven from beads with our own hands, is ready!  To decorate it, you can make several more types of flowers and herbs. We enjoy the result of our work.
Beadwork is a popular type of needlework. The elegance of beadwork, the variety of assortment, and democracy are what contributed to the spread of this type of creativity.
Weaving of trees and flowers is a separate direction in beadwork. There are truly no limits: you can create a small copy of almost any plant. Oak, maple, lilac, mountain ash, honeysuckle, exotic sakura and palm. And even Ava’s tree of happiness from the movie Avatar.
A slender birch with spreading branches is often associated with Russia itself. How much is stacked about white-barrel songs, how many verses are written! Let's create our little Russian beauty!
Master class "Birch from beads"
Materials:
- green beads in three shades;
- wire of different diameters (0.2 - 0.25 mm; 0.8 - 1 mm; 1.5 mm; 5 mm);
- sewing threads for winding;
- acrylic paints (or gouache);
- acrylic varnish;
- pVA glue;
- alabaster (gypsum building).
Work Stages:
At the initial stage, we need to make small branches in the amount of 100 - 120 pcs.
To do this, string the beads on a wire with a cross section of 0.2 - 0.25 mm.
We make small loops! The distance between the loops is about 1 cm.
The number of stitches can be different, depending on the size of the twig.
Then fold the twig in half and twist.
Shorter branches for the top of the tree.
After the required number of branches is woven, we connect (twist) them 2.3 pieces each.
Then we take a wire with a diameter of 0.8 - 1 mm and we wind it with threads to our branches. We make the winding cm 2 - 2.5.
Thus we wrap all double and triple branches.
We proceed to the formation of large branches.
For this we need a wire with a diameter of about 1.5 mm.
We take one double or triple twig and wind another one with it along with the wire.
Below we retreat cm 1.5 - 2 and we attach another. Here is what should happen.
Now we need to collect the top of the tree.
We take 2 branches and connect them together, not forgetting to add wire.
At the next stage, we will attach larger branches to the top of the tree.
We make branches all different. I got these.
We wind them with threads to the trunk of our future tree. The trunk will gradually thicken. For this we need an aluminum wire ∅ 5 mm.
We wind the branches in this way: first one branch, lower by 2 cm –2.5 another. We twist all the branches in a circle.
And so they tied 2-3 branches to the trunk.
Wrap tightly with threads (for example, I take “iris”, they are thicker than sewing). If there is a floral ribbon available, then you can use it.
So, they wrapped 2 more branches (or maybe more as you wish) and a thick aluminum wire.
Now we make the roots of our tree: like this, as shown in the photo. Aluminum wire is very flexible, but at the same time lightweight and durable.
Now we need to plant our birch. We take the container, cover the plastic bag.
We plant alabaster and water, but not too thickly.
We plant a tree and pour this mixture into a container.
We are waiting for 15-20 minutes until it freezes. We take out the tree, and this is what happens.
Then we need to make a mixture of alabaster and PVA glue. Stir sour cream until thick and apply the mixture to each twig with a flat brush.
We put on the barrel in two layers, after allowing the first to dry.
As soon as the first layer on the trunk is dry, apply the second and make the grooves with a sharp object.
They made grooves.
We are waiting for everything to freeze properly, about 5 hours.
We begin to paint - first with white paints. The paint must surely dry well, otherwise, when we apply the black layer, the paint will smear or leak. We are waiting about 2 hours.
Now we take a thin brush and make short strokes of stripes on the trunk and branches.
Paint the trunk. For this we need a wide brush. We will paint with a dry brush!
It remains to make a clearing. I fill it with beads and glue it on acrylic varnish, and also paint over the stand itself.
And now our birch is ready.
Wish you success!
Yulia Guseva worked for you.
Even in our modern society, not prone to excessive romanticism, it is quite difficult to find a person who would be completely indifferent to white birches. For most people, this beautiful tree is associated with their home and comfort, as it brings them memories of a happy childhood. That is why bead birch, woven with your own hands, can be a great gift for a loved one or a good friend.


First of all, I would like to note that our master class is designed for beginner craftswomen, so we will make a small tree about 25 cm high. However, if you have some experience in creating, then you can very well make your birch taller and thicker.
So, before you start studying our master class, prepare all the necessary materials in advance. This will greatly facilitate your task, as you can fully concentrate on work, and will not be distracted by trifles. Here is a short list of what you may need to create your own birch:
- special wire used in beadwork;
- pVA glue;
- copper fittings for weaving a birch trunk;
- putty or gypsum;
- white and black paint;
- a small piece of drywall, which will subsequently become a stand for your tree;
- primer;
- green thread floss;
- many light green beads having one size;
- yellow, pink and green beads - for decoration.
Having finished all the necessary preparations, you can safely get to work. This small step-by-step instruction will help you quickly and easily make a beautiful summer birch, the beauty of which will amaze all your friends.
Weave twigs
We will begin beadwork with making branches for birch trees. There is a slight nuance: all branches should be of different sizes, since in this case the tree will look more realistic and believable.
So, you will need pieces 25-30-35-40 cm long. The more pieces you have, the more magnificent your birch bead will end up.
To get started, take the longest piece and put on it 8 green beads. Then you will need to twist a small loop of beads and fasten. You will get the first leaf.
Now you will need to make the next leaf. First you will have to collect 8 more beads at one end.
And then twist the next loop and connect it to the second tip. For clarity, view a phased photo master class. Next you will need to make the exact same eyelet on the second end.


Without changing the sequence of actions, you will make a whole branch with your own hands, which will subsequently decorate your tree. After the desired number of leaves on your branch is ready, you will have to twist the two parts of the wire to the end.
Now, in the same way, you can spin out all the other branches of our birch. Our master class talks about creating a birch tree consisting of 33 branches. However, as we said earlier, you can very well make a larger and fluffy tree. The only thing you have to consider is that the number of your branches must necessarily be divided by 3.
After weaving all the branches, you will need to take them in 3 and twist them together.
In the next step, you will need to form the top for the future tree. To do this, you will need to twist together 3 triple branches.


We form the trunk of the future tree
Having finished weaving to the end, you can see the basis for the trunk of the future tree.
Then you will need to strengthen the branches with copper wire.
You will now need to attach such a branch to the trunk. You need to do this as close as possible to the very top so that the branches create a beautiful dense crown.
In order to make the tree more magnificent and its foliage looked like a “dome”, you will need to make one more such top and attach it to the trunk just below the previous one.


Then you will have to create one more branch yourself, consisting of 5 small branches.
Attach it to the trunk will need to be a little lower. The photo shows that we made this twig a little curved, because it seems so really “alive”.
In this way, you will need to attach the required number of branches to the trunk and finish weaving the warp.
Now you can move on to a new stage, for which you will need floss thread and PVA glue. You will need to glue the branches and the trunk with glue, and then wrap them with thread.


Our master class is coming to an end, and you can already see that your bead birch is ready. However, in order for the tree to look beautiful, he needs a special stand.
We make a stand and decorate a tree
Cut out such a detail from drywall and prime it. Then select the place where your tree will "grow". Put putty or gypsum on the selected area and "plant" the roots of your birch there. After that, you will need to align the top of your stand with plaster or putty.
The final stage of work will be the completion of the tree trunk and its decoration. To do this, you will need to dilute the PVA glue with gypsum in a ratio of one to one, and then add a little water to the resulting mass and mix well again. From the resulting composition, you will need to form a birch trunk.
Having done this, you will need to wait until the trunk and branches are completely dry, and then apply black paint in a thin layer.


Now we can apply white paint to the branches, trunk and stand. You need to do this with a little careless light strokes so that you get a coloring that is as close to the natural color as possible.
After the paint is completely dry, you will need to put a little glue on the stand and pour bright green beads on top of it. You get such a small clearing.
You can decorate it with colorful flowers, bushes or grass.


You yourself see that in our photo the view of the birch growing in the summer meadow was quite realistic. It seems that now a light breeze will blow and the leaves will rustle, and we can feel the wondrous aroma of beautiful flowers and meadow herbs.
A beautiful summer birch can also be made a little different, it can be said in an even simpler way. In order to learn how to weave a symbol of wisdom and power, you can watch the video presented in our article.
Learning to weave a winter birch
Before you start creating a winter birch, let's watch a video that will help us catch inspiration and “give” a lot of new ideas.
Video: Ideas for weaving different types of beads of birch trees
Having finished watching the video clip, you can safely begin work. Our master class will help you create your first winter beauty-birch.
Beadwork is a rather fascinating activity, but it does not tolerate fuss and excessive haste. Therefore, in order that nothing distracts us in the process of work, let's prepare in advance everything that we may need:
- silvery friable spangles;
- alabaster;
- colorless transparent varnish;
- construction tape;
- white acrylic paint;
- white thread with silver lurex;
- 40 cm of aluminum wire (0.5 - 0.8 cm);
- 2 meters of wire (1 mm);
- approximately 30 m of wire (0.3 mm);
- silver beads No. 10 (about 50 g.).
We will begin the master class by creating twigs for our winter tree:


In order to see different models of winter birches, you can view photos and videos of the work of ready-made snow beauties. Perhaps some of these works will interest you, and you decide to do it yourself.
As you have already noticed, weaving patterns are different and each master himself chooses the most convenient and interesting option for him. However, it is worth noting that, despite the same technique of execution, each birch is still unique and inimitable, because the master puts the warmth of his heart and a piece of his soul into it. That is why it is safe to say that beadwork is one of the most amazing and incredible activities in the world.
Video: Beadwork workshop weaving a birch tree
“White birch under my window” - words familiar to every Russian person from childhood, white birch - has long been one of the main symbols of Russia, and probably no one would refuse to have this tree at home, and from beads such a product It looks very nice. In this article, we will offer you to make a birch from beads, step-by-step instructions will help to make crafts quickly and efficiently.
You can make a winter tree or autumn, but you and I will create a tree in the "prime of life", summer, with green leaves, bright and very beautiful. This master class is very detailed and designed more for beginners, but even if you have experience with beads, it will be useful for you.

We will have a medium-sized birch, about 25 centimeters, you can do more, but in this case you will need to correctly calculate the amount of material, the working scheme will not change.
You will need:
- Bright green beads for leaves (better than light shades);
- Green, pink and yellow beads for decoration;
- Wire 0.3 mm;
- To make the barrel, copper wire, preferably thicker;
- Green Mouline Thread;
- Alabaster;
- PVA glue;
- Something for the stand (you can take a piece of drywall);
- Primer;
- Gypsum;
- Paints in black and white.
Now we will gradually explain the essence of the work, read everything carefully, the work is simple, but it will take a lot of time for its execution.
We make the basis of the birch.
- Cut the wire, about 30-40 centimeters. Take wires of different lengths so that the branches are not the same (you have never seen a tree in life that has all branches of the same length). We string 8 beads on the first wire, form a loop from it and twist it in 6-7 turns, as shown in the second photo.

- Now again we put 8 beads on this wire and twist, connecting with the first leaf.

- We continue weaving in the same spirit until we make the number of leaves we need.

- When everyone has twisted all the leaves, twist the ends of the wire and cut off the excess. The first branch is ready, so make the remaining branches, in the quantity that you consider necessary, but their number must be a multiple of three. We got 33 branches.
- Now we make large branches out of small branches, twist them together in three pieces.
- Now let's make the top of our tree. We take three triple branches and twist them together.


- We begin to make the trunk. We take the copper wire, fold it in half and screw it to the ends of the twigs.

- We twist the copper wire, thereby forming the base of the trunk.

- The remaining triple branches are fastened to the trunk. Try to attach these branches closer to the top, so the birch will appear more magnificent.

- Now you need to make one more tip and attach it to the trunk, a little lower than the first.

- Next, we’ll make a larger branch: for this, twist 5 branches, you need to screw it below the first two to the trunk.


- We twist those branches that remain, 5 pieces each and attach to the trunk.

Decorate a tree.
Take the green threads and wrap them around the trunk and branches, pre-lubricating them with glue. Wrap the birch firmly without leaving spaces.

We make a stand.
- Cut a piece of drywall in the shape that you want your stand to be, do not make the diameter very small so that the craft is stable.

- Ground our future stand, apply plaster and place a tree on it.

- Wait for the gypsum to dry and coat the wire with gypsum.

- Now, mix gypsum and PVA glue (1: 1), add a little water to this mixture. We apply the solution to the tree trunk, giving it a natural look.

- We are waiting for all this to dry, and apply in thin layers, first black paint, and then white.

- Decorate the stand. Put glue on it and sprinkle with green beads.

For decoration, you can make small flowers and install them on a stand, for this you need to make small holes, fill them with glue and stick flowers there.

The birch is ready.

You can make the same birch with earrings, for this they need to be made separately from brown or golden beads.
In order to make earrings, we take a wire of about 20-25 centimeters, put one bead on it, twist the wire so that it does not go away. Now we put a few beads on both ends of the wire and twist it at the end. We fasten the carefully obtained earring to a twig.

Do not be alarmed by the laboriousness of the weaving process. You will get a surprisingly beautiful tree, if you make a little effort, this craft can be a wonderful decoration of the interior or a wonderful gift that will definitely surprise the recipient.
White birch from beads is an excellent decoration in your home interior. Any beginner craftswoman will be able to make a tree with her own hands. From this article, you will learn some simple details of weaving bead charming crafts in a simple way.

Preparatory stage
It is necessary to prepare in advance all the material from which the Russian birch will be made. Branches made of yellow shades of glass beads look beautiful - in autumn.


The scheme of manufacturing twigs

The birch will be magnificent, beautiful and crumbly, if weave about a hundred pieces of twigs. Material Required:
- mixed beads of green shades from light to dark and a little yellow
- 0.3 mm wire
- thickened copper wire (make 15 cm lengths)
- 60 cm thick wiring - tree trunk
- crepe paper strips or white nit
- pVA glue
- glue "Dragon"
- scissors
- alabaster
- acrylic clear coat
- paints - gouache or acrylic of white and black colors
- container for wood

Master class creating Russian birch
Weave many twigs of beads for a large tree. We cut the wire from a length of 60 cm to about a hundred segments. On each of them, on the one hand, we make a knot holding the beads.
| We string mixed beads about 25 cm on the wire, so it will be easier to weave loops with beads in a row. |  |
| Separate seven pieces of glass beads and create a loop at a distance of 7 cm from the second end of the wire, this will be the tail of the twig. Twist with five turns. |  |
| We retreat about 1 cm from the leaf and do the following. We make 13 such elements in one segment. |  |
| Having folded the wire in half, we form a twig with leaves, twisting together. |  |
| The more you spin the clusters, the more magnificent and more birch you get. Getting to the assembly. |  |
| 2-3 pcs. We connect by twisting, applying a thick copper wire for mounting. Then we put glue on a strip of white paper and wind the core, gluing at the same time up to about 1.5 cm. |   |
| We take the following three connected branches and apply them to the sizing of the rod made obliquely, twist a little, and then wind it again with a strip. This will be our first blank for wood. |  |
| By this principle, we twist and glue the branches, weave 20 blanks. |  |
Step-by-step tree formation
We create a tree with our own hands.
1. Attach and twist each twig to a thick rod, gently lowering them along the trunk.


2. We make a branched wire at the base, in the form of rounded loops for stability. Before plastering the trunk, it is necessary to wrap the branches in foil. 

3. In a shallow container we put a tree and fix it with putty. Here you can dream up, make, for example, tubercles of roots, relief for the naturalness of the earth. 
4. While the base hardens, you need to process the birch trunk, making a mixture of putty (1 tablespoon), PVA glue (2 tbsp) and a little water. We paint the entire barrel several times at intervals with a brush so that it can dry out. After full hardening, the barrel should be painted with white gouache, adding black stripes.
We paint over a trunk of a birch tree. 

5. Upon completion, you need to process the tree trunk with acrylic varnish. Then completely free from the foil twigs, straighten them carefully and proceed to the design of the bottom of the tree. The bottom can be decorated in different ways, for example, with artificial grass or moss, beads or decorative insects. We take the Dragon glue to glue small decorating details.
We decorate a birch from beads with decorative grass.


The master class is completed on the creation of summer white birch from beads. You can also make a charming autumn birch, replace green beads with dark yellow. The items made of sequins look amazing and bright. Sakura, birch, maple, winter options attract its colorful look. I wish you success in creation, dear needlewomen, fantasize and create your exclusive crafts!


It looks like a real white-birch birch.


