No one can argue that brooches have recently become an integral part of the person who follows fashion. I remember that our grandmothers always wore beautiful, shiny brooches for the holidays and it was believed that this sophisticated product emphasizes the taste of its owner. But like everything else, the fashion is slightly modified, but the basis remains the same. So with the brooches there have been various changes. Modern craftswomen have developed this art so much that now everyone can choose for themselves an exquisite product or learn how to make such a jewelry on their own. Here is one of the holidays where people massively put on a theme accessory is Victory Day. But why buy in a store and spend money if you can make brooches by May 9 with your own hands, while having a lot of fun?
Basically, such brooches are made with the symbols of this holiday. The most commonly used St. George ribbon or star. So in the master classes presented below it will be possible to learn how to make a brooch, which then should be worn on Victory Day.

There is no limit to the imagination of creating such accessories. Some needlewomen use beads in making brooches, they are made of ribbons, badges, artificial flowers. And it is important that every beginner is able to cope with such a task.
Kansash style
This master class will show how you can easily and quickly make a very interesting brooch from St. George ribbons in the style of kanzashi. Such a product is suitable for both adults and children. The execution technique is not complicated, it is important to follow a step-by-step description and then everything will work out even for those who first decided to make such an accessory.

What will be needed for manufacturing:
- orange satin ribbon with a width of 5 cm;
- the same width and black satin ribbon;
- glue, glue gun;
- scissors;
- candle;
- st. George ribbon;
- pin for our decoration;
- bead;
- a small patch of black felt;
- compass, measuring ruler, chalk.

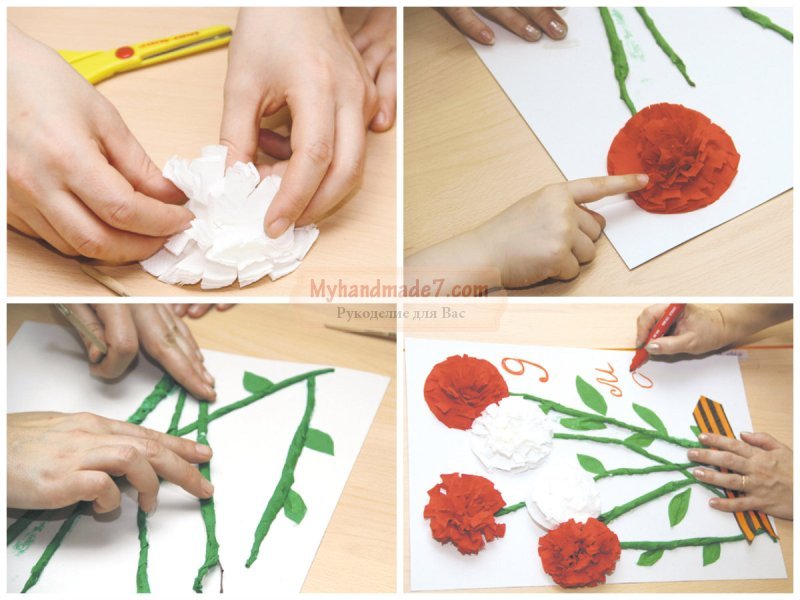
We take an orange ribbon and cut the squares so that their size is 5 cm, of which we should get 7 or 8 petals. We form a petal, for this we take one small square and fold it diagonally. After, we should bend the corners of the triangle in the manner shown in the photo below. With the help of a candle we fasten the corners, and we get a petal. Then we add the side corners as indicated in the photo, look carefully. We fasten the corners with the help of a candle, and now we have the first petal ready. In the same way we do the rest of the orange squares.
Now we make double petals, for this we cut 8 black squares and 6 orange. We add each triangle and then lay it on top of each other, as indicated in the photo below.


Next, we need to seal the corners with a candle. The resulting part is folded in half and again connected with a candle. The photo below shows how such a petal should look. In the same way, we form other petals.
Now you need to make sharp orange petals. To do this, cut 6 squares of orange. Fold each square so that it makes a triangle. Then we fold it again, and seal the corners. We connect the resulting corners and also fasten with fire. Get a little corner. Next we fasten with the help of fire and an angular petal is obtained.


Now, using a compass on felt, make a circle whose diameter will be 3 cm. After cut. We measure 25 cm on the St. George ribbon and cut it off. Now we add it as you wish, in the form of a droplet or as described in this master class. When we form the desired shape, fasten the tape with glue.
On a circle of felt alternately glue double petals and pointed. When the flower comes out, on top of it attach with the glue and round petals, as indicated in the photo below. Glue a black round bead in the middle of our flower. And the next step will be that the flower is attached to the tape using the same glue. And so that our brooch holds, on the back we fasten the clasp, which can be in the form of a pin. Our holiday brooch is ready.


On the great and bright Victory Day, everyone logically has a desire to do good to people who have devoted their energies and years to gaining a peaceful sky above our heads. The brooches for the holiday of May 9 quickly and simply with their own hands, of course, will not be able to fully convey all the gratitude to these great people who have conquered our homeland, but will be a pleasant gift that will remind us of how much we value what they have done for us.
Learning to make a beautiful brooch by May 9 with your own hands with decor
Consider a simple method of making brooches from ribbons of black and black-orange (St. George's).

You will need:
- two segments of the St. George ribbon of greater and shorter length;
- black satin ribbon;
- needle, thread;
- glue;
- scissors;
- candle or lighter;
- clasp for brooch or pin;
- decor.
The St. George ribbon of the required size (30 centimeters) must be folded in the shape of an eight.
With a piece of tape of a shorter length, we wrap the resulting workpiece in the center, and fix it with glue or walls from the inside.
Now take the black ribbon. We invest the basis of the bank from it. To do this, we connect the tips from the bottom to the center, connecting them with a cross.
It remains only to assemble the product. On top of the black cross, the received day is fixed from the St. George ribbon.
Top in the center we add decor.

A brooch decorated with a flower using the kanzashi technique will look appropriate and at the same time stylish.
The following materials will be required:
- St. George Ribbon
- Ribbons in black and orange
- Decor
- Scissors
- Tweezers
- Lighter or candle
Work Stages:
Black and orange ribbons are cut in the form of a square with sides of 5 centimeters. In this way, seven elements of black and 14 orange are prepared. It is imperative to cut the slices over the fire to prevent shedding.
Let's start making the petals. Since the resulting parts are small in size, it is recommended to use tweezers for convenience.
The orange square folds diagonally in half to form a triangle. Then again in half.
We take with our fingers the opposite corner, and cut off the edge, which was held by tweezers. The slice is fixed above the fire.
Now you need to fix the petal with tweezers and bend the ribbons in a parallel way. The slice is processed over the fire.
We proceed to the black square, which develops as described above. The resulting black petal is applied to the orange.
The result should look like this: inside the orange workpiece there is a black workpiece in which there is a small leaflet.
The sharp corners formed behind the tweezers are cut off, the edges are processed.
As a result, you should get seven petals from three layers, which must be connected with glue. The junction is decorated with any element.
A loop is formed from the St. George ribbon, which is the basis and is placed under the resulting flower. At the end, a clasp is attached. And a wonderful brooch is ready.
The location and number of petals can be varied to get, for example, a brooch as in the photo:

Consider a master class decorating the St. George ribbon with the tricolor of the Russian flag.

The following tools and materials will be required:
- st. George Ribbon;
- ribbons of white, blue, red;
- rhinestones or beads;
- pin;
- scissors;
- glue;
- tweezers;
- lighter, matches or candle.
We take ribbons of the three colors of the flag and cut them again into squares with side lengths of five centimeters. Prepare two blue and red squares and three white squares.
Each square is folded twice diagonally, as in a brooch obtained earlier. Then it folds again until a droplet is obtained. The corner is cut, the cut is processed by fire. We carry out similar manipulations with all seven petals.
We begin the assembly with white petals. We connect two elements together at an angle, fastening the ends with glue. The third leaf is placed between them. A symmetrical design should be obtained, the central petal protrudes slightly above the side ones.
Then petals of blue and red colors are glued in pairs.
A piece of about 20 centimeters is cut from the St. George ribbon, from which a loop is formed, the connection is fixed with glue. Gently lubricate the inside of the obtained tricolor with glue and firmly stick to the front side of the tape blank. The corners of the loop from the tape are cut off and fixed above the fire. This will prevent shedding of threads.
The junction is decorated with rhinestones or beads, which we attach to the glue. The main thing is not to overdo it. Do not forget that the brooch for the holiday of May 9 should not be flashy and defiant.
The original and symbolic brooch is ready, the manufacturing steps are presented in the photo:

Video on the topic of the article
DIY crafts by May 9 - part of the patriotic education of preschool children, they can be performed at home with parents, older sisters, and brothers, in kindergarten in a team with other children. As a rule, in kindergarten, pupils are offered the simplest ideas, for example, a three-dimensional star or several carnations tied with a ribbon. primary school students also perform, a school exhibition is organized specifically for the work created. At school, children already have enough skills to work with various materials, so they can make compositions.
Performing along with young children dIY crafts on May 9, photo Guided by a master class, you acquaint children with the history of the country, with its tragic and heroic stories, explain to them the significance of this holiday, so that from early childhood they would not perceive Victory Day as entertainment and triumph, but would make a huge sense in this popular holiday. In addition to children, craftsmen are also busy with creative work on the eve of the holiday, for example, they can make beautiful brooches using St. George’s ribbon.
DIY crafts by May 9
Of course, the most popular option is to perform for the holiday, which you can give to grandma. If veterans live on your street, you can congratulate them together with the children and bow low for their courage and self-sacrifice in the struggle for the homeland.
The picture-postcard can be made by children of the senior group of the kindergarten, we will use a mixed technique, which involves working with different materials, as well as a different approach. In this case, we need a dense cardboard for the base, for example, gray or light blue, as well as colored paper in white and yellow, in addition, you can use red colored paper or red napkins. In progress crafts by May 9 do it yourself master will use scissors, pencil and PVA glue. For a child, glue must be poured into a small container, for example, in an iron cover and provided with a brush for work.
Our postcard will consist of two parts: a red star and snow-white flowers that resemble an apple color. For the red star, we will use paper lumps, and we will make the petals using the origami technique. Do not worry that origami is too complicated a technique for a child, because in this case we only need to make a few folds to make a curved petal.
Fingers need to break off pieces of a red napkin and roll balls from it. We recommend pre-rolling a lot of balls and put them in a bowl, so that then stick on the contour.

If the child will perform a postcard, then the cardboard should be folded in half and decorate the front side. With a pencil, draw the contour of the star, and inside it the number "9", next to the word "may". On this contour, you need to stick red lumps, dipping them with the lower part in glue. While the glue dries, you can do the petals, for each you need to cut a circle 2.5 cm in diameter. Each flower will consist of five petals, and at least three of these flowers will be needed to decorate the card.
DIY postcard for May 9 do it yourself It can also be decorated with carnations, which are a symbol of the holiday. In this article, we will also tell you how to make a carnation flower using napkins, paper or corrugation.
For the apple color, we need to fold one circle in half, and bend the corner in from the bottom and glue it, now when you open the petal, it will have a curved shape. The petals must be glued with an overlap, and the core should be decorated with yellow balls.

Craft "Tank" by May 9 do it yourself
Ideas on how to make voluminous crafts by May 9 do it yourselfthat may become part of the composition. You can make a volumetric star and make eternal flame, you can make a plane by printing patterns on a printer and then gluing them together, or using corrugated cardboard, you can get a real tank. When you and your children perform such crafts, you can tell them about military equipment. Especially such creativity will be interesting to boys who are always interested in military subjects.

To create the tank, we will use the quilling technique, but we will not create small elements, but only large ones with the help of corrugated cardboard. A primary school student can cope with this task, and working with corrugated cardboard is a pleasure. To make the tank look realistic, we will choose cardboard of dark green or gray color. In the process, we need a pencil, a ruler, scissors, glue. A special tool can also be useful for quilling, but if it is not at hand, you can use a toothpick.

The cardboard must be cut into strips: you need one strip of 2 cm in width, and 10 strips of 1 cm wide. All prepared strips must be twisted into a spiral, and the ends fixed with glue. As a result, we got the wheels for our tank (rollers). One row of rollers on each side will consist of five such spiral wheels that need to be glued together and wrapped in black paper.

A large spiral will be used as a tower, and it is still necessary to twist a tube that will serve as a muzzle. To assemble the tank, you need to glue all the details on a cardboard square: first the tracks, on top - the tank tower with the barrel. Then it remains to glue additional elements, and draw a star on the tower.
Now you are ready dIY tank by May 9 do it yourselfif you want it to become part of the composition, you can make camouflage for it, put small trees and tin soldiers next to it. Preschoolers can try to mold from plasticine.

DIY crafts for May 9 do-it-yourself
The St. George ribbon is one of the main symbols of the Victory Day, so when creating children will definitely use it. So that you do not have to glue a striped ribbon from individual strips of paper, you can go for a little trick and print a ribbon template on a printer, then cut and glue it. You can also find a bow-related ribbon template that can decorate a greeting card for a veteran.
The card can be decorated with red carnations, which are created using corrugated paper. Finished flowers are glued to the cardboard base on one side, and the second remains lush, which allows you to create voluminous crafts. In addition to the corrugation, napkins can also be used to create clove buds.

Depending on the size of the flower, we need to cut out the circles of the required diameter from the corrugation, and then fold the circles so that as a result only a sector different from the eighth of the circle remains. More details on how to fold a circle you can see in the picture.
To do it yourself by may 9 do it yourself, we need to get a volumetric flower, so from the edge to the center you need to make a lot of cuts, as we perform the “grass” for children's applications. Then the elements should be expanded and spread the fluffy tips. In the center of each circle you need to drip a little glue, and then fold it in half.
From green colored paper it is necessary to cut a sepal and a stalk with leaves. Form an application on cardboard: stick a red bud, a stalk and a sepal. From below, all flowers should be tied with a bow, which should be glued on top of the stems. In addition, the child can draw green stems with a felt-tip pen and write a congratulatory inscription.
Volume crafts by May 9 do it yourself
For the smallest, you can offer to perform very simple dIY crafts for May 9 do-it-yourself. Pupils of the younger group of kindergarten are difficult to work with scissors, so for them we have prepared an original idea - a volumetric star, which should be painted with paints.
For crafts, we need a template, which in two copies must be printed on a printer. Each star will consist of two halves. Rays are separated on the star - they should be decorated with orange and black, alternating them, as shown in the master class.

In the end, it is necessary to bend the workpieces along the fold lines, this step can be started already after the paint dries. Two halves should be glued together with PVA glue.
If there is no template, and for the application or composition for the contest you need to complete a three-dimensional star, you can use another idea to create it. To do this, you need to use colored paper on which to draw a contour of a six-pointed star with a pencil. We will use one extra ray in order to make the asterisk voluminous. The resulting workpiece must be bent to determine the bend lines separating the rays, then bend all the rays to the center to get clear bend lines.
Between the two rays, an incision should be made to the middle of the workpiece, one ray placed on the other and glued. Now you have a star with a voluminous central part, and its rays should be glued to the cardboard base when creating the applique.

Original crafts by May 9 do it yourself
If you are wondering which original crafts by May 9 do it yourself If a real craftswoman can do it, you should, first of all, pay attention to the St. George ribbon, because with it you can get a beautiful brooch using the kanzashi technique.
At the Victory Day parade, it is customary to fasten the St. George ribbon on a pin on a jacket or blouse, but you can make a beautiful flower, as when working with satin ribbons. You can add the colors of the Russian flag to such a brooch and make it layered. Your friends will be delighted if you present them with such a gift on the occasion of a national holiday.

Even those craftswomen who are not familiar with the kanzashi technique can do dIY crafts on May 9, video It will tell you in detail how to properly form the petals. When working with ribbons, it is very important to process the edges with a lighter so that the strings do not crumble. To work, place a candle on the table, first cut the tape into squares, then process its edges with fire, holding a piece of tweezers so as not to burn yourself. The finished brooch can be glued to a pin.
Brooch using the tsumami kanzashi technique for the Victory Day holiday. Workshop with step by step photos.
Shabanova Marina Gennadievna, primary school teacher, MBOU Sarasinskaya secondary school, village Sarasa, Altai region, Altai TerritoryMaterial Description:this material will be useful to teachers, teachers of additional education, parents. Work can be done with children of middle and senior school age. The petal is easy to perform. Work can be done in one lesson.
Appointment: decoration for the Victory Day, a gift to veterans.
Goal:making brooches for Victory Day from ribbons.
Tasks:
Educational:to form skills and practical skills in working with a satin ribbon.
Developing:
- develop artistic taste, creativity, imagination, imagination;
- develop fine motor skills of the hands, eye, spatial imagination;
Educational:
- inculcate interest in art, arts and crafts;
- educate independence, patience, perseverance;
- instill patriotic feelings, respect for veterans.
ST. GEORGE RIBBON
St. George ribbon - and gunpowder, and fire,
And the bitterness of tears, and the joy of Victory Day.
Not just a proud symbol, but a silk shoulder strap,
For the good world that our grandfathers got to us.
St. George ribbon - like a surviving flower,
What evil ruined childhood saw evil
Burned villages, ruins deadly smog ...
Not just a symbol - a memory of inheritance *.
St. George ribbon - two-color simple stripes -
On the front roads, blood and flame
And the lives of echelons that have gone downhill ...
And with evil flecked the banner.
St. George ribbon - and gunpowder, and fire -
And the grief of the soul, and the sun of new life.
Two-color lines pattern - palm stories,
Fates ornament ... Memorable word.
Natalie SAMONIY
05/04/2012


Let’s make a symbol brooch with you that will remind us of those distant days ...
For work, we need the following materials and tools:
- satin ribbon 2.5 cm wide in black and orange;
- St. George ribbon - 25cm;
- felt circle (two possible);
- basis for a brooch (pin);
- the middle for the flower (beads);
- lighter (candle);
- scissors;
- tweezers, clamp;
- thermal gun.

Rules for labor protection when working with scissors:
1. Scissors should have blunt, rounded ends.
2. Work with well-adjusted and sharpened tools.
3. Put the scissors with the rings towards you, and the closed blades away from you.
4. Do not leave cutting tools open.
5. Watch for blade movements while cutting.
6. Pass the scissors with the rings forward, holding the ends closed.
7. Do not play with cutting tools, do not bring to face.
8. When working with scissors, do not walk around the office. Work at the table.
9. Use these tools only for their intended purpose.
Rules for labor protection when working with a candle and matches, a lighter:
1. Remove loose hair.
2. Do not bend low over the flame of a candle or match.
3. The candle should be in a glass or tin container.
4. Do not throw burnt matches into the urn, but put them in glass, tin dishes.
Rules for labor protection when working with a thermal gun:
1. Do not leave unattended.
2. When working, put the thermal gun on a stand, and not put it on its side.
3. Work only with a working tool.
4. Do not touch the tip of the gun and touch the hot glue.
5. At the end of work, turn it off.
Prepare the required number of pieces of satin ribbon.

The diameter of the finished brooch with a given number of petals and the diameter of the felt circle is 15 cm.
Note: you can take a felt circle of smaller diameter, then you will need fewer segments for the petals.
Petal.
Fold a piece of satin ribbon along half face up and cut off as indicated by the arrow in the photo.

Holding tweezers, solder the edges of the tape over a fire or lighter. Using tweezers makes the adhesion place more accurate.

We add the second side of the segment to the cent with an overlap, solder the edge with a lighter.

Prepare the required number of petals.

Assembly.
Glue on the felt circle around the circumference with a heat gun first row - 12 petals of black color.

Second row - 12 orange petals glue with a thermal gun in a checkerboard pattern with a slight shift to the center relative to the first row.

Third row - 12 black petals in a checkerboard pattern relative to the second row with a slight shift to the center.

Fourth row - 8 orange petals evenly spaced around the circumference.

Note: when assembling such flowers, many masters vary the number of petals in the rows: each row has a smaller number of petals in relation to the previous one. I chose for myself such an option when three rows have the same number of petals. The brooch looks more magnificent and more elegant. You can experiment.
In the middle, I glued three black beads onto hot melt glue. You may have another option.

We put the St. George ribbon 25 cm long along in half and cut it off with a corner, as indicated in the photo.

The edges of the slices are scorched over the fire of a candle or a lighter and doubled at a slight angle along the edges of the tape.

Glue the tape to the back of the flower on hot melt.

Further options are possible: 1. immediately glue the base of the brooch; 2. Glue another felt circle of a slightly larger diameter. Such a “back” of the brooch looks much more aesthetic. If you have no foundation, it doesn’t matter! I used regular pins last year

And the final step: glue the base of the brooch on hot-melt adhesive.
Perhaps modeling jewelry designed to celebrate Victory Day is a very responsible mission for Kansasha craftswomen. If you want to learn how to make a kanzashi brooch by May 9 with your own hands, study our master class with step-by-step photos. In this case, it is wrong to use bright colors and catchy fittings, because the main symbol of the holiday is the St. George ribbon.
Ever since the time of Catherine II, outstanding soldiers were awarded orders in which a black and orange element was present. And to this day, the St. George ribbon remains a symbol of the irresistible desire for victory, an indicator of dedication and heroism in the battle for the homeland. Today, this element of decoration has acquired a special sound - the younger generation thanks the Veterans for a happy and peaceful life, presented to them at the cost of difficult trials. And in honor of the heroes on the eve of May 9, everyone wears a wonderful accessory. Let us consider in detail what is needed for creative work, how to create a beautiful, festive and unusual brooch in the kanzashi technique for the holiday on May 9 with your own hands.
To simulate a brooch by May 9, you will need:
- 14 pieces of black ribbon - squares 5 * 5 cm;
- 7 segments of an orange ribbon - squares 5 * 5 cm;
- 7 segments of an orange ribbon - squares 2.5 * 2.5 cm;
- 7 pieces of black tape - squares 4 * 4 cm (such a tape is not always on sale, if such a width is not available, you can take cuts 5 * 5 cm and cut);
- 7 segments of an orange ribbon - squares 4 * 4 cm;
- discreet hug - diameter of about 2 cm;
- the middle in the form of a black half-bead - 1.4 cm in diameter;
- black felt base - circle diameter 4 cm.
Decoration parts:
- a star made of red felt with a gold frame as the basis or a loop of a wide (5 cm) St. George ribbon;
- voluminous flower, consisting of four-layer black-orange and double black-orange kanzashi petals;
- pin.
How to make a kanzashi brooch by May 9 with your own hands
1) Four-layer petals will be made of black squares with a side of 5 cm and orange - two sizes: 5 cm and 2.5 cm. For one petal, it is necessary to prepare 2 black and one orange large square, 1 orange small square. It is this combination that is relevant and resembles the St. George ornament.

2) To complete the workpieces, bend all the parts diagonally. At each stage of the workpiece, you can solder with a flame of a lighter and help yourself with tweezers so that the atlas does not slip.
3) Bend the retrieved triangles in height. These will be the layers for the petals.

4) First you need to make a large triple petal in the following sequence: black - orange - black layers, separately simulate a small single petal - the middle of the orange square with a side of 2.5 cm. Fold the parts together and fold the boat.

5) Glue a small petal into a triple. This trick is simply necessary for beginner craftswomen, because working with several layers of tape at once is quite difficult.


6) A total of 7 parts are needed to model the flower.

7) Petals gather on a thread.

8) Make small double petals in the same way. For their implementation, you will need blanks with a side of 4 cm. Prepare a hug and a black bead in black.

9) Make a smart center of the St. George flower. Glue the hardware.

10) Glue double petals of medium size between the main parts of an already prepared flower.

11) Glue to the black felt base.

12) The resulting decoration can be applied to a red felt star. The edge of the star will look solemn if it is ennobled with a golden tire or even a lace.


