Irina Kirsanova
1. Materials that will be needed for work: 4 cm wide satin ribbons of the required colors, scissors, needle, thread, glue or a lighter (be very careful with it, follow fire safety rules, beads, picture frames, flowers, patches for decoration.
2. Getting started with satin ribbons, which we cut into squares.

3. Fold diagonally in half , we get a big triangle, then in half, hold by the corner.


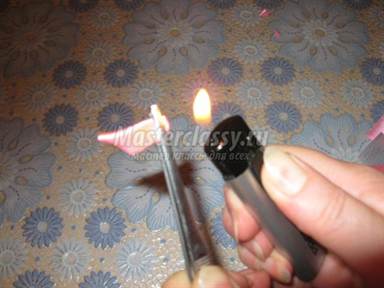
4. We burn with the help of a lighter the edges of the folded triangle and glue them together with glue or the same lighter.

5. Crop on the other hand, a small part of the future petal.

6. Connect all the finished petals with a needle and thread, fasten with a knot.

Such flowers turned out here.

7. Sew on in the middle of each flower is a bead,

8. Glue on a frame covered with fabric flowers, stems, leaflets.


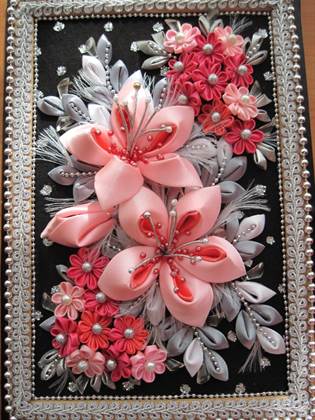
Here is the picture I got!
Related Publications:
It's no secret that teachers prepare many attributes for doing with their own hands, and there are several reasons for this — I want to do something.
Dear colleagues. I want to share with you my experience in making cute ribbon bows. Not so long ago I spent this.
A craftswoman sits, creates kanzashI, Trying to put her whole soul in a flower. Maybe so? Or is it better like this? And you look, shines in your hands.
Hello, dear colleagues, I offer another master class on the works of Ray Bradbury, today I was inspired by the story 451 degrees.
In our kindergarten "Tale" of the city of Malaya Vishera there was a competition of paintings among educators. Probably, like all creative people, and we.
To create an elastic band you will need: For a bow: Lilac satin ribbon wide 5 cm - 2 rectangles of 10 cm and 2 rectangles.
Paintings from tapes: lessons for creating chic panels (photo)Paintings from tapes: lessons for creating chic panels (photo)
Based on the kanzashi technique, you can make satin ribbons not only spectacular jewelry with your own hands, but also amazing paintings and panels. Basically, these canvases consist of a variety of colors. The most popular are of course roses. Looking at such works one gets the impression that we are as if drawing with ribbons. 


How to make a picture of satin ribbons

We draw with ribbons - so to speak about the creation of such paintings. This master class will serve beginners as a guide to action. Based on it, you can easily understand how such work is done with your own hands.
Since this picture will consist of flowers, namely roses, it is necessary, first of all, to prepare petals for them in three different sizes. To do this, a satin ribbon of a suitable shade is taken and five by five centimeters squares are cut from it. The sizes of the petals you can vary at your discretion. For example, for one rose, you can make four narrow petals, five - medium size and ten - wide. The height of each such part must be the same.
With themselves, the petals cut out obliquely. The edges of all elements must be melted, using a candle or a lighter for these purposes. For beginners, this will not be easy to do the first time, so you should first train and fill your hand. In the course of work, you will gradually understand how this process occurs and how the petals are given the necessary shape, as in the photo. 
To make leaflets for flowers, you can use organza, as well as silk ribbons in four different shades. Use different shades of green satin ribbon in your work. So your picture will have a more lively look. Such tonal diversity will bring interesting overflows to the picture. Three colors of tape can be used in work. This master class uses four tones - two from silk and two more from organza.
In order to fasten the leaf branches, use glue. To glue roses, hot glue is more suitable. 


We continue the master class and draw ribbons further. Roses are made according to the following scheme: first we form the core, which consists of narrow petals, after which, we fix the following medium ones and the remaining wide ones behind them. You can make a rose at your own discretion by arranging the petals in random order. See how such stunning flowers look in nature or in the photo and make an original rose with your own hands. 

Next, you need to prepare a subframe and pull contrast material on it. For example, this master class uses dark silk for these.
At the final stage, it is necessary to fix the flowers and leaves on the prepared canvas. Use hot glue from a special gun for these purposes. 


As a result, you get a wonderful picture of satin ribbons, as in the photo. Such a product is perfect for the interior of your home or will be an original gift for loved ones.
Panel with roses

Another master class will show you the steps to create a wonderful panel with lush roses, which is suitable for a classic interior.
To create such a cute mural, prepare:
- Hoop frame;
- The material on which roses will be placed;
- Satin or silk ribbons;
- A needle;
- Threads
- Glue;
- Cardboard;
- Scissors;
- Decorative ribbon (can be replaced with a golden cord) to create a fringe of a vase;
- Pins
The beginner's master class begins with the creation of roses from satin ribbons. In total for the panel you will need seven of these elements.
Next, you need to fix the material, which is taken as the basis for the frame. The frame itself can be put on a pillow and using pins sequentially, one after another, attach roses with leaves to the material.
You can sew on all created flowers and leaves in any order, as it will be convenient for you. This way you get your own original product. First, leaves are fixed on the canvas, and then proceed to fixing the flowers of roses. The last is a vase. For her, take a square template made on the basis of cardboard and wrap it with the selected material. Also, a vase can be decorated with a beautiful ribbon or a golden cord. At the final stage, glue the vase under the roses. Thus, you will get a wonderful panel that is suitable for the interior of a living room or children's room. 


Having examined all the stages of creating a picture from tapes with your own hands, we will consider how its main elements are created.
We draw flowers with ribbons. For creating
, take a tape of fifty millimeters and make from it segments of a length of 10.5 centimeters in the amount of eight pieces, and 11.5 centimeters - nine pieces. Vary this amount as you wish. It all depends on how lush the flower you want to get. The borders of the tapes must be melted with a lighter or matches. After making the required number of segments, we proceed to folding the bud.
Making the bud begins with the fact that you will need to bend the right edge of the tape and fix it with a pin. How to do it right can be viewed in the photo. Next, you need to bend these edges one more time and fix it with a thread in several additions. 


The next step is to bend the upper border of the ribbon and fold the bud. Fix the received part with a thread. As a result, we get a rose bud, as in the photo. Next, draw ribbons with petals. To do this, take the upper part and bend it by 0.7 centimeters and stab with a pin. The corner of the satin ribbon is folded next and is also pinned with a pin. With the second corner we do the same actions. Then we take the thread in several additions and mark the lower edge with it. After that, the basting is pulled together.
Before sewing on the second petal, you need to pin it on a pin to the bud. This will help to avoid its displacement. The borders of the petal are wrapped around the bud and fixed with threads on the bottom.
After the second petal, create the next - the third in a row and fix it on a pin to the bud, after which it needs to be sewn.
All other petals are made on the basis of a similar scheme of actions. To make your rose look natural, use several shades of ribbon in your work. For example, make the petals inside the rose out of a darker material. Finished buds can be additionally decorated by applying beads for this. It remains only to sew the leaves of the green ribbon and the rose will be made. 


Now, let's look at how leaves are created for a panel. Prepare ribbons, threads, a needle, a lighter, scissors, a ruler, and also a simple pencil for work. If possible, you can also use a needle threader. 
Leaves are also best made from satin ribbons of different colors and with different widths. They can be not only satin, but also kapron or organza. Choose any material of your choice. Try each of the above materials in work and choose the option that is more convenient for you.
Leaves of roses will make spiky shapes with assemblies. To do this, you need to take a ribbon whose width is five centimeters. Next, you need to take a ruler, measure eleven centimeters and cut them off. To avoid shedding of tape edges, they must be scorched. They will help you to make it a lighter, or a candle. Just melt the edges over the tribe. 
The resulting segment is doubled so that you can determine its center. Next, we bend the edges from the center to the bottom. A stitch is sewn on the underside. Please note that when sewing the stitch, you must grab with a needle all the tape layers.
Having laid the line, it must be pulled off. Tighten the thread sufficiently tight, wrap the base of the sheet with it and lock it.
Having thus made all the necessary blanks, proceed to fixing the colors on the panel. For a classic interior, such a picture is perfect. 


We have examined several options on the basis of which wonderful paintings are made using the kanzashi and panel technique. For these products, everyone’s favorite rose flowers using the kanzashi technique were used. In addition, there are many more
with which you can decorate such work. Working with such paintings, we seem to draw ribbons. Choose the appropriate master class for beginners, which is on our website, look for new ideas and create wonderful paintings in an interesting style for any interior.
Video: Making gorgeous roses from picture tapes
Kanzashi is an old Japanese type of needlework, which appeared 400 years ago. Japanese women, who always knew a lot about style and charm, fastened hair ornaments from ribbons and beads. According to their belief, such little things also drove away evil spirits. The article "Kanzashi Technique for Beginners with Schemes" is sure to be useful to needlewomen and will help you learn how to make original crafts.
Today, kanzashi technique is actively used not only in the creation of jewelry, but also in interior items. Panels and paintings with flowers from ribbons are perfect for any interior. Also, such crafts will be a wonderful gift for family and friends.

Painting with flowers
To create a product you need:
- orange satin ribbon (3 meters);
- yellow satin ribbon (3 m);
- burgundy satin ribbon (3 m);
- green satin ribbon of dark and light shades (3 m);
- tweezers;
- sharp scissors;
- dark beads;
- wire;
- a piece of dark fabric;
- frame for photo A4;
- burlap for the background;
- soldering iron.
Get started by cutting all satin ribbons into 5 by 5 cm squares.

Take the burlap and pull it on the frame. Then proceed to create with your own hands the flowers that will decorate the picture. Take one square piece and fold it so that the triangle comes out, as shown in the photo. Then fold it two more times.


Then bend one of the corners.

It should go like this:

Bend the next corner in the same way. Cauterize the ends and cut to the sides.

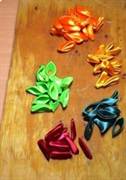
Draw all subsequent petals with ribbons using orange, yellow and burgundy ribbons.
From tapes of a green shade it is possible to create simple pointed petals and large petals, for the foot of the picture.
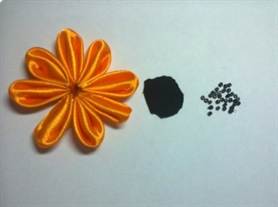
The final stage is the process of assembling the prepared parts and placing them on the canvas. Create two flowers from yellow petals, and three from orange. For the core of the flowers, take a wire and string beads on it. Cut a small circle from felt, where low beads will be attached. Connect all the workpieces with each other with glue.

The picture is ready!
Flower panel
Crafts in the kanzashi technique will always be pleasing to the eye, like this wonderful floral panel.

Necessary materials:
- ribbons of different colors;
- cardboard;
- large format frame;
- sharp scissors;
- lighter;
- tweezers.

Work begins with the production of flowers. First, prepare the squares from the ribbons.

Fold in half three times, trim the tip with scissors. Then grab it with tweezers and secure with a lighter.
Repeat on 10-12 petals.

Assemble them on a needle, sticking a needle into the middle of the edge of the product.

Tighten the thread and tie a knot. Decorate the middle with half the beads.

Make a second flower larger than the first and glue them together.

The second kind of petal looks different.


A wonderful gift for any holiday is a picture. It is especially nice to get an incredibly beautiful and delicate product from ribbons. Such paintings are made using the kanzashi technique. A kanzashi painting with his own hands carries the warmth and part of the soul of the person who created it. To create it will take a lot of time and effort. This is a special sign of attention and desire to please.
Kanzashi in the interior
Kanzashi paintings are universal, as they are images of bouquets assembled from separately created flowers. Bouquets organically fit into any interior and add colors to it. Beautiful and delicate flowers will cheer up every time you look at them.
You can also make such a picture for the decor of your home, choosing the appropriate color scheme. With the help of Kanzashi flowers, bright accents will be added to the decor. Or they can be used to dilute existing, repeating colors. You will definitely want to make a picture of the ribbons for yourself after you try to make several flowers and see how magnificent they are.


Making petals
There are many types of flowers. To create a beautiful unique picture, you need to learn how to make different flowers and use different methods of making petals.
Consider a workshop on creating petals.
Before starting work, you need to prepare the necessary materials and tools:

- satin ribbons. They are very convenient to work with, and for beginner needlewomen they are perfect;
- scissors. Their blades should be sharp;
- cardboard. The bases will be cut from it, on which the petals are then glued;
- ruler for measuring tape cuts;
- needle and thread. They are needed to hold the petals together;
- tweezers. It is better suited with non-sharp edges, but if there are none, then you can use the usual one;
- lighter or candle. With their help they melt the edges of the ribbons so that they do not gut.
Tapes need to be cut into squares. To make them even, use the ruler.
For many types of petals, a standard workpiece is suitable. It is done by folding the square diagonally. Then the resulting triangle is folded again, and then one more time.
Make a round petal. One of the three corners of the workpiece is wound back towards the tip of our petal. Gently align the resulting arc from above. Singe the edges of the petals. While the edges are hot, we press them and glue them.

The sharp petal is also one of the main types of petals. To create it, it will be enough to fasten the corners of the workpiece, singe their tips and glue.

Petal with a curl. The middle corner of the workpiece must be rolled up into a tube, and then the two remaining tips fastened together. So that the tube does not unfold, a drop of glue can be gently applied to the tip.


These are one of the main types of petals. Using them as a basis, you can add smaller petals inward for greater splendor and layering of the flower. You can attach a blank of another color to the blank of one color and create unusual petals. When gluing the ends, you can change the folds. Imagine, try, experiment with both flowers and petal shapes, and you will get original and unique flowers using the kanzashi technique.

Creating colors for a picture
To make a picture using the kanzashi technique, you need to think over the image, the arrangement of colors, choose a canvas and frame.
The image will help you come up with imagination, the canvas and the frame can be bought in the store of goods for needlework. It remains the matter of creating flowers and assembling the picture.
Very tender and beautiful paintings are obtained in which lilies are gracefully and gracefully arranged. Flowers look like real ones. A master class with step-by-step photos will be useful for their manufacture.

To make lilies you will need:
satin ribbon and wax pencil. The ribbon can be of different colors, depending on which flowers you want to receive. Petals can be painted with a wax pencil, imitating the natural color. In the photo of this workshop, a tiger lily from a yellow satin ribbon. Tiger spots are drawn on the petals with an orange pencil. You can depict any other colors of this beautiful flower;
- sharp scissors;
- ruler, pen and cardboard for making the template;
- clothespin or office clip;
- tweezers;
- candle or lighter. You will have to refill a lot, so a lighter will do better;
- transparent glue. A Moment Crystal or Dragon is good, but a hot glue gun is ideal;
- soft fabric backing. A flannel is best suited, which must be folded several times;
- knife with a blunt end;
- stamens;
- hair fixation spray.
On cardboard we draw a petal pattern.

We cut out the template and conditionally measure on the tape the width into which it will fit. At these marks, we cut the rectangles from the tape.

Gently and evenly fold all the rectangles. From above we impose a cardboard template and tightly clamp everything with a clothespin.

Cut out the petals according to the pattern.
Try to keep the rectangles clearly and evenly, and the blanks for the petals are the same.

Now proceed to singeing the edges. Take the petal with tweezers and gradually singe the edge. While the edges are hot, stretch them with your fingers. This must be done to give the petal a natural look. Also shape the petal itself, giving it a natural bend.


We apply a drop of glue to the base of each petal and improve the shape by pinching the tip. Then we clamp the base with a clothespin and let the glue dry.

We create an imitation of veins by pressing a hot knife into the back of the petal.


Glue a few stamens to the petal.

Then glue two more petals at the same distance and level.

Now glue three more petals lower than the first. We place them between the petals of the upper level.


Spray the flower with hairspray. This is necessary so that in the future the lily does not lose its shape.

Inside the flower with wax pencil we draw spots.

Lily is ready.

Now make some more flowers and you can create a magnificent picture of lilies, showing your imagination.


Video on the topic of the article
In the video selection, you can see how pictures are created from tapes using the kanzashi technique. Now you know how the petals are created, from which the flowers are collected, you learned how to make a kanzashi lily with your own hands. Videos will help you see the process of creating flowers and paintings.
We can recreate a variety of flowers from satin fabric.
Today I want to present you a violet panel using the kanzashi technique. It took me a lot of time to make this panel, but I like to make panels - small peculiar paintings from satin flowers.
1. satin fabric or satin ribbon 5x5 cm purple;
2. a satin ribbon 2.5 cm in a greenish-olive hue;
3. satin ribbon 2.5 cm blue;
4. satin ribbon 0.6 cm olive;
5. a rectangular piece of cardboard 20x30 cm for the base;
6. pink fabric for the base slightly larger than cardboard;
7. jute;
8. ready-made middles for kanzashi or mother-of-pearl beads and large white beads;
9. Dragon glue or hot glue;
10. candle and lighter;
11. ruler.
Work process
Step 1: make the foundation
We take cardboard and pink fabric for the base. We apply fabric to the base. From the wrong side, we apply Dragon glue to the cardboard and glue the fabric to the base.
Step 2: make the lilac petals
To make the petals, we need pieces of satin fabric 5x5 cm lilac.
Take one piece. Fold the fabric diagonally in half, and then four times.
We take the fabric folded four times with our fingers at an angle opposite from the double corners, retreating by about 0.7 cm. We turn the fabric from the front to the back by 0.7 cm. Then we turn the fabric forward by 0.7 cm, and again back, also by 0 , 7 cm.
On one side of the craft, we formed half of the petal. On the other side of the petal, we also step back 0.7 cm back and forth until we get a nice petal.
We fix the petal with tweezers. In the front of the petal, we cut off the excess tissue. We melt this part over the candle. Then we cut the sticking-out fabric from below, and melt the trimmed edge above the candle.
Working in this technique, we produce the required number of petals. I decided to make 6 purple violets, so I made 24 petals.
Glue the 4 petals into neat flowers.
Step 3: make the middle
You can take ready-made middles for kanzashi, but I made the middle myself from pearl beads, large white beads and monofilament.
Glue the lilac flowers on the base. Inside the flowers we glue the midpoints made by us for kanzashi.
Step 4: make green leaves
For the manufacture of leaflets we take a green ribbon 2.5 cm. Cut the ribbon into pieces 2.5x2.5 cm.
We take one of the pieces and fold it in half diagonally. Then fold it four times diagonally.
With fingers we take the folded fabric for the lower opposite corners. We put these corners together, forming a pretty petal from them.
Take the petal with tweezers. Cut the excess fabric in front and melt this part above the candle. Using your fingers or tweezers, grab the melted area so that it sticks together well. Then we cut off the excess fabric from below and melt this area above the candle.
Working in this technique, we produce a sufficient number of petals.
Glue the petals together into branches of 3 and 5 petals. Glue the branches to the base.
Step 5: making rose petals
To make the petals, we take a satin ribbon 2.5 cm in blue. Cut the tape into pieces 2.5x2.5 cm.
We take one of the pieces and fold it in half diagonally. Bend the side corners down to the central lower corner.
We fix the fabric with tweezers. From below we cut the fabric and melt this part above the candle. The petal is ready.
Working in this technique, we produce a sufficient number of petals.
Step 6: make roses
To make a rose, take one of the petals and twist it with a tube. Glue fix the tube. Take another petal and glue it around the duct.
Then we glue over the lap around the workpiece other petals, forming a rose from the petals.
In total for the panel, I decided to make 3 roses.
We glue roses on the panel.
Step 7: make rose petals
To make rose petals, we take a tape of 0.6 cm olive color. Cut the tape into pieces of 5 cm.
Glue the ends of the tape as indicated in the photo.
Glue the petals around the roses under their bottom.
Add some more green twig petals for symmetry.
The flower decoration for the panel is ready, it remains to make a frame.
Step 8: weaving a frame
I decided to weave the frame for the panel out of jute twine. Weaving is made of double flat knots for macramé.
For weaving, we cut the twine into 6 threads 2 meters long. Fasten the threads to a flat surface.
Take 4 threads on the left. We twist the leftmost thread and push the fourth thread into it. Tighten the threads. Then we twist the fourth thread and push the leftmost thread into it. Tie a knot.
Then we take four threads on the right. We twist the rightmost thread and put the fourth thread on the right into it. Then we twist the fourth thread and poke the rightmost thread into it. Tie a knot. In a word, remember that first you need to turn the leftmost or rightmost threads, and then the fourth threads in a row.
Working in this mode, weave a tape around the perimeter of the panel. In my case, this length is 1 meter.
Glue the jute tape around the perimeter of the panel.
The panel in the technique of kanzashi "Violets" is ready.


