Olesya Linnik
16:10 25.03.2017
After sewing clothes or curtains, you still have fabric, and you do not know what to do with it? Let her go! Use leftover textile in interior design. How exactly, see our tips.
Wall decor
You can make original paintings or panels from the fabric, which then decorate the bedroom, living room or nursery.

To create a "masterpiece" even an old summer dress is suitable,which you will not wear anymore, but it’s a pity to throw it away. It will make an excellent bright picture.

The "soft" plates on the wall look very stylish. It is easy to make such wall decor from wool, cotton, linen or other fabric, which will need to be glued, for example, to a simple wooden plate.

By the way from pieces of denim to get a great option for wall decor.
White or light blue fabric, which also, as in the photo, needs to be placed in large and small hoops, goes well with them.

A simple and very original idea to make a collage directly on the wall of colorful rags. And no need to glue wallpaper or paint the walls.

The ideal solution for the design of the working corner of a creative person.

Lampshade Material
If you sewed curtains or pillow covers for the order, and you still have pieces of fabric, you can make a new lampshade from them.


So a boring lamp will quickly turn into a bright and colorful detail in the interior.

Upholstery
Thick colored fabric can be used to make the head of the bed. True, for this you need a few meters of textile.

And with the same fabric as the curtains, you can upholster the chair, if suddenly the seat or back has already been worn.

Home accessories
Many mothers prefer not to buy, but to sew bedding for their children. And if you suddenly didn’t guess with the sizes, and took more fabric, it can make original decorative bags for storing little things.

From Fert or an old cashmere coat you can make stands for hot.

And decorate a clay flower pot with velvet, satin or silk.

Photo in article: Pinterest
Look for more ideas in every magazine.
The most interesting needlework for the house with your own hands is much simpler than it seems to inexperienced lovers of hand-made. Hand made literally translates as manual work, that is, absolutely all types of needlework can be attributed to hand made. This can be either making a rug or do-it-yourself mittens.


If you like to needlework, adding a twist to the interior of your home will not be difficult. We present you ideas not only for experienced needlewomen, but also for beginner craftswomen. Prepare materials and start creating!
Newspaper baskets
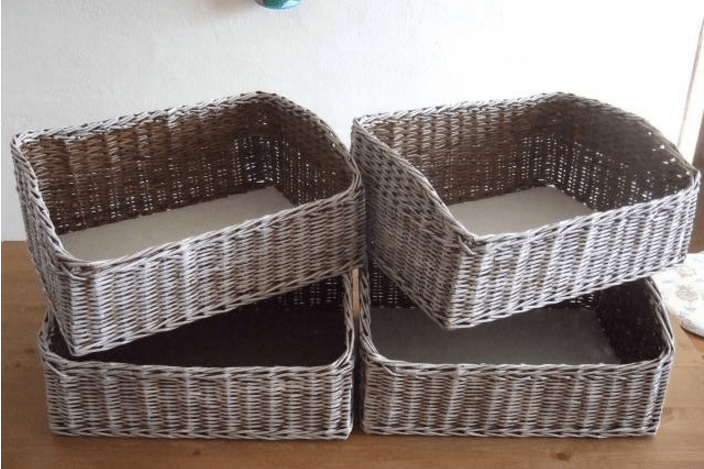
It’s not necessary to spend money to have such baskets for every little thing, because you can make them yourself.
We will need:
- braiding box
- thick cardboard
- many newspapers
- scissors
- knitting needle
1. Cut the newspaper sheet in half and begin to wind the newspaper strip onto it at this angle:


2. Glue the tip of the newspaper to the tube.

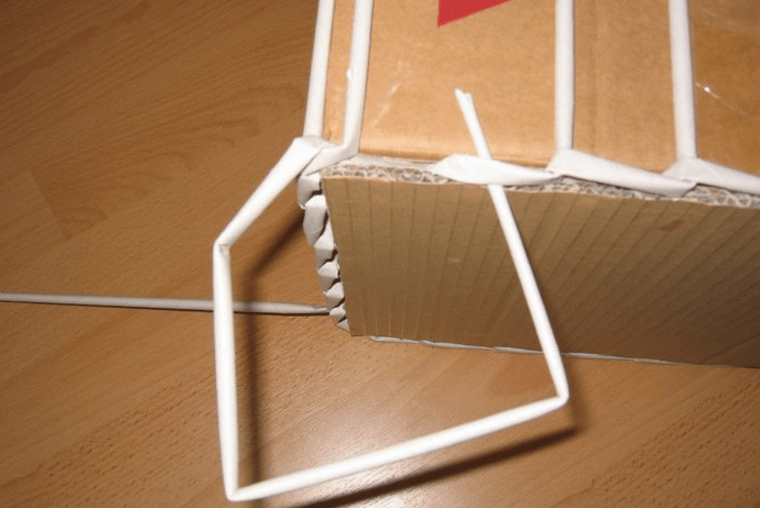
3. We take a cardboard for the bottom of the basket and glue the tubes to it.

4. On top you need to glue another piece of cardboard.

5. For the first row, simply wrap the tubules one after another.

6. Wrap the last tube, as shown in the photo.
7. Glue the extra tube and start weaving the basket.

8. Attach the tubes by inserting one into the other.
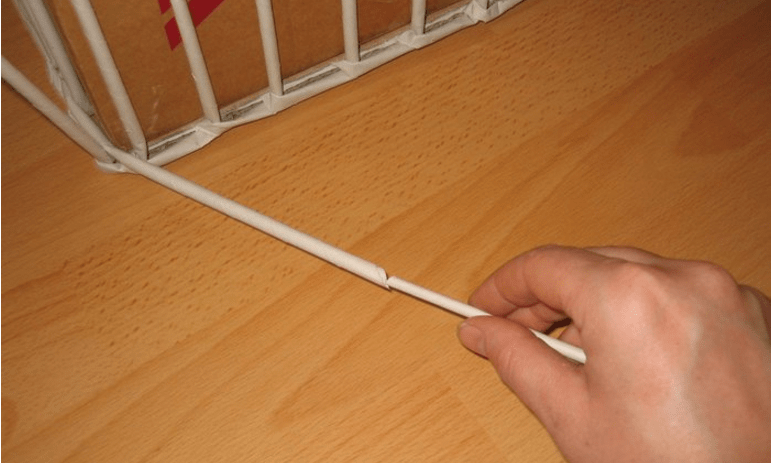
9. We build up tubules in the process of weaving.

10. We look how weaving ends.

11. Place the wrapped tubules inside our basket.


12. At the final stage, the tubes must be cut and scorched.

13. The finished basket can be painted in the desired color.

And in this video you can learn how to knit a rug from bulk yarn
Cork Mat

We will need:
- basis for a rug (it is possible to use a laminate)
- corks of the same size
- knife and scissors
- glue or glue gun

1. Cut off part of the base.
2. Cut the cork in half.
3. Glue the plugs on the base. Voila, the new rug for the entryway is ready!
Mat from unnecessary things

Such a rug will not only decorate the entrance to the apartment, but also save you from old, unnecessary things.

1. Cut unnecessary clothes into thin strips.
2. Tie the pieces of fabric tightly to the net.
3. Secure with tape and the mat is ready.
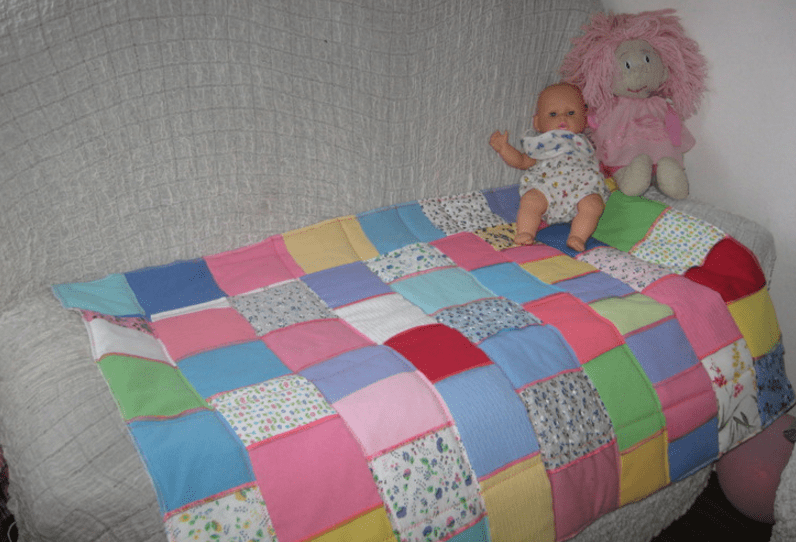
Plaid from pieces
A plaid of pieces can be made in different ways:
1. From knitted pieces. First you need to connect the squares of different colors with the help of knitting needles or a hook, and then connect these squares together.

2. From different shreds of fabric.
Bead picture
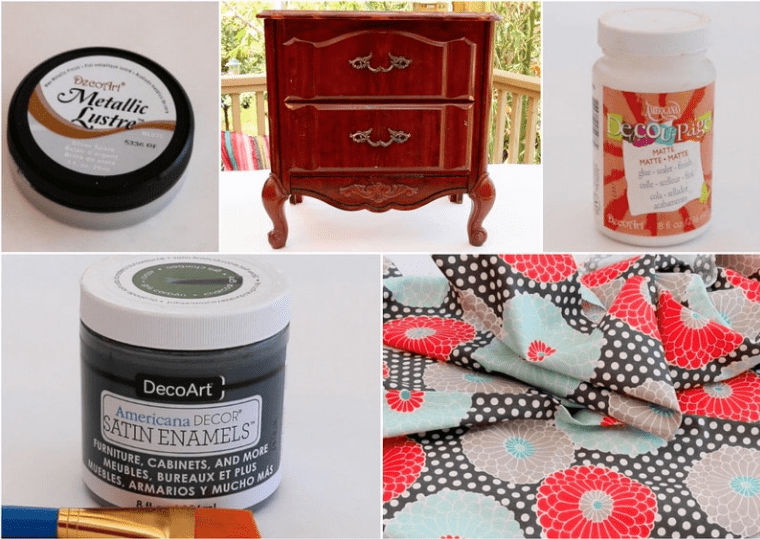
Decoupage furniture
Recently, decoupage is becoming more popular, because this is a great way to update your furniture and decorate the interior of the apartment. For decoupage, photographs, old books, newspapers or magazines, cloth are usually used. These materials are varnished or glued to furniture.
Table decoration


Dresser Dressing

Such crafts will be very useful in everyday life, and to make them quite easy.


Hand made products can decorate the interior of not only your home, but also your garden. Unnecessary things can turn into very useful for giving.
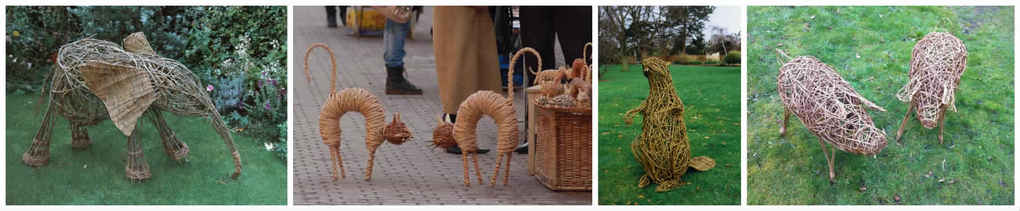
Crafts from the vine
If grapes grow in the country, then you are provided with material for needlework for the rest of your life. From the vine you can make decorative figures, benches and much more.

Planter and rope rug
Mat made of plastic bottle caps
Each of us has a whole bunch of plastic bottle caps at home, so why not do something useful with them?

The lids are interconnected by a fishing line, and the holes in them can be made using an awl.

Country Paintings
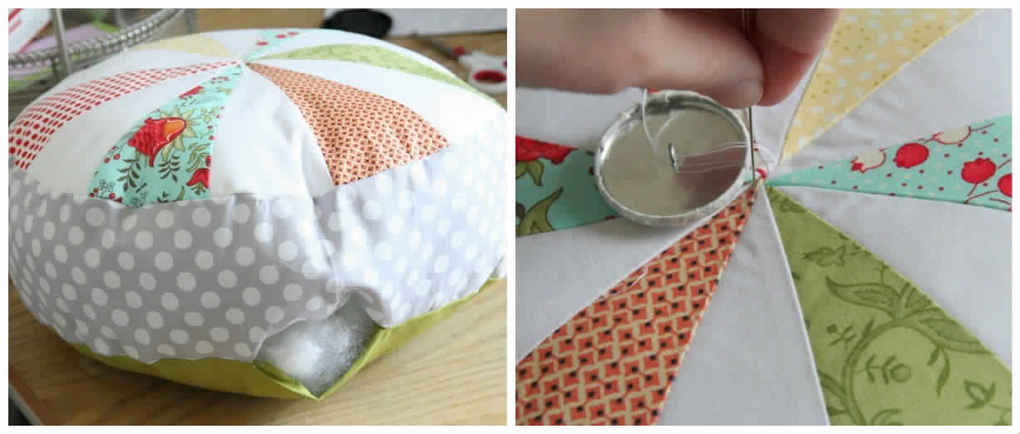
Patchwork ottoman
Patchwork is another recent trend in the world of interior design.

1. For the manufacture of such a ottoman, we need to cut 12 triangles of colored material and sew them together.

2. Cut out a flap of fabric that will be the side of our pouf. We sew the cut and sew with the triangles made earlier.

3. Cut a circle of the same diameter as the top of the ottoman. Sew on the bottom, leaving a small piece not stitched.

4. In the final stage of manufacturing the pouf, it must be filled, darned and sewed on a decorative button for beauty.
If you have your own cottage, then why not make a hammock on which it will be so convenient to read your favorite book.

To make a hammock chair, we need:
- thick fabric
- rope
We proceed to the manufacture of:
1. Cut the base from the fabric (rectangle 115X86 cm) and cut into 14 strips 8X15 cm in size. Each strip must be folded in half and stitched. We fold the resulting tape in half and stitch it, so we get a very strong loop.

Patchwork is a fashionable technique for creating different elements of decor, which is simple and original. Crafts and serious products in patchwork technique are created not only from fabric, but also from tiles or wallpaper. First of all, of course, they use sewing and textiles. Everyone can create unique patterns of bright colors and geometric shapes with their own hands. The sizes and purpose of products for the home can be very different, but, in any case, needlework will provide comfort and beauty to the home interior.
The patchwork technique is based on the principle of mosaic, the essence of the scheme is to compose a picture of small details. An important plus - there are no costs for the purchase of material, since everything that is necessary for work can be found in the attic or in the closet. What can be done from such a set with your own hands? Patchwork-style things are stylish curtains, bedspreads on a sofa or bed, table napkins, rugs, rugs, seats, cosmetic bags, wallets, crafts ... You can swipe at furniture (ottoman, sofa or designer chair). Patchwork will adorn the head of the bed. The patchwork technique is perfect for making covers for sofas, armchairs and chairs, decoration (cup, teapot, original tablecloth), rooms (colorful panel). Other home ideas will tell you a photo.

Homemade needlework and crafts using the patchwork technique allows you to beautifully and simply create original interior elements, breathe new life into old things, filling the house with bright colors and a sense of celebration. The patchwork technique involves 2 methods and different schemes. Application - fragments of multi-colored shreds sewn into a specific composition sewn onto the basis of plain fabric. Decorative stitch can be contrasted or in tone. Or many shreds are made into a specific product like puzzles.
Interior design with patchwork elements (video)
Do-it-yourself napkins, paths and tablecloths
In the patchwork technique, fabrics can be in the same color palette to complement each other, or to contrast. In this case, the finished product will be in harmony with other interior items or dominate in it. It’s easy to create an interesting tablecloth for your home with your own hands, the main thing is that the stitch, the colors of the track, countertops and other furniture do not merge when choosing a pattern. You can even sew the tablecloth onto the table with your own hands even from handkerchiefs of a matching color, arranged as patchwork. A cup with a cover in the power of a patchwork complements the interior. The track on the table in black and white creates a classic serious style. A napkin masterclass can be used as a guide for more voluminous things.

For napkins on the table you need to prepare:
- Base fabric 36x36 cm;
- Old knitwear;
- Sintepon 33x33 cm;
- Chalk, scissors;
- Triangular pattern;
- Iron; the car;
- Fabric strips 90x4 cm - 6 pcs.
- Sewing machine.
Tailoring of the product is quite simple, and step-by-step instructions will help to accurately comply with all the nuances without missing a single detail.
Napkin path on the table, instructions:
- Fold all the strips, arranging to your taste, sew with an allowance of 0.5 cm. Iron the panel on one side. For the design, it is desirable that the tissue connections are contrasting in color.
- From a thick cardboard, make an isosceles triangle template with an angle at the apex of 45º. Width and height should correspond to 1/8 of the width of the panel.
- Put the template on strips and circle around with chalk.
- Cut parts along the contour.
- Fold the layout of the napkin in the form of a diagram.
- Stitch the parts in pairs and iron them. Machine stitch. Get 4 stitched triangles.

- Also sew the second half of the napkin in pairs and smooth the seams.
- Connect the two semicircles and sew a napkin as in the photo.

- These parts are sewn in the corners. Arrange them so that the round napkin becomes square.
- It turned out patchwork in the form of the upper part of a napkin measuring 35x35 cm. We turn to the lining.
- Cut a lining out of knitwear in the form of a square with a side of 36 cm. It is better to make a lining from synthetic winterizer, the square should be smaller, with a side of 33 cm.
- Fold all 3 layers and secure with pins.
- On a sewing machine, first stitch radial seams, and then concentric ones.

- Trim the edges of the napkin and cut off excess tissue.
- The final touch is edge processing. For her, you need to cut a strip 5 cm wide, iron it with the wrong side inside and sew it to the wrong side of the napkin.
- Bend the facing to the face and sew again. The stitch is straight.
- Iron a napkin and decorate the table.

Patchwork style cosmetic bag and wallet
An ancient form of needlework - patchwork - today at the peak of popularity. It is fascinating, first of all, with its variability, as, for example, a purse or a cosmetic bag - crafts in the Japanese style with origami elements.
To make it with your own hands, you need to cook:
- Two types of main fabric;
- Washable lining fabric;
- Zipper - 34 cm;
- Pendant for lightning;
- Non-woven;
- Threads - contrasting or in tone.

Material pretreatment: to avoid deformation, the patchwork fabric must be washed and ironed.
When everything you need is at hand, you can start sewing the product:
- We will prepare the templates: circle Ø 16.5 cm, circle Ø 14 cm and a square with a side of 10 cm. The smaller circle and square should be cut out of plastic or hard cardboard.
- Cut the workpiece: circle 16.5 - 19 parts from one main fabric. A square - 19 parts from another main fabric and 19 parts from non-woven fabric.
- We collect the patchwork according to the scheme in the photo. Assemble a large circle, the stitch is shallow, with an allowance of 3 mm along the edge. Leave the tails of the thread long so that the pattern can be pulled.
- We place a small circle of cardboard in the center of a large circle swept from the inside out. Evenly tighten, tightening the ends of the estimate. Iron, keeping the shape of the part. After incising the mark, carefully remove the template and iron the part.
- In the center of the circle, we put a square blank on the inside, iron the protruding edges of the circle per square.
- We connect a square from another main fabric with non-woven fabric, put it into the workpiece and iron it. We fix the product with stitches, departing from the edge of 2 mm.

- From the blanks to collect a cosmetic bag or wallet.
- From the fabric for the lining we cut a 42x52 cm rectangle. Fold it in half, sew the side seams with an allowance of 1 cm. The result is a 40x26 cm part, measure 7 cm from the bottom edge from each edge and form folds, sew.
- Fold the cosmetic bag or purse inside out. From above we turn 1 cm flush with the front side, fasten with pins and sweep.

- We sew the zipper by hand, fixing the two parts of the cosmetic bag, the end of the zipper (4 cm) should hang.
- Sew the handle for the zipper (2 children), unscrew and cut the corner.
- Iron, turning the edge inward. Insert the free end of the zipper and sew it up.

Using the same principle, not only a patchwork cosmetic bag or wallet is made with your own hands, but also a handbag, a phone case, various crafts in the style of Japanese patchwork.
Patchwork in the interior: seat covers for chairs or armchairs, a cup, furniture
Handwork has always been appreciated, and patchwork will add a twist to any style of home. Using patchwork, you can restore an old sofa or other furniture, realizing your ideas. Sofa and armchairs with patchwork upholstery bright spot dominate any interior. To do this, it is advisable to withstand other objects in pastel colors. Upholstery in patchwork technique can be done independently or ordered in a furniture workshop. If you restore furniture (sofa or armchair) at home, you must remove the old upholstery and use it as a pattern. The main rule is to choose fabrics that are close in texture and thickness, since thinner wears out faster. If you still have to sew thin fabrics, they need a lining. The color scheme is limited only by fantasy and taste.

The interior in the patchwork style in the kitchen looks original and stylish, helping to bring together diverse furniture, a colorful variety of details. For stools in the style of patchwork, you can make pillows or seats. Curtains, potholders, towels, a tablecloth, a motley cup and other crafts will add brightness to the design of the kitchen. The cup or teapot looks original in a patchwork style case.
The interior of the living room is complemented by pillows on the sofa, panels, paintings and curtains in patchwork. The primary colors are important to duplicate in accessories, given their color scheme.
The interior of the bedroom can be supplemented with a quilt, wraps, bedspreads. Furniture looks stylish - patchwork upholstery of an ottoman or a chair, if when choosing a base color, choose a shade already present in the interior. Take inspiration from the photo.
Patchwork paintings (video)
In the patchwork style, you can decorate the walls with special wallpaper or tiles. Well-kept non-woven wallpaper. Usually they paste over one wall - such a bright accent should be in harmony with the interior of the room or bathroom.
Patchwork little things and not only (photo)


In contact with
Crafts made of fabric are always interesting for needlewomen of any age. Such material can make not only decorative, but also useful crafts.
Moreover, if you approach the process creatively and creatively, you can give old things a new life. For example, excellent crafts are obtained from denim with their own hands. Therefore, from old jeans you can make a beautiful bag or even a durable wallet.
But not only denim and dense fabrics are suitable for work. If the craftswoman tries, then beauty can be made even from the smallest scraps. There are always a lot of such people who are engaged in creativity, including sewing. It is not worth getting rid of shreds, as they can become the basis for a very interesting and even useful DIY craft.
 Do not get rid of the scraps, as they can become the basis for a very interesting and even useful DIY crafts
 Fragrant sachet
Sachets can be made of small bright patches - this is a flavor in which natural components serve as a filler. You can make sachets of any shape. The patchwork mosaic technique is perfectly suitable for this, when several shreds are taken at once for the manufacture of the base. They must be stitched according to a certain pattern or randomly - depending on the ideas of the master.
To make a sachet of fabric, you just need to sew a bag. Do not forget that after the main seam is completed, the bag must be turned out on the front side.
Then it is filled with a fragrant composition. To do this, you can use various components, for example, coffee, cinnamon, dried orange peels, various flowers and spices. Lavender creates a very good effect. It not only perfectly aromatizes the room, but also helps to avoid unpleasant insects.
At the end of the work, you should take a piece of tape and sew it into the bag. The hole through which the filler was poured is neatly hemmed, and the sachet can be used for its intended purpose or presented to loved ones.
Attention! It is worth noting that the shape of the products can be any. The more originality the master shows, the better.
For example, you can make several small fragrant sachets of fabric, and then place them on a beautiful dry tree branch, which should be put in a vase. So a very original air fragrance will appear at home.
 Sachets can be made of small bright patches - this is a flavor in which natural ingredients serve as a filler
 Crafts from fabric for the kitchen
Here, the patches are especially useful, since with their help you can create very interesting products with your own hands for the kitchen. Including those that make homework more convenient, and the atmosphere is cozy.
Textile elements in this room always play a big role in decoration and design. If you choose the right fabrics and the right colors, you can get a beautiful decoration of the kitchen interior.
Idea! From bright and colorful shreds you can make beautiful potholders.
The simplest option involves sewing them in their entirety, but you can use complex patterns to get an interesting and unusual version of a kitchen mitten.
 Shreds are especially useful, since with their help you can create very interesting products with your own hands for the kitchen
 In this case, the patchwork mosaic technique will also be relevant. In order to make a beautiful tack, you need to cut triangles from different pieces of fabric so that when they are combined, a circle is obtained. When cutting the product, be sure to leave allowances for the seam. Next, you need to sew two round parts. This will be the front and back of the tack.
In order for the product to perform its functions well, it should be made more dense. You can take several layers of very dense fabric, which is laid between the pieces of shreds. Then everything is stitched in a circle. Edges are processed by a slanting inlay. It can also be used to make a tail, for which the tack will be hung on a hook.
 Textile elements in this room always play a big role in decoration and design.
 Such products are made very simply and quickly, especially if there is a machine at hand. Work is suitable even for beginner craftswomen. There are several such products. They can play the role of not only tacks, but also supports for hot. But here it must be borne in mind that for work you should choose only those tissue options that will not melt. A very good material for tacks, coasters and other types of kitchen textiles is felt or denim.
 Such products are made very simply and quickly, especially if there is a machine at hand
 If such a product seems to the master to be very simple, you can take a closer look at the more complex fabric crafts with your own hands. For example, according to the pattern, the craftswoman can sew a comfortable and original bow tie, which will definitely decorate the interior of any kitchen and will be a wonderful gift.
Beautiful fabric needle case
Each craftswoman will need such a thing as a pillow for needles in her work. It can be made simply from a fabric bag filled with sintepon. But original crafts always delight the eye, cheer you up and give an impetus to new creative achievements. Therefore, the needlewoman should have an unusual needle bar.
 Every craftswoman will need such a thing as a pillow for needles
 To create such an article from scraps of fabric with your own hands, you need to stock up on several pieces of material, preferably in a contrasting color, scissors, a needle, cardboard, thread, cotton or synthetic winterizer, pins, and a simple pencil. If there is a sewing machine at home, it is worth using it to make an original pillow for needles.
This variant of the needle bed is best prepared according to the patterns. To do this, you need cardboard. One large square should be drawn on it, as well as a small one, the size of which will be a quarter of the first. When cutting fabric, do not forget that here you will need allowances for the seam. Their optimal size is 5 mm.
 The needle bar can be made simply from a fabric bag filled with sintepon
 Now you need to take a large square of fabric and fold its edges to the center. The craft should be ironed with high quality. Inside, put a little cotton wool or synthetic winterizer. Each corner is fixed with tailor pins. Next, the square is flipped so that it turns into a rhombus.
A smaller square is laid out in its center. At this point, the corners of the larger square in the center should be reassembled. A small piece of fabric will be inside a large one.
Directly in the center, the corners should be stitched together securely. Now you can remove all the pins, since the product will already hold its shape. But you should not completely flash the holes.
They will need to be slightly turned to the side on each side. The result is fixed using tailor pins. Then, with the help of a thread with a needle, everything is sewn so that the lapels are clearly visible.
 To create a needle bed, you need to stock up on several pieces of material
 At this stage, work on an unusual needlepoint made of scraps can be considered completed. If desired, you can add a beautiful button in the center or leave the needle bar in the version in which it turned out.
Crafts from fabric without sewing
Bright shreds are always useful to those who can not imagine their life without needlework. Even those craftsmen who still do not know how to handle needles and threads can use fabrics for their crafts.
 Bright shreds are always useful to those who can not imagine their life without needlework
 One of the most convenient options in this regard is felt. This material holds very well, does not crumble, it does not have to be sheathed. Fine toys, applications, souvenirs and other crafts are made from felt.
Glue is used to connect the parts, so using a thread with a needle is not necessary here. Moreover, from this material it is very convenient to make three-dimensional crafts (flowers made of fabric) that can be put in a vase. One of the advantages of this fabric is that it is produced by manufacturers in various color options, so the master will always have a wide selection, which will make it possible to realize even the most daring ideas.
 From shreds you can create very interesting paintings
 But felt is not cheap, so needlewomen who would like to make a craft out of fabric without sewing have other options. For example, you can create very interesting paintings from shreds. To make them, you need to draw or print the base on paper, and then transfer all the elements to different pieces of fabric.
Important! Such paintings are interesting in that they are very easy to make, but they always look spectacular. If you choose the right fabric for every detail, you can get a very original canvas, which will become a real decoration of the interior.
The basis of small shreds
All needlewomen who work with fabrics are aware of how many small scraps remain after each product. Most often, they just go into the bin, but such scraps can become the basis for unique products that no one else will surely have.
 All needlewomen who work with fabrics are aware of how many small shreds remain after each item.
 To make a fabric base, you need to take a lot of small patches. It should be borne in mind that they will look best in different colors, but similar in composition. If you take very light and coarse fabrics, the result will be far from what is expected. Moreover, fabrics that quickly light up or melt should not be used in this work.
First you need to decide what size fabric blank is needed. Then prepare in shape a piece of adhesive fabric such as non-woven fabric or adhesive web. Baking paper is useful in work, but only without oil impregnation.
 Such trimming can become the basis for unique products that no one else will definitely have
 Now, small scraps of different fabric colors are laid out in different order on the ironing board. They should lie tight enough to each other so that there are no gaps. After that, adhesive fabric is applied to the blank, and baking paper is also placed on top.
Then everything needs to be ironed carefully at a very high temperature. This is necessary so that the adhesive base captures all the scraps well. To make the fabric more durable and reliable, it should be sewn on the machine with a transverse stitch every 1.5 cm.
 This creates a unique fabric base that can be used for kitchen crafts, for example, creating unusual tacks or coasters for hot
 This creates a unique fabric base that can be used for kitchen crafts, for example, creating unusual tacks or coasters for hot. The same fabric can be used to make interesting handbags for girls or purses.
There can be many options for use, so do not rush to part with scraps, which may seem completely useless at first glance.
 Any fabric is a real find for those who like to create beauty with their own hands.
 Any fabric is a real find for those who like to create beauty with their own hands, from it you can make crafts of any complexity and for any occasion.
For example, by the New Year's Eve you can sew interesting toys for the Christmas tree, and by February 23, give dad a postcard with a felt tank. Even a preschooler will cope with such products.
At all times, the housewives-needlewomen carefully collected colorful patches, because they knew for sure that it was possible to sew original interior items from this material.
Moreover, patchwork is very entertaining. There is a whole science about how to properly assemble a mosaic from pieces of fabric. This patchwork technique is called. How to make DIY crafts from scraps.
Selection and preparation of material for work
It is worth noting that the new fabric must be washed, starched and ironed so that the material does not fade and does not significantly shrink. Cotton fabric is best for patchwork. It is simple and convenient to iron, cut, sew. Cotton is wear-resistant, suitable for the manufacture of various bedding, kitchen products.
Silk is also very well suited for creativity, only its features must be taken into account. Silk fabrics are more loose, less durable and not suitable for kitchen products, as they have contact with hot dishes. But they are bright, shiny and smooth, so they are useful for decoration.
 Before starting work on crafts from scraps of fabric with your own hands, you need to sort out your stocks. The material must be chosen the same in thickness. However, a mosaic of pieces of different textures will look spectacular. As for the color scheme and pattern, here you can fantasize as much as you like. Of course, threads are needed for needlework. Suitable thicknesses for sewing particular fabrics should be selected. On sale you can find various threads:
- for embroidery;
- sewing;
- weaving;
- darn;
- weaving;
- knitting.
For patchwork use sewing threads (manual and sewing machine). Thickness depends on what fabric the craftswoman works with.
Also need needles. The thickness of the needle is numbered (0 to 12). For patchwork, it is advisable to have a whole set, since there may be different materials. But the most popular needle is No. 3. As a rule, it is used for cotton products.
Scissors must be of several types (small, medium and long). Additional tools: pins, rulers, felt-tip pens, crayons, and cushioning accessories: synthetic winterizer, batting, foam rubber. As materials for decoration, you can use lace, ruffles, ribbons, etc.
If it is difficult to choose a material of the same texture and thickness, then it is possible to lay a cushioning fabric under thinner fabrics. By the way, ready-made products from flaps of different textures look very interesting.
Another original version of patchwork needlework is the manufacture of knitted squares. From the remains of multi-colored yarn, squares are knitted with knitting needles or crochet, which are crocheted or sewn together, getting nice knitted blankets, blankets, rugs.
Crafts in the patchwork technique
In the patchwork technique, you can do almost anything. Plaids, potholders, capes for chairs, rugs and even bags are sewn by craftsmen from rags.
Back in school, at home economics lessons, girls were told that they could sew with their own hands from pieces of cloth. True, then it was most often suggested to limit oneself to tacks. Here is a far from complete list of what a craftswoman can do:
- Funny pillowcase in a folk style.
- Patchwork style quilt.
- Curtains.
- Apron.
- Toys
Basic rules for sewing curtains
Curtains from patches look original and stylish. However, their creation is a very time-consuming process.
 Before you begin, you need to select a pattern and draw its outline. It can be different and consist of elements of various sizes. For such products, you need to take large pieces of matter, because it is easier to deal with them, because to connect small pieces you need to make a lot of seams, this gives the finished product more weight.
The pattern must be made of thick paper without allowances for seams. Details are best numbered. Finished pieces are applied on the reverse side of the material, circled, give allowances of approximately 0.5 - 1.0 cm. Parts are wiped inside out, then stitched on a typewriter. Patchwork curtains are usually made with a lining so that it closes the seams.
Patchwork Patch
To make a useful little thing for the kitchen with your own hands, you need to take the remnants of cotton material, plain fabric, non-woven fabric, tape and be patient. Next, do the work in the following sequence:

That's the finished product. If everything worked out, you can start sewing more complex and voluminous things. For example, you can sew a pillowcase.
Attention, only TODAY!