Stylish accessories of bohemian 30s of the last century with their elegance and luxury under the beautiful name “vintage” are rapidly returning to fashion.
I propose to make a beautiful accessory - a velvet in the vintage style, which will perfectly suit both the modern look and will be appropriate at themed evenings.
So, for work we need:
- half a meter of satin ribbon, 1 - 1.5 cm wide;
- silicone glue;
- needle with thread in the color of the tape;
- scissors;
- a piece of lace fabric (10x10 cm will be quite enough);
- piece pebble or a large decorative bead of oblate shape;
- standard clasps for jewelry.
Important! Do not take a tape more than 2 cm wide, it will look rough and visually shorten the neck.
DIY handmade velvet fabric
Step 1. We measure the length of the future velvet with a centimeter tape: neck circumference minus 5 cm for the fastener. I got about 28 cm.
Step 2 Now cut off the necessary length of our tape, overcast the edges so that the edges of the tape do not peel off and sew on both sides of the fastener. The edges of the tape can be carefully melted with a lighter, and then tucked in - so you will avoid strings that may break out of the tape during wear. You can choose any fasteners that are convenient for you, although, perhaps, the system on hooks will often be unfastened, it is more reliable to take a fastener made as a “lock”.
Step 3So we come to the most creative part of the work. We take the selected stone (it should not be heavy), we put it in the center of the lace fabric face down. We retreat from the stone around the entire perimeter of 5 - 7 mm, cut off the rest of the fabric. Using a needle, carefully collect the fabric around the perimeter of the stone and tighten in the center.
Step 4 There is a finished tape, there is a lace pebble, but something else is missing, is not it? It is here that the remnants of the tape come in handy, because we used only +/- 30 cm out of 50, remember? The remaining length is just enough to make. You can make a bow more magnificent, or you can just make a hint of a bow, as I did. So, we sew a bow in the center of our ribbon - the basis for velvet.

 It remains only to complete the composition with an exquisite lace pebble. Glue it on top of the bow, using silicone glue. Retro style velvet is ready.
Velvet is an elegant women's accessory that is worn around the neck. It is a velvet ribbon or ribbon decorated with a medallion, rhinestones, pendant or other decor. The product is tied at the back with an intriguing bow. Today, a stylish velvet is an original jewelry for a woman who, in addition to precious metal products, also appreciates unique crafts.
History of Velvet
The appearance of this product dates back to the 18th century. Queen of England Alexandra, wanting to draw the attention of others to a thin snow-white neck, wore a black velvet ribbon. The court ladies appreciated the original accessory, which can advantageously emphasize the grace of the neck of its owner. French women preferred to wear velvet from beads and velvet. Decorations made of lace were considered more elegant then. A refined accessory is sometimes supplemented with a medallion or a fashionable pendant. If previously it was exclusively black, now you can purchase or sew on your own velvet of any color, depending on the chosen style and individual preferences.
Pre-Measurement
The velvet fabric is intended to fit around the neck. We measure the circumference of the neck with accuracy, then mark the necessary segment on the selected material. In addition, add free fifteen centimeters so that the accessory can be tied with a bow at the back.


Making velvet
A velvet, sewn from a ribbon, looks feminine and elegant. As an original and delicate addition to the decoration, we take lace and sew it on a ribbon. In addition to lace, organza is successfully used as an original addition. To make the organza ribbon more voluminous, stitch it, and then pull the thread. Next, we sew it to the velvet. If desired, we immediately sew an accessory from lace ribbon. To create the effect of volume, we harmonize the lace with an accordion.


Decor for velvet
First, we mark the middle of the product, determining the place for attaching the selected decoration. It can be a delicate artificial flower, a stylish medallion, jewelry, an exquisite pendant, weaving from beads, rhinestones or a bow. We place the selected element in the center of the velvet fabric, sew it firmly and gently.


How to wear an accessory
The velvet looks advantageous in tandem with a dress with a deep neckline. In this case, the decoration will add grace and glamor to the image. It is advisable not to combine earrings with massive velvet. A set of velvet and earrings in the same style will look stylish. The ideal option is when exactly the jewelry on the neck dominates and attracts more attention, since several catchy jewelry looks vulgar. A velvet with a short or high hairstyle - a haircut and clean hair looks better.


Fashion for jewelry is constantly changing, velvet during its existence has repeatedly gone out of fashion, now again became the highlight of the season. The specificity of jewelry lies in the existence of an individual meaning, riddle, they are a part of the owner’s personality, a manifestation of his personality. Using our instructions, you can quickly and effortlessly sew your own unique accessory!
From the history of velvet
Many people think that velvet is just a ribbon on the neck, but this, of course, is not so. It is faster than a ribbon-based necklace. The tape itself must not necessarily be velvet. The tradition of walking velvet came from ordinary centuries, when the neck of a charming woman without thinking of high-value necklaces could be decorated with a beautiful ribbon with a medallion, a rose or an expensive stone. Behind the velvet fabric is bound with a flirty bow. The British tsarina Alexandra, following the desire to call attention to her white-boiled neck, lifted the habit on a sweeping tarry velvet ribbon. Such a device great meaningfully emphasized the beauty of the ruler. Quickly after which the velvet took on the delicate female necks of the court aristocrats.
During the pouring hours, velvet is a Gothic device.
How to make velvet with close paws?
The velvet fleece should tightly contain the neck; therefore, it is necessary to patiently measure the neighborhood on the neck and mark it on the tape. In addition, it is necessary to outline a wide 15 cm so that the velvet can be tied with a bow. As a perfect addition to velvet, it is imperative to take hold of the lace and sew it on the tape. Also, velvet can be sewn immediately from a patterned tape. In this case, the lace can be laid harmonica to fulfill the result of the volume. In addition to decoration in the manufacture of velvet, organza can be used as an addition. So that a ribbon of organza starts large, it should be sewn, and then winded by the thread. In such a state, it can be sewn to velvet.
It is imperative to highlight the middle of the velvet: a unique decoration is attached to this place. This can be fake flowers, a bow, a medallion, a thin pendant, a large pendant, rhinestones, beads, etc. .. To the sample, prone unnatural flowers must be placed in the center of a velvet fabric and neatly killed. An inclined velvet can be ruffled with an always-on dress, which has a stylish neckline. If the velvet has turned out to be extremely healthy, then the earrings can not be raised, so as not to overload the type. Or you can try to squeeze a set of velvet + earrings in the same style. But it is necessary to store in the skull that the neck piece should be soloed in a mass ensemble. In our days, velvet is known only among lovers of vintage jewelry, representatives of civilization. Those girls who just want to emphasize their personal peculiarity also love to walk her.
In contact with
Classmates
How to make velvet on your neck with your own hands
Velvet is a piece of jewelry on the neck that contains it tightly. Usually marigolds are made from a material of dim color, but there are exceptions. For sewing the most average velvet, the clock does not fit well, but the thing worked by close handwriting will walk much nicer.
The question "how to make a choker on the neck with your own hands" is asked by real fashionistas. After all, this jewelry, emphasizing the beauty of the female neck, is unlikely to ever go out of fashion. This article will describe in detail the manufacturing procedure for tattoo chokers, metal chokers, wire, beads, ribbons and velvet.


A bit of history
Choker first appeared in Europe in the Victorian era. However, he entered a special favorite during the time of the Queen of England, Alexandra, who tried using a pearl necklace and dark velvet to hide a small scar on her neck. Such an ornament, emphasizing the whiteness of delicate female skin, undoubtedly pleased the then fashionistas. So, with the light hand of Alexandra, the chokers have now firmly established themselves not only in Europe but also in the USA.


In the 20th century, Coco Chanel gave a second wind to this jewelry. The chokers from her collection were made not only from velvet, but also from leather or silk ribbons and were trimmed with a tablet (insert) made of precious metals.
Today, choker necklaces are firmly settled not only on the catwalks, but also in the wardrobes of many modern women. For example, Princess Diana preferred pearl chokers with inserts of large gemstones. The images of Matilda from Luke Besson’s film “Leon” or Angelina Jolie from “Tourist” cannot be imagined without a black ribbon choker tightly fitting to the neck.
Advice! This necklace can be worn with almost any clothing. So, couturier John Galliano considers chokers to be a universal decoration, which is quite combined with both jeans and an evening outfit.
Types of Chokers
All chokers can be divided into main groups:
- men's: have a minimum of details and jewelry;
- tattoo chokers: they are made by weaving from elastic threads or woods of any color, are stretchable, perfectly adhere to the skin and outwardly are little distinguishable from the pattern on the skin; can be complemented with small jewelry: beads, rhinestones, etc .;


- chokers on a lace, ribbon or chain with or without pendant;
- jewelry woven from wire: unlike tattoo chokers, they are made more voluminous, have more jewelry (beads, beads, stones, chains or rhinestones);
- chokers made of beads or beads;
- leather trimmed with buckles or metal jewelry;
- performed in the form of a small metal rim of wire or precious metal;
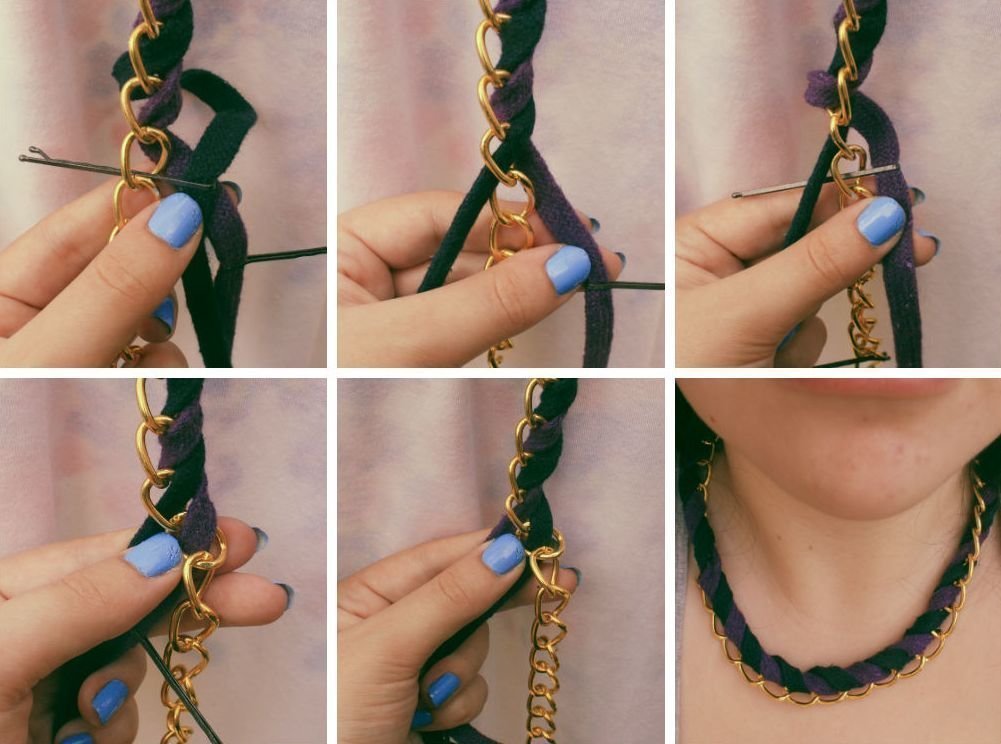
- made in the form of a wide collar of velvet, lace, wool or metal stripes;
- knitted from yarn products: soft and comfortable, are not only decoration, but also serve as protection from the cold.


Advice! Choker should be the main highlight of the image. Do not supplement it with an excessive amount of other jewelry.
Materials used
Today, chokers need not be jewelry. For their manufacture and decoration, wood, leather, metal, bone, stone, plastic, beads, beads, rhinestones, pieces of fur, mouline thread, lace, fabric, including velvet, etc. are used.


The technology of weaving chokers is simple, so even an exquisite elegant decoration can be made by yourself. They can be performed in one or several tiers of any width - to be thin and miniature, or to have the form of a fairly wide strip, encircling the neck. Ornaments can be strung on wire, fishing line, spandex (elastic thread made of polyurethane), elastic bands.
Advice! Too wide a choker will visually shorten the neck. To prevent this from happening, be sure to choose a blouse or dress with a sufficiently long neckline for this jewelry.
Tattoo Choker
Created from an elastic material (thread or spandex fishing line), the necklace snugly attached to the skin externally really resembles a tattoo applied to the skin. That is why this jewelry got its name.
To create such a choker we need:
- fishing line or elastic thread for weaving 2.5 m long;
- beads for decoration (optional);
- lighter.


To begin with, the fishing line or thread should be bent in half and fixed on a board or book using a stationery clip. Then we begin to knit a necklace, making alternately the usual knots alternately left and right threads. If desired, beads are periodically strung on the threads in the right places.
When the length of the choker is sufficient and equal to 35–40 cm, excess threads are cut off. To make the simplest clip-fastener on one side of the jewelry, they are fused together in a ring with a lighter.

Advice! From the same material, you can make a whole set consisting of a choker, bracelet and a pair of elegant rings.
Accessory from old headphones
For the manufacture of a tattoo choker, it is quite possible to use a long wire 1 mm thick from a charger or headphones. To get a quality necklace, do not use only too worn and scratched headphones. A choker made of flat wires will also look unattractive - for its manufacture it is better to use round ones.


The most difficult step is the manufacture of the fastener:
- the simplest option for her is to leave the ends of the threads to tie them on a bow or knot, however, this method is suitable only for owners of long hair; in the presence of a short haircut, protruding wires will be striking;
- you can also make the fastener by twisting the wires, for this they are cleaned from the winding and tightly intertwined so that there are no small ends left, they can catch on clothes;
- you can make it from a microphone; To do this, at the ends of the wires are tied into knots that are inserted into the microphone and snap into place.
If desired, such an ornament can be painted with colored or metallic paint from a spray can. Doing this before weaving is not worth it - in the process, it can be erased.


Advice! An interesting version of the necklace can be obtained from two wires of different colors, for example, black and pink or white.
Metal choker
This original piece of jewelry matches perfectly with jeans or leather clothes. For its manufacture, you can use a sufficiently strong decorative wire that can hold its shape, metal plates for decoration with holes made in them, or wire rings, rivets, beads, etc.


Very extravagant look jewelry in the form of a plate, open necklaces of irregular shape with stones or balls at the end or twisted jewelry made of metal.
Advice!Massive metal products are able to visually shorten the neck. Full women with a small neck should better refuse them.
Ribbon Collar
For this type of decoration you need to take:
- satin or velvet ribbon, its length should be selected with a margin for hem;
- ring for attaching jewelry;
- pendant or coins with a hole made in them;
- clasp (carabiner) for jewelry;
- glue;
- scissors.


The pendant or coins are threaded into a small ring that is attached to the ribbon. To fix the decoration, it can be gently pressed with pliers or fixed with a drop of glue. At the last stage of work, the ends of the tape are bent, a fastener is inserted into them, and then the tape is sewn.
Advice! You can fix such a choker on the neck with a small bow. To do this, the tape must be purchased with a small margin.
Velvet or fabric choker
Women have long noticed that a dark velvet dressing can emphasize the whiteness and tenderness of the skin. To make this aristocratic decoration you will need:
- a velvet strip of the required width of about 50 cm long;
- pendant, medallion, brooch or other jewelry for use as a pendant;
- iron;
- sewing machine;
- threads
- scissors;
- clasp.


The principle of manufacturing such a velvet fabric is similar to the previous one. The only difference is that the fabric does not scrub and lie evenly enough, it must be sewn in half. To do this, cut out a strip of the desired size, bend it in half outward, iron it, sew it, and then turn it so that the seam is inside the choker. A clasp is attached to the ends of the jewelry.
Advice!Velvet blends perfectly with lace. You can decorate such a necklace with a flower made of felt or finishing braid and thin chains in tone.
Stylish tattoo decoration can be made from beads. It is better for beginners to choose the simplest weaving pattern.

You can make such a choker from both large and small beads:
- before starting work, the fishing line is attached to the ear of the castle;
- two needles are threaded on each side of the thread;
- beads are put on a fishing line with a needle according to the selected pattern;
- each bead is tightened with a knot using a second thread, which is also first passed through the hole; thus, the beads are supported on two sides by two nodes;
- after completion of work, the thread is tied in the eye of the carabiner lock;
- if necessary, the second row of the choker is knitted, after inserting the last bead, the thread is again fixed in the carabiner.
Advice!You can decorate such a choker with the help of pendants. Bead strands can also be wrapped in bundles, thus forming a more complex necklace.
 We will need a piece of unnecessary jeans.
 This technique is based on weaving lace paintings with knots. The main elements of the pattern are rings and arcs. The technique is somewhat similar to the method of crocheting. The difference is only in the method of threading the threads through the nodules.
The simplest method is to tie ready-made rings or arcs of plastic or metal using two nodes - direct and reverse. Anyone familiar with the tatting technique more closely can use more sophisticated weaving methods.
The necklace can be supplemented with earrings woven using the tatting technique and graceful openwork rings made to match the main item. You can decorate them with a fringe with beads.
Advice!When choosing a choker, you should carefully consider the whole image. The elegant necklace in combination with heavy, massive bracelets looks absolutely ridiculous. Wide chokers next to elegant weightless brooches and earrings do not look the best way.
What to wear?
There are only two limitations to wearing this jewelry:
This necklace is designed to emphasize the beauty and shape of the neck, so when you wear it, it must be open, the V-neckline in this case will be the most successful
- This necklace is designed to emphasize the beauty and shape of the neck, so when wearing it, it must be open, the V-neckline in this case will be the most successful; the deeper such a neckline, the more weightless and elegant the decoration will seem;
- With everyday clothes - T-shirt, checkered a shirt - a simple decoration that is not burdened with an excessive number of details will ideally combine. Lovers of suede or leather clothes, as well as products made from coarse linen, can choose chokers made of chains, stones or shells as decoration. For jeans and the same blouse, an elegant choker of lace or satin or a product with an abundance of chains and staves in the style of “punk” or “rock” will suit.
- It is better to emphasize the femininity of an elegant dress or blouse with a choker made of fabric, beads or pearls with a contrast pendant or a tablet insert made of natural or artificial stones. A little black dress Femininity of an elegant dress or blouse is better emphasized with a choker made of fabric, beads or pearls with a contrast pendant or an insert-tablet made of natural or artificial stones


Advice! The choker should be the only decoration on the neck. The one exception is the long metal chains that go well with such a shortened necklace.
One of the criteria of female beauty is an elegant and long neck. For many peoples, it is she who is the standard of femininity. The neck requires a certain attention, and, of course, jewelry! It will be about the oldest, but still trendy decoration - a choker. You will learn how to make a choker with your own hands on the neck from improvised means.
When translated from English, “choker” means “strangler”. This is a short necklace, its length is 35-40 cm, when worn, it is located at the base of the neck and is regulated by girth. The choker is also called the "standing collar."
If you have a short or wide neck, then a choker necklace is not the best option for you, because visually this jewelry makes the neck even wider and shorter. In this case, it is better to give preference to thin chokers and not very contrasting colors to the skin. Chokers with long elements will visually make your neck longer, such as a lace choker.
Very often, a choker is confused with another type of necklace - collar. Collard is also a short necklace, but slightly shorter than the choker (30-35 cm), it fits snugly to the neck. Visually, the collar creates a transverse division of the neck, very often consists of several rows of beads or pearls.

History of occurrence
There are many versions of the appearance of this decoration. According to one of them, even the Indians wore items made of straps, beads and animal claws on their necks. They believed in the mystical defensive power of these jewelry.
Europe also conquered this accessory. So, French women of the 16-18th centuries also preferred chokers, they were worn by both ladies from high society and the courtesan. Wearing a red ribbon around their neck, women expressed their grief to those who died during the revolution.
In the 19th century, the English princess Alexandra of Wales hid a scar on her neck using a choker. Imitating the princess, many ladies of that century began to wear such jewelry.

Queen Elizabeth I of England also adored this piece of jewelry.

Princess Diana also loved this pearl accessory and more.

The inimitable Coco Channel preferred choker necklaces in their collections. Her jewelry was a ribbon of velvet, leather, silk and pearls. The innovation was a tablet - insert.

In the 90s, the choker often expressed belonging to a certain subculture (punks, rockers, hippies).

The fashion trend of "chokeromania" has survived to this day. You can make a choker with your own hands with minimal time, effort and money! The materials from which you can make a choker are simply amazing in their variety.

What will be needed to make a choker necklace?
Materials
Materials for making a choker can be different: leather, suede, velvet, lace, wires, threads, ribbons, cords and much more. All of them can be used both for the manufacture of the base of the choker, and for fixing the pendants.
The basis for weaving chokers from beads and beads can also be different.
Bead Fishing Line (nylon). Products on the fishing line are more “tough”, that is, they keep their shape, in contrast to products on the thread. The disadvantage of fishing line is its property of deformation, that is, it is better to store products from it in a straightened form, or to use a “braid” fishing line. When weaving products from large beads, it is better to take the fishing line thicker, with a diameter of 0.2-0.25 mm.
Or gum (spandex), it comes in various diameters and colors. The heavier the beads used in weaving, the more durable the elastic should be.

Used in beadwork and bead making, but better in two additions.

(lanka) - a metal string coated with a polymer layer can be of different thicknesses, flexibility and different colors. It is very convenient when making jewelry from beads.

Wire soft, it can be of different diameters (0.3-04 mm is suitable for beadwork). From a wire with a diameter of 0.5 mm, you can make a frame for beads and stones.

(with memory effect), is sold in the form of springs and is characterized by high strength.

Hardware
- one of the types of fasteners for jewelry. Locks come in the form of a simple hook, and there are also carbines that are more reliable to use.

Used to fasten at the ends of the product. A lock is attached to the hole in the ear.

Needed to connect different elements. They can be solid (cast) and detachable.

- used to mask nodules.

With different sizes of links used to decorate and lengthen necklaces.

Decorative elements

In addition to all of the above, useful in work scissors, pliers (necessary to compress and unclench rings and other fittings), wire cutters (needed to bite off excess materials), as well as glue (Superglue or epoxy based glue will do).
Clasps and mounting methods
The choker must have not only a beautiful, but also a reliable fastener. In needlework and online stores offer various types of accessories for jewelry.
Let's consider how to fix some types of accessories on a product.
We fix the ends of the product with adhesive tape or tape, align the ends. Next, we put a clip on the end of the product, while hiding all the protruding elements, threads. Gently press the clamps on both sides with pliers and put the lock on the ears of the clamps.

The trailer can be fixed at the ends of the product with glue. At the same time, using rings and wire, you can insert natural stones into the middle of the choker.

Connect the ends of the jewelry using pieces of chain on which the lock will be attached. In this way, you can increase or decrease the length of your product.

You can do without accessories at all. The simplest thing is to make a loop of lace, which will hold the bead, thereby forming a lock.

Using the same principle, you can weave a buttonhole out of thread.

A lace choker will look much more interesting if its tips are metal.

We cut off two identical pieces of a metal tube with pliers. We put them on the tip of the wire or lace. We fix with a hammer at the ends and give the desired shape.

If you make a choker from threads, then you can weave such a neat loop.

To do this, we fold the four threads in half and fix. We begin to braid with one thread all the others according to the principle of tying knots in macram. Weave about 1 cm on one side and the other. Next, we continue weaving in any way you choose.
Bead Chokers
Beads are an indispensable material in needlework and, of course, in the manufacture of jewelry. Even one or several strands of beads strung on a fishing line will add uniqueness to your image. And if you weave a choker out of beads with your own hands, it will turn out even more interesting!

To do this, we will need two-color beads, fishing line, pliers, wire or finished rings, clasp and pendant. We collect 4 beads on the fishing line and form a “cross” from them. In a circle between each two beads, add one more, it should turn out a rhombus.

Similarly, make the following rhombus.

We continue to weave diamonds to the desired length. Such a choker may consist of one woven strip or 2 or more. To fix the strips between each other, insert between them rhombuses of beads in a contrasting color. The result was an openwork choker on the neck.
From beads, beads, glass beads, you can make chokers for everyday wear and for celebrations.


Experimenting with other colors, you can weave bright jewelry:

Visual scheme of weaving a "snake" tattoo-choker:
Using such a simple technique of weaving, you can make a whole set (rings, bracelet and tattoo necklace)
Applying imagination and sleight of hand, you can get a tattoo-choker in the form of flowers, interconnected by rings of wire. The product is best made from black fishing line, and its ends are thermally processed with a candle or a lighter.
You can beat the choker tattoo with beads, stringing it on a fishing line when weaving.
Choker tattoo can be of different colors. Beads and beads will make the usual black - bright. Decoration can be combined with other jewelry, competently combining the colors.
The highlight of the choker will give a small thematic pendant.
Lace chokers
Lace chokers are distinguished from all others by their refinement and sophistication. Depending on the color, their thickness and decorative ornaments on them, they will look great with all kinds of things in everyday life.
To make a lace choker with your own hands you will need only a piece of lace (about 30 cm per neck circumference) and accessories. Lace choker can be decorated with various decorative pendants.
Beads under pearls will help to make your choker more gentle and noble. They can simply be embroidered with lace, glued to them, or suspended using a soft wire. The lock on the choker can be replaced by an ordinary thin elastic band fixed in the middle. Lace stitches can be hidden under a satin ribbon at the ends of the product.
Narrow light chokers are a great option for summer light outfits. They can also be supplemented with a decorative stone pendant.
Wide light lace chokers are perfect for "going out" and will make your image more romantic, sequins will give this image an extra sparkle).
Black lace chokers are an irresistible decoration for the evening dress of any fashionista. Brooches can also be used to decorate a choker.
Decorating a black lace choker with beads and chains, you can make such a creative decoration. It can be worn both in everyday life and combined with an evening gown. If you focus on the central part of the choker, thereby lengthening it, it is better to wear such jewelry with a neckline.
Using metal ornaments, ribbons and lace, you can create such a small masterpiece!) At the same time, a thin satin ribbon connecting the edges of the choker will serve as a clasp.
If you don’t have the necessary accessories for the choker at hand, then a simple Chinese clasp can help you out, which you can also do with your own hands.
Black lace and pearls still look elegant.
The following master class will show us how to make a similar choker with your own hands:
A choker with a pendant-medallion carries the unusual charm of antiquity.
Satin ribbons are great material for creating chokers! Even a small thin black ribbon tied in the shape of a bow and decorated with a small pearl can be an ornament on your neck.
The simplest options for making a do-it-yourself choker from a tape demonstrate Afinka DIY in their master classes:
Such a voluminous bow secured with a satin ribbon will add piquancy to the image. Black color is best diluted with something bright, for example, such a bright red center.
A wide satin ribbon enhances the effect of the image of an attractive woman. Shades of red always attract attention.
Atlas in combination with multi-colored stones will make your image more interesting and sophisticated.
Ribbon chokers are very popular due to the simplicity of their manufacture and sophistication. To decorate them, brooches, beads, beads, rhinestones, etc. are also suitable. It is also not necessary to make a fastener, the ribbon can simply be tied behind.
Or make an elegant bow on the side, the long ends of which will hang beautifully in front. In this case, you can combine contrasting color tapes.
If you still have various decorative "little things" from a bag, a belt and clothes, then you can safely decorate a satin ribbon with them.
If you have a necklace lying around that no one has been wearing for a long time, then you can also make a choker out of it. Wrap the necklace with bright ribbons, and the jewelry can be made of thread in the form of fluffy tassels.
From beads of different sizes can get a voluminous choker.
A decoration from a simple checkered fabric will look very cute on a child’s neck. You can decorate it with bows and pendant in the form of strawberries.
Velvet Chokers
The velvet choker is a universal decoration and looks organically with almost all clothes, if you choose the right color scheme.
Based on the basic colors of your wardrobe, you can make chokers of various colors, as they say, "for all occasions in life."
You can decorate your own velvet choker with everything you can find at your fingertips: bows, beads, rings, decorative crosses.
The black velvet choker does not tolerate rivalry, so it is better to wear it on an open neck without any other jewelry, or with thin chains suitable for it in style.
Velvet is a material that in itself looks very impressive. Therefore, do not overload your product with various decorative ornaments.
Thread Chokers
No less original thread choker. Such an ornament will enliven any everyday look: be it jeans with a shirt or dress.
Olga Konovaltseva tells in her master class what materials and in what quantity is better to use when weaving a yarn choker:
From threads of pastel colors you can make a more relaxed version of a choker-braid. For ties we use a simple satin ribbon.
Beating our pigtail around the edge with beads, we get such an elegant choker. It can be worn with an evening dress, or simply with a white shirt.
By weaving the beads directly into the pigtail, one can make such variations of “modest” chokers. You can wear them one at a time or several at once. In their manufacture, you can use any thread and even bleached twine.
There are different options for weaving a choker with your own hands from threads. This is a great option for lovers.
You can decorate a choker of threads with various pendants, for example, in the form of a sun, or by attaching your amulet, a cross or any natural stone to it.
Using metal elements (rings, chains), you can get such a “rich” pigtail on the neck.
A pigtail can also be woven into a large metal chain.
Using a blank, a thick cord or an old necklace, you can make a bright choker by tightly wrapping it with threads of various colors.
Leather and suede chokers
Leather products and their substitutes always look stylish and spectacular, especially in jewelry. Such jewelry is mainly preferred by fans of casual style and military. To make a leather choker you don’t need any special skills.
A narrow strip of skin will further emphasize the slender neck of its owner. As a lock, you can use ties made of threads or a suede cord with “brooms” at the ends.
A laconic strip of brown suede perfectly complements the delicate look.
Using a metal ring, rivets and pink leather, you can create a trendy accessory.
A strip of leather, a chain, glue and accessories - all this in deft hands gives rise to a stylish decoration. It will look unusually good both with a dress and with leather things.
From a small piece of leather stitched along the contour on a typewriter, as well as metal rivets, you can create an author's jewelry. Be individual!
Shoelaces & Bead Chokers
Even a child can make a choker out of lace and beads with their own hands! But this fact does not deprive this product of its charm.
Such chokers can be interconnected, forming from the beads in its middle, for example, a triangle.
Shoelace chokers can simply be tied around the neck. Even from the laces you can weave a neat pigtail and tie the resulting choker on a bow!
As a decor for a choker, you can use a small piece of a large chain.
Decorative ornaments (rings, hearts, leaves, etc.) will make lace ornaments more interesting. Note that the laces can be used in various colors, and not just the usual black and brown. Red color always sets you apart from the crowd.
Braided cords can be used to create a choker, and together with beads you get such a creative decoration.
For inventive fashionistas - a choker from a small scarf!
A bright shawl tightly tied around the neck can radically change your entire look, as well as enhance all the necessary accents.
For girls who prefer calmer colors in casual wear, a combination of a neckerchief in unison with the color scheme of other clothes is a good option. For example, a pale blue striped shirt will complement a navy shawl.
A universal option for many: a white shirt and a bright or more restrained choker-scarf! A win-win!
A choker neckerchief is a truly fashionable accessory that will add charm and enhance the effect of any lady!
For those who want to always be original and stand out from the crowd, you can combine several chokers at the same time. For example, a choker of rhinestones and beads will perfectly complement the leather black lace.
Thin lace, selfish velvet, impudent lace and you are unique!
The choker is also a stylish accessory for men. He emphasizes the courageous and strong neck of its owner, thereby attracting the attention of girls.
The main difference between a man’s choker and a woman’s one is the small amount of detail in it.
Jewelry for men is not common, so the male half of humanity prefers to put on discreet models of chokers. Basically, such models are made of natural materials: leather, wood, rubber, magnets and natural stones, metal.
Create jewelry with your own hands and be stylish!
Headings


