Decorating your own garden plot is an activity that has become a favorite hobby for many. What ideas just do not find embodiment on six hundredths. After all, this is a great opportunity to show your creativity, sense of humor and surround yourself with objects that can deliver joy and aesthetic pleasure. Despite the abundance of crafts made of plastic and other artificial materials, wood and stones were and remain leaders in summer cottage art. These two materials look especially organically in any processing. We have already talked about how stones can be used in garden design, so today we will pay special attention to painting on stones with our own hands.
Choosing the right material is best done in the summer. And those who have already tried their hand at painting on stone, well know why. In the summer, many of us go to the sea, but choose not beautiful and alluring sandy beaches, but those places where there are pebbles. This is a real Klondike for artists. It is here right under our feet that material that we really need is literally lying around.
The advantage of sea pebbles is that it is so smooth that when working with it you can do without preliminary primer with PVA glue
The stones suitable for our venture are round or oval. Most often they are light, have a smooth surface and a flat base. If you come across an interesting instance, the form of which is not so simple, do not refuse it. It is enough to come up with an image that will correspond to this form, and will lie well on it.
The flat base of the stone allows it to occupy the most stable position on any surface. For a lawn, this quality is not so relevant, but if it is necessary to decorate smooth surfaces, then it will be in demand exactly the flat shape of the boulder. Armed with a creative approach, you can use other stones, for example, porous. Painted yellow, they will resemble pieces of cheese.
What if there are no stones needed?
If you had an idea, for example, to draw a lotus flower at different stages of its flowering, using cobblestones of different sizes, but there are no suitable stones, you can make them yourself.
To do this, you need to prepare a container (pot or basin) of the appropriate size, pour sand into it and wet it to keep its shape. Make a deepening in the sand of the shape that you would like to give to the future boulder. The recess must be lined with transparent polyethylene.
This stone made of cement fits perfectly into the surrounding landscape. They did not begin to decorate it, although it was not difficult to do it.
Mix the cement. If you want to get a stone of a certain color, you can add the appropriate pigment to the cement. Then you can put the resulting solution in polyethylene, and then tie the film. In whole economy, inside the stone can be made hollow.
It may make sense to pick the pebbles in size to use them to fold two wonderful snakes, but it’s much easier to make them yourself
Until the future stone is dry, its outer surface should be covered with sand 10-15 cm to avoid cracking. A large boulder is best done near its installation site. After the cement has completely dried, proceed to its painting.
Choosing the right paint
Brushes and paints are an important element of the work ahead. Undoubtedly, you have heard that acrylic paints are used to paint stones. Why acrylic? After all, there is also gouache, watercolor and oil paint.
Acrylic paints have many useful properties: they cover stones well, do not rinse with water, do not fade and tolerate a change in temperature
We prefer acrylic for the following reasons:
- these paints dry quickly and turn into an elastic coating that does not crack;
- acrylic lays well on the surface without slipping or absorbing;
- the colors of these paints are extraordinarily bright, they do not fade in the sun, do not become dull with time, and are not washed off by water;
- acrylic coating is non-toxic and odorless.
The elastic film that acrylic paints form on the surface of the stone after drying is strong enough, resistant to mechanical stress, does not respond to high humidity and temperature extremes, and does not dissolve in water.
Acrylic paints are produced by both foreign and domestic manufacturers. It is necessary to choose those that would suit us not only with high quality, but also at an affordable price.
Gamma paints are very suitable for the first work of beginners: they are inexpensive, but quite solid, and their ability to darken after drying just needs to be taken into account
Consider several options:
- Art acrylic of the Gamma brand (Russia). This is an inexpensive material that can be used by novice artists. Its feature is that the picture after drying becomes darker by a couple of shades.
- Glossy paints "Decola" (Russia). Due to their richness and brightness, they are perfect for the image of flowers and plants. The glossy surface allows the picture to look more spectacular, but creates unwanted glare that is not needed by animal images.
- The Russian products of Ladoga and Sonnet are an excellent example of a normal ratio of quality and price. Due to the increased adhesion, the paint of the Ladoga series is well fixed on the stone and can withstand the change of temperature conditions. Acrylic of both series becomes darker after drying. To create additional effects, you can successfully combine the use of matte paints "Ladoga" and "Sonnet" and glossy "Decola".
- Pebeo paints of joint production of France and China and creamy acrylic “Vivace” \u200b\u200bare materials of a higher level that are used by real artists, so you should look for them in art salons. They are not only easy to operate, but also do not change their shade after drying.
- “Maimeri” and “Plaid” paints are not so easy to find, and they cost more than the previous ones. It should be remembered that under these trademarks they also sell materials for work on glass, metal and plastic. We need those that say "for work on cement or stone." If the stone will subsequently be in the garden, then acrylic should be for outdoor use.
- American Plaid FolkArt products will likely have to be ordered online. The drawings she creates will never darken. In addition to a large palette of colors in this series there are mediums - the means by which you can create various special effects.
- The Polycolor series of Maimeri paints (Italy) have solid advantages. If you find them, and you are not afraid of the price, you will get every chance with their help to create something truly unique.
As you have already seen, there are many colors. Every artist from beginner to professional has the opportunity to choose what he likes.
Polycolor Italian paints make up a large series, which includes many different colors of excellent quality, durability and brightness
Which brushes work best?
If the paints are quite difficult to choose: you can just get confused in different names and buy, as a result, something is not right, then there should be no confusion with brushes. Usually they sell in sets of eight.
For stone painting, synthetic or nylon brushes are needed. The bristle products for this purpose will be too coarse, and natural materials, such as columns or squirrels, too fragile and soft.
If the brush becomes temporarily unnecessary during operation, it must be lowered into a glass of water so that it does not dry out
In the photograph, brushes are presented by numbers. Each brush from the set has its own purpose.
- No. 8 - is used to work on large boulders weighing more than 4-5 kg;
- No. 7 - for large stones. If you master the technique of one stroke, then this brush is useful to you for drawing flowers and leaves;
- No. 6 - useful for working with large stones, they can also draw leaves and flowers using the technique of a single brushstroke;
- No. 5 is a very convenient and quite universal brush, with it you can paint both large and small stones;
- No. 4 - an ideal brush for working with small stones;
- No. 3 - is used not only in work with small pebbles, but also for drawing details of drawings on large boulders;
- No. 2 - with its help they draw the smallest details of drawings - patterns, eyes, hair, hair and so on;
- No. 1 - necessary to create special effects, such as spot painting.
Now that we have stones, paints and brushes, and we know how to use them, it would seem that we can begin to do the work. But, a minute of attention, there is another point that needs to be clarified.
How to build a palette
One of the properties of acrylic that helps us in our work is its ability to dry quickly. But for beginning artists, this circumstance causes some difficulties. They have to draw faster than they can. In addition, you constantly have to add new paints, and this unnecessarily increases their consumption.
You can, of course, use special tools that slow down drying, but then the desired effect disappears, and creating drawings will be much more difficult.
As you can see, such a container is easy to find in any grocery store, so you should not have problems with the construction of the palette
Meanwhile, if the jar of paint is opened, and we begin to dip a brush into it, acrylic will quickly become a viscous, and then elastic, dense substance. Simply put, the paint dries and you have to throw out the whole jar. If you squeeze the paint on a regular palette, then its consumption will be huge, and that’s no good.
To work calmly, slowly and without spending extra paints and nerves, you need to make a special palette with your own hands. To do this, take:
- ordinary lidded plastic container;
- toilet paper or napkin;
- baking paper.
First, take a container of any size. Subsequently, when you already begin to draw regularly, you yourself will understand what size palette you need. The wider the container, the larger the color palette that you can use to paint the stones for your garden.
The small container that we chose is perfect if you need to paint small pebbles. At the bottom we put a piece of toilet paper or a paper towel. Tamp the paper lightly and fill it with water so that it is well saturated. The cloth should be wet, but not float in water.
In this homemade palette there are several drops of paint of different colors, which indicates a minimum consumption of material
Now you need to take the waxed paper and cut out from it a piece corresponding to the size of the bottom of the container. We put this paper on top of a wet towel. The work is completed, we have made the perfect palette for acrylic paints. Baking paper retains moisture and prevents paints from drying out. When closed, this palette can even be refrigerated if the painting process has to be interrupted.
Now it’s really time to start painting the stones.
Painting sequence
Stones should be prepared for work - rinse thoroughly with soap and dry. Then each stone must be primed with PVA glue and dried again. Now you can start applying the background. The color must be determined in advance, shake the paint well and apply it to the surface of the stone. After this, wait 15 minutes for the base layer to dry.
If it now seemed to you that you spend too much time while the stone dries, then this is not so: you can simultaneously prepare several more blanks
Before you make a drawing on a stone, make a sketch on paper, imagine how it will look ready-made. With a pencil, reproduce the drawing on the stone. Check again if all the details are well drawn. Subsequent coloring will be done in layers. Each element must be dried for 15 minutes. The contours of your painting are done with liquid paint.
It is best to dry the product on a battery. The finished product must be coated with a layer of protective varnish. He must also dry. After painting, you can put the finished stone in its place in the garden.
And look at the video - as they say, it’s better to see once:
What can be painted on the stone?
If you answer this question briefly, you can draw everything! Everything that you want and everything that tells you the imagination. But we still give some advice.
In addition to popular frogs, ladybugs, flowers, foliage and fish, you can draw a collection of emoticons. What they should be, you can always spy on the Internet.
You can draw on a stone not only representatives of wildlife or a fictional hero, but also such a beautiful abstraction
A great idea is to create a whole collection of characters in a fairy tale or a popular cartoon. These can be the heroes of “Repka”, located on boulders of different sizes from the largest, which will be Repka, to the small one, the Mouse. Smeshariki loved by everyone will look good on the playground.
Watch this video and we are sure you will get a lot of positive emotions and ideas:
Where is it better to use painted pebbles?
Now that we have figured out how to paint the stones that will be in the garden, we can begin to use them for their intended purpose. A variety of patterns can be applied to the stone. The scope of such a stone also depends on their content.
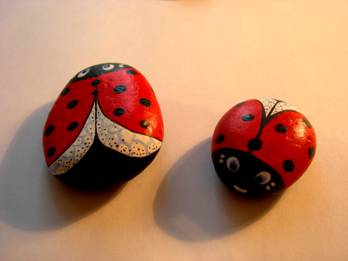
These wonderful animals painted on smooth stones look so natural and vibrant that they will become a real decoration of your lawn
Playing with the pebbles on which the numbers are drawn, the child will be able to easily and easily learn how to count without any special pressure from adults.
But such a simple and, at the same time, very original sign will unobtrusively invite your guests to take a walk in the garden
To arouse your own imagination, we are ready to offer you some examples:
- At the pond. Near the pond, you can place large boulders, drawing on them beautiful Japanese carps, frogs, lilies or water lilies against a background of green leaves and other living creatures living in the water.
- Paths. Narrow paths or paths can be paved not with simple medium-sized cobblestones, but with pebbles with painting on them.
- Area. If there is a need to divide the paved area into different zones, you can use stones painted in different colors. They can form colorful spirals, be arranged in zigzags or depict an ornament. They also do the same with curbs and lawns: they are simply covered with colored pebbles.
- Pointers. The idea to put a large boulder at the crossroads with directional inscriptions was born a long time ago. Even Ilya Muromets came across such a pebble. Why not revive this tradition on your site?
- Game Zone. On a smooth surface of a pebble, you can apply not only a pattern or drawing, but also letters, syllables, numbers, or just crosses and zeros. If you place such toys on the playground, the child will always have something to do.
- Sculptures and sculptural groups. Colored or painted pebbles look great in the form of pyramids. Between them they can be glued with special glue. From flat copies you can make a real "gingerbread house."
- Decoration of vertical surfaces. Pergolas and fences, utility rooms and barbecue can be decorated with beautiful painted pebbles.
All possible directions for the use of such crafts is difficult to describe. They will undoubtedly be prompted by your own imagination.
Many of those who were on vacation near the sea once brought with them bewitching smooth pebbles, carved over many years by sea waves. To be honest, it’s not entirely clear what attracts us to the shape and smoothness of the pebble surface, and only a few people think of making crafts out of stone. What crafts can be made and how can they be useful? In this article we will look at the methods of painting on stones, a master class on their creation may perhaps inspire you to new works.
Paints for painting
Art painting of stones can be done with gouache and acrylic paints. Moreover, acrylic paints are very good for stone, as they are bright and durable. For beginner artists, it is worth noting that acrylic paints require some care. Firstly, they cost more, they dry quickly, and secondly, you need to use synthetic brushes, since the substance in the paint corrodes the natural pile, do not leave it in the open air with the paint, otherwise the brushes will be difficult to wash.
Note! The working surface and clothes must be protected with some oilcloth or, in extreme cases, newspapers and paper.

Sometimes a primer is used to keep the paint even. Usually this is a solution of PVA glue with water, it is recommended to apply white paint before applying the primary colors, this will give brightness to the next layer of paint. But to make thin contours and lines, you can use special acrylic or permanent markers, as well as thick paints, which are used for the contour in stained glass painting.

Particular attention is paid to the colors of the contour in spot contour painting, which entices with its easy creation process and fun final work. Although when creating, it is still desirable to apply the background and primer. Stones in bright paintings can be used to decorate the interior. Juicy acrylics will give the impression of sweets in flowerpots that do not melt, or as an addition to flower pots.


Excellent pictures are obtained from pebbles. Small stones can be glued to building glue, and it will hold tight in the vertical form. The decorated stones gather like a puzzle in a beautiful panel. Photo below for examples:

In the absence of skills of experienced artists, you can use stencils or ordinary masking tape and a combination of your favorite colors. It is necessary to put layers in the sequence of their drying.


ladybugs
Use this type of craft in class for children. The technique of painting stones can be used at exhibitions of children's creativity, or as an exciting home game to create decorative pictures for the interior of a room.

Pebbles can be used both large and small pebbles. Consider a small step-by-step micron for creating "ladybugs" from stone with your own hands.
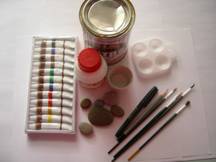
Step 1. Prepare the materials.
You will need stones that are best smooth and rounded, like real insects, PVA glue, pen, pencil, acrylic paints, synthetic and natural brushes, a palette.
To protect clothes, use an apron, make a workplace, laying with oilcloth or paper. Wash the stones with soap and dry.
Step 2. Using a solution of PVA glue and water in the calculation of 1: 1, apply the primer with a natural brush, let it dry. Then we paint with diluted water and white acrylic paint, this is done so that the applied background is brighter.

Step 3. Outline the lines of the wings and head. We paint with synthetic brushes the main details of the ladybug, wings and head. Let’s dry.

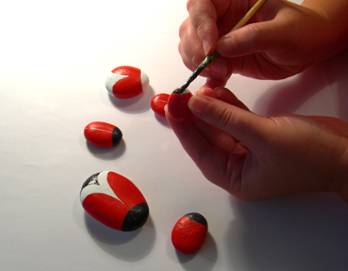

Step 4. Use a thin brush or markers to make circles on the back and eyes. At the end of the work, give your product a glossy sheen with furniture or decoupage lacquer.

For suburban areas
Large ordinary stones can also be found on the land, which can also be turned into fancy animal figures using acrylic paint and several layers of furniture good varnish.
Work on such a decorative product requires professional skills if you want to achieve a detailed picture. The stones must first be thoroughly washed and, after complete drying, apply the soil. And then the background color, you can apply paints intended for external work.

If it is difficult to draw animals, then you can resort to a schematic simple decoration of funny houses. A stone of any size will do. Now we need more paints and varnish. Better to take the good ones. Example in the photo below:


(20
ratings, average: 4,20
out of 5)

Smooth pebbles brought from the sunny sea coast or mountain river can be a unique decoration. With painted pebbles, you can decorate flower pots, flower beds in the garden, bookshelves, a nursery, etc. To a person who does not paint, the idea of \u200b\u200bpainting is complicated. But in fact, even small children can decorate pebbles with acrylic patterns. You just need to start with simple ideas, train and try new design options. And over time, you will definitely be able to create a real masterpiece on the stone.
Work stages
To make the creative process pleasant, it should be divided into several main stages.
- the choice of stones that are suitable for painting and applying the desired pattern or pattern;
- preparation of necessary materials (brushes, paints, napkins, etc.);
- preparation of the initial sketch of the drawing on paper (you can draw the same drawing several times to fill your hand);
- selection and preparation of the necessary shades of paints and sizes of the brush, testing the material on a draft;
- transferring the picture to the “clean”;
- fixing illustration or pattern with a special tool.
If you follow the sequence of steps, then the likelihood of drawing material with crooked drawings is reduced, and you will have many beautiful, bright stones, ready to decorate the garden or flower bed.
Stone selection


Ideal for creativity large sea stones. They are smooth and flat, the colors lie on them evenly. If desired, you can draw on any stone, even on a piece of granite. The main thing is to combine the roughness and bends of the stone with an artistic idea.
Perhaps the shape of one stone resembles an owl, and it lacks a nose and feathers. Another pebble is very similar to a purring kitten, the third is like a ladybug. It is important to give free rein to your imagination, not to turn off the voice of your inner child and come up with your own, unique drawings and patterns.
Color selection
 The most suitable for this type of decor paints - acrylic. Firstly, they do not have a pungent, unpleasant odor and are suitable for joint activities with children. Secondly, acrylic paints dry quickly. And thirdly, they are quite resistant.
In addition, pebbles can be painted with gouache, watercolors, compositions for painting ceramics and utensils, acrylic blanks, wax crayons, paints for glass and stained-glass windows, etc.
Please note that paint is not the only material for covering cobblestones. After a pattern or illustration is applied, the pattern must be fixed. Especially if later these stones will be used as a landscape gardening decor. For greater effect, it is recommended previously. cover stones with special primer. If there is no primer, you can mix acrylic white paint and PVA glue. Only after absorption and complete drying of the material can acrylic paints be applied. Finish the job with varnish.
Gallery: painting on stones (25 photos)


If a person has artistic experience, then you can create a real masterpiece on a small pebble. It’s a little more difficult if there are no such skills, but I want to immediately get a complex picture. It’s better for beginners to start with simple patterns and design options.
Popular painting options
Some of the most popular ideas. stone painting for beginners, which are easy to portray, but they always look beautiful and stylish:
- Berries The brightest and easiest to draw is strawberries. You can draw a small wicker basket on the flowerbed and decorate it with non-spoiling juicy pebble berries.
- Ornaments, folk and geometric patterns. Since ancient times, our ancestors decorated household items with various patterns. Some images were symbolic, others were a flight of fantasy. And always such drawings looked advantageous. Today, ethnic style is very popular, and even a child can depict a geometric ornament on a stone. Such cobblestones can not only decorate flowerbeds, but also design a dining table, use for photo shoots or interior decor.
- Bitmap. It can be a geometric pattern, flower or plant.
- Mandalas. Another option is to turn a small pebble into an object of "cult" and decor. Modern man is increasingly drawn to unidentified, filled with meanings and hidden symbols, objects. In addition, drawing mandalas is a kind of therapy that helps a person to relax and rest.
- Coloring and turning stones into insects, animals, fish. Drawing animals, birds, and fish is harder than patterns. But some beetles and mammals can be depicted without even having artistic practice. For example, paint stones under "ladybugs", turtles, fish or a worm.
- Houses for elves, gnomes and other fairy creatures: the cobblestone, which has turned into a fairy house, will look advantageous not only in the children's corner of the garden, but also in the flowerbed, in the garden itself or near the gate. It’s easy to draw a fairy house. First you need to find a sample in a network or a book, make a sketch, if necessary, practice on paper, then transfer the drawing to a stone.
- For a children's game. Here you can engage in creativity both with your child and prepare such surprises for your kids yourself.
Use in landscape design
 Painted stones - actually a universal decor. Much depends on the type and size of the stones, the picture they depicted, and the place where decoration or decoration is planned. For example, in a serious office made in the classical style, an island on a table with stones decorated with children's drawings or gnomes will look ridiculous. At the same time, if in such a room do stone decoron which some symbols, ornaments or mandalas are drawn, that is, it is likely that the element will fit into the general interior.
When designing a garden, it should be borne in mind that a more elegant composition of painted stones looks in small grass. In order not to get too clumsy, you can use painted and clean elements in one composition. Fairy houses, pebbles with plants or animals look better on a flower bed, terrace or in a house.
How else can you paint pebbles with acrylic? We draw on the stones:
- For blogging on social networks. Now there are a lot of blogs that can be read on the Internet. These are people who write about the latest in cosmetics, clothing, parenting, psychology and food. Often, in order to please their subscribers and attract new ones, bloggers need beautiful, stylish photos. And painted stones with unusual patterns are a good option. They can be used both for subject shooting, and for conducting online or offline master classes.
- Pebbles with painted houses or patterns will fit into the design of the festive table.
- Using painted stones for advertising subject shooting.
- To design a children's playground;
- For corrective and educational activities with children.
Painted stones for the development and education of children
 A small painted pebbles can be turned into a real manual on the early development of the child. For instance, for the little ones You can make pebbles with the image of fearless beetles, cars or fish. The kid will use this painted pebble to play in the sandbox or grass. It is important that the stones are not too small, so that the child does not take them in the mouth.
From pebbles of equal size, you can make a mosaic or designer. For example, on one draw a muzzle of a bunny, on the other - a tummy, on the third - a left foot, etc. And show that if you put these stones in the correct sequence side by side, a drawing of a bunny comes out.
Another option - toys for the story game. For example, to paint pebbles with houses, cars, etc. And make your city in the sandbox, with its own rules and laws. In this case, the child will breathe fresh air, develop imagination, fine motor skills, speech.
To train the score or study the letters, you can depict the numbers or alphabet of any language on the stones. You can write whole words and eventually begin to make sentences out of them. You can draw vegetables or fruits to study and solve simple math problems.
And also it is possible to make board games for the street from the painted pebbles. For example, peculiar crosses and toe.
Even herself coloring stones with eco-friendly paints in the fresh air is a wonderful educational activity.
Pebbles with drawings - This is an amazing guide for preschoolers, which will appeal to both children and adults. Especially if parents will make this beauty together with the baby.
Master class on creating a pebble house

Step-by-step instructions on how to easily turn a gray cobblestone into a bright house:
- Choose a stone that visually looks like a house. It is important that this image is seen by the person who is going to draw. So the vision of images is very individual, and someone sees the desired shape in a circle, someone in a triangle, and someone in a stone with uneven edges.
- We ground the painted stones with a special primer or a mixture of white paint and PVA glue.
- Make a sketch with a simple pencil.
- We select the necessary materials: brushes and paints.
- We carefully paint each element of the house: separate windows, roof, walls. First we draw out large areas, then draw outlines and details.
- Let the paint dry.
- We fix the picture with a special varnish. For example, hairspray or for outdoor surfaces.
Workshop on the manufacture of artificial stones
If there is no way to bring beautiful blanks from the sea or mountain river, you do not need to be upset. Pebbles for garden decor can be made independently do it yourself.
- Pour a large amount of water into the container. You can take an unnecessary garden basin, bowl or bucket;
- Normal quarry or river sand is poured into the tank to the water level.
- Sand should absorb moisture as much as possible so that excess water does not stand on top.
- In the mass of sand, make a recess with your hands and gain this mass, forming the future cobblestone.
- A pre-prepared form must be covered with polyethylene;
- Fresh cement mortar is poured into the mold;
- A blank of sand is dipped in cement, then sprinkled with sand and allowed to harden the artificial stone. When the cobblestone dries, it can be painted like a regular sea stone.
Stylish painting on stones and workshops on coloring stones for every taste can be found on the net. But it should be remembered that the first time a complex drawing will not work. And to make a real masterpiece, you need to practice a little.
Good afternoon, our beloved readers! Today we will talk about how to draw on stones. This is not an ordinary way of drawing. More precisely, you can choose different methods for such drawing, but the surface for creating a picture in this case is not quite typical.
What stones should be chosen for drawings? What colors to paint? How to choose the necessary material? We are with you today and will find answers to all questions. So let's get started!
From childhood, parents, educators and teachers teach us what to draw on paper. And you remember yourself small! After all, I really wanted to draw on an unusual surface - on the walls, on the floor, and even on furniture. And for this we often got from parents. Today there are many types of unusual creation of “masterpieces”, and painting on stones is a great alternative for our children to paint on an unusual surface. In addition, this type of creation of drawings is a wonderful activity not only for children, but also for those adults who like to draw and admire how inanimate pebbles turn into living images: animals, plants, all kinds of edible vegetables, fruits, and other compositions.
You can do this all year round, at any time. In summer, in the country and the coast, in winter - in the apartment. And then this is a great solution for those parents who do not know what to do for kids in the hot time of the day. Try to master this type of creativity with the children, and you will see how much pleasure they will draw.
So, you decided to paint a few pebbles, and where to start do not know? Now we will deal with you in detail, what are these unusual crafts and how to do them?
Which stones to choose?
Best drawings are obtained on ordinary medium-sized pebble sea. They are quite flat, so the drawings are very beautiful. So, returning from a vacation at sea, do not forget to grab souvenirs in the form of beautiful sea pebbles.
But do not limit yourself to choosing only perfect flat stones. For such creativity, the stones that lie in your garden are well suited, you just need to take a closer look. If you look closely at the garden stones and dream a little, you can see how some pebbles resemble the outlines of animals or some kind of object. From such a cobblestone with unusual geometric shapes, you can create a unique masterpiece.
It is most convenient to work with light stones, of a non-porous structure, then the paint lays down fairly evenly, and the drawing is neat and clear.
How to make artificial stones?
If you don’t have a stone, and you want to learn how to draw, then you can buy pebbles of various shapes specially prepared for drawing in the shops for creativity. The selection is very wide. But it is much cheaper to make a stone of the size and shape you need yourself. What is needed for this?
- Prepare a container (basin or bucket).
- Pour a small amount of water.
- Pour sand into the container to the water level (excess water should not stand above the sand).
- Make a recess of the necessary shape in the sand.
- Cover the recess with transparent polyethylene.
- Knead a regular cement mortar and pour it into your mold (you can add pigment to the cement, which will give a background to your future stone).
- Cover the mold with polyethylene and fill it with sand on top (so that the stone does not crack).
- After the cement has dried, you can start drawing.
What paints to use?
The most popular paints for painting stones are:
- acrylic;
- gouache;
- watercolor;
- special compositions for painting ceramics.
All of these paints can be used to create your own craft, but it is best to use acrylic, as they have a number of significant advantages over the others:
- do not fade in the sun (unlike watercolors with gouache);
- dry quickly (about 15 minutes);
- have no smell, are not toxic (it is good to draw both on the street, and in the house);
- do not crack;
- very well withstand low and high temperatures;
- do not wash off with water;
- affordable (as opposed to special formulations).
We have figured out which colors to use best, but that's not all. In order for your masterpieces to live as long as possible, you must use a primer and varnish to fix the work before painting.

What can be painted on the stone?
Briefly answer this question, yes, anything! How much is enough of your imagination! But we still give you a couple of tips.
For beginner artists and children, simple patterns and flowers, simple insects are best suited. Start, for example, with daisies or a ladybug.
Here are examples of more complex drawings:
- ornaments and patterns;
- berries;
- animals;
- insects
- all kinds of flowers;
- fish;
- vegetables and fruits;
- houses
- elements for the game.
You can create a series of characters from your favorite cartoons and fairy tales, and then play with the kids. It will turn out very unusual and fun! Sketches can be found on the Internet or drawn by yourself. And remember that in order to paint on stones, you do not have to be an artist. Drawings can be any. The main thing is that you have time and desire.
Painting technique
Well, here we picked up a stone, paints and found a suitable pattern. How to start drawing? Let's see what processes need to be performed:
- Wash the stone in soapy water and dry thoroughly.
- Apply a coat of primer (you can use a mixture of PVA with white paint) and wait until it dries.
- Draw the outline with a special felt-tip pen or pencil.
- Color the background with a wide brush, and then draw small details with a thin one.
- Leave your masterpiece to dry for 15-20 minutes.
- For reliability, cover the pebbles with a layer of acrylic varnish.
Everything, your work is ready! Now you can decorate it with a garden or a house.
We have selected for you several workshops on painting stones, because it’s better to see once on the video than hear a hundred times:
Where can I use painted stones?
Now that we have already learned how to draw on stones, let's see how to beat painted stones and where they can be used.
- In the garden. It can be a decor for rock garden and other rocky garden compositions. On stones for giving and a garden images of animals will organically look: various insects (ladybugs and other bugs, butterflies), animals, etc., and also flowers.
You can also lay out paths in the garden not with simple cobblestones, but with painted ones.
If your garden is located in a fairly large area, you can make a large stone-pointer, for example, to show where you have a pond or how to get to the playground. - At the pond. Near your pond you can place large boulders and depict frogs, lilies and water lilies and other animals on them. It will be very original!
- Playground. Color the pebbles in the form of cartoon characters, fairy houses and place them in the play area. Your kids will be delighted! You can also draw the alphabet and numbers on pebbles - and combine business with pleasure. If you place such toys on the playground, the kids will always have something to do.
- Home decor. In the house, stones with the image of plant drawings feel great. For example, if you have no time to care for indoor flowers, but want to decorate window sills with something, depict a cactus that will replace you with a living flower.
- Sculptures. Create an unusual sculpture of painted pebbles in your garden. Between them they can be glued with special glue. It can be a fabulous house, a pyramid or some kind of animal.
Well, what did we give you the original ideas for creating painted stones, you just have to try. Fantasy more and create your own unique pebbles!
The stone was probably the first item that a person consciously picked up. People began to use it as a basis for creativity too a very long time ago. Painting on stones is very popular today, for example, in eastern countries.
It is considered good form to give a close friend a birthday stone decorated with an author's drawing. In addition, stones, like everything that surrounds a person, have their own energy. Not for nothing that each zodiac sign has its own stone, which protects from troubles.
But here we are talking about ordinary pebbles lying on the ground. Not every stone can become the basis for a picture. There are too porous stones that absorb all the paint, there are few pebbles with sharp edges. Therefore, for creativity, you need to select smooth stones with a dense texture.


- Since the material for work was literally lying under your feet, before starting the process, the selected stones should be thoroughly washed and dried.
- The field for creativity is very tiny, so the paint on the palette should be poured quite a bit.
- Acrylic paints dry very quickly, turning the brush into a hard scraper, so during painting, the brush should constantly return to a glass of water. For the same reason, when changing colors, the brush should be thoroughly washed and dried with napkins or a paper towel.
- Drawing on stone is a rather specific process. To avoid unpleasant surprises associated with paint getting on clothes, it is better to paint stones with your own hands in an old T-shirt and jeans, or wear a large apron that covers everything. Even a small drop of paint dried on trousers will immediately ruin the thing. You can, of course, try to wipe it fresh, armed with an old toothbrush, but it is better to exclude the appearance itself.
- The same goes for the whole workplace. A faithful assistant in protecting the table surface from meetings with paint and water is an old newspaper.
- But it’s easy to correct the mistake - the paint is easily erased from the surface of the stone if necessary, or painted over with a different color after drying.
Materials required for painting
Paints
It can be a watercolor set, jars with gouache or tubes with acrylic paint.
Each artist works in the manner that he likes, although painting on stones for beginners makes it possible to try their hand at all kinds. Experienced craftsmen still prefer to deal with acrylic paints. The whole palette of bright colors perfectly fits even on an uncoated surface. And if you use metallic acrylics, the pictures will get a nice soft shine.

After painting, pebbles or ceramics can become brighter and more brilliant. You can fix them by putting the painted stones in an ordinary oven for roasting. But even without this procedure, the pictures get a beautiful look.
Contours, felt-tip pens, pencils
In addition to paints, today there are a large number of tools in the form of contours and felt-tip pens, providing decoration of the painting with additional touches and details.

Flowers are applied by a volume contour
Few people can depict their plans without preparation. Even experienced artists first sketch the image. For this, special sketching pencils have been developed for dark and light stones, respectively white and black.
Brushes
Painting on stone is impossible without the presence of various types of brushes - from the largest, for coloring the background, to miniature ones that can leave subtle touches on the surface. A set of brushes can be purchased at the appropriate store.

Lacquer
The created miniature needs to be protected in order to enjoy it for many years. To do this, the stone is varnished. As an illustrative example - a painting on stones called "The owner of the forest" by Leonard Popov:

The lacquered stone has a characteristic beautiful shine.
Stone painting process
First, the issue with the primer is solved - whether to apply it or not.

Then the plot of the picture is determined. Not only imagination will tell his author, but also the shape, color, texture of the used pebbles.
Before work, the stones are thoroughly washed and dried.
On the primed surface (if such a decision was made), the background of the drawing is applied.
Future contours of the plot are drawn with a sketch pencil.

When filling fragments with paint, options are possible - first draw a contour with a brush, and then fill the drawing with paint. Or draw the whole picture in color, and then with a thin brush select the outline.


The hand can flinch and a professional artist. Any solvent will help to correct an uneven line or to erase an excess stain.


The last step in creating a stone masterpiece is to varnish the entire surface of the painted stone. Only in this case the image will be preserved in all its glory, even if the stones were intended for the garden, and not as a gift.

True, if the pattern occupies only a part of the pebble, then it is possible to preserve its natural appearance by lacquering only the painted area inside the contour.

After finishing work, the scope of application of colored pebbles is diverse. It can be a wonderful gift for close friends. A glass jug filled with colorful pebbles will decorate the interior design. Magnets glued to pebbles will allow you to create a unique composition on the refrigerator door. In general, there is no limit to the flight of creative thought.
A workshop on painting stones for beginners
To consolidate creative lessons, original stone painting is offered, a master class will help to cope with it without much difficulty.

To create a fun little family, stones of a certain shape and size will be required. The basis of the composition will serve as a large flat naked. In the role of big-eyed chicks will be elongated thin pebbles.
All stone “sticks” are carefully glued vertically to a flat base using any moisture-resistant glue.


