Hello to all!
Today I will show you how to make a wonderful room decor from twigs and balls of thread. Such decor is much cheaper than store decor, but in no way inferior to them in beauty.
We need:
- Fresh willow branches;
- The branches are thicker;
- Aerosol paint in a can;
- Acrylic paint;
- PVA glue;
- Thick threads;
- Balloons;
- Acrylic lacquer.
Step 1.
Step 2.
We paint our balls of threads with aerosol paint.

Step 3.
Then, you need to clean the willow twigs from the foliage.

Step 4.
When the foliage is cleaned, we collect the twigs into a bunch and, attaching one edge to a flat tube or stick (in this case, a mop was used), we fix the bunch with tape. Then we wind the rods in a spiral along the stick, periodically fixing them with tape. Let the twigs dry. It took me 3 days.


Step 5.
After working with willow branches, you need to clean the thicker branches from the bark. Then you can dry them in the same way.

Step 6.
The willow twigs have dried up and now you need to remove them from the stick, and then paint them with aerosol paint, since it will be very difficult and long to paint them with acrylic (here the color is the same as for balls made of threads).


Step 7.
Thick branches, also after drying, must be processed sandpaper and paint them acrylic paint, and after it dries, cover with acrylic varnish.


Step 8.
Now that everything is dry, we put our branches in a vase, nicely distributing them and put on the ends of the branches thicker balls of thread.

Now you're done! It turned out very delightful, in my opinion.
In every home where there are small children, the main task when decorating a Christmas tree is, first of all, its safety. These little rascals not only strive to remove all the shiny things from the branches, but also taste them, especially if the teeth are being cut. And here undeservedly forgotten retro jewelry can come to the aid of parents, in particular, christmas decorations made of wood. They do not fight, which eliminates the likelihood of injury from sharp fragments, and even if a child accidentally chews on such a toy, he will still not be able to bite through it and swallow the particles.
The shape and appearance of wooden products can be very diverse: from simple snowflakes made from twigs to figurines of animals and birds. It all depends only on the imagination and patience of adults who will be engaged in the creation of masterpieces, although older children can also be involved in the manufacture of simple models. While dad is engaged in cutting and assembly, mom and daughter or son will color the blanks.
So, what kind of Christmas tree decorations can you make with your own hands to decorate your Christmas tree and give it an original look? We offer a short selection of such jewelry.
We make delicate openwork balls from the vine with mom
 In the New Year's workshop, there is enough work for everyone. Mother needlewomen can easily cope with the simplest preparation of balls and weave them from willow twigs. Such toys do not even need to be additionally painted, the air structure of the balloons will only emphasize their weightlessness, but if there is a desire, toys can be gilded or painted in different colors. To hang a wooden Christmas ball, it is enough to tie a small thread or a satin ribbon to one of the sides.
The ball will be more accurate, and the vine will be easier to bend if, before weaving, the willow branches are first boiled for 30 minutes and the bark removed from them.
Balloons made from wooden twigs
 Another easy way making Christmas tree balls from wood will come in handy if there is nowhere to take the vine. It is quite possible to replace it with ordinary thin rods, cut or collected from any tree or shrub in a city or private garden. The toy is made in this way:
- First, a regular balloon is inflated.
- Then twigs are glued around it so that they are in contact with each other.
- After the glue dries, the ball is punched.
If the twigs are thick, it doesn't matter, they are easy to cut into two parts.
Wooden balls from semi-sphere blanks
 You can get very beautiful Christmas tree decorations made of wood if you ask your dad to make blanks in the form of two halves of a ball. They are put together and painted to your liking. However, it should be borne in mind that such balls will have much more weight than openwork ones, and the branches under them can bend.
We light wooden stars on the tree
 Wooden Christmas tree decorations in the form of stars are no less beautiful from thin branches and vines. For this you need:
- choose five even twigs;
- cut them to the same length;
- fold in the form of a star, fixing the tips at the points of contact with a thin wire;
- wrap the inside of the star with a willow vine.
If desired, the stars can be painted or varnished.
Adorable saw cut toys
For those who like to draw, the manufacturing option is suitable christmas tree decorations from wood cuts. They can be found after harvesting firewood for a summer residence, or you can make it yourself by sawing unnecessary tree branches of various thicknesses.
It is enough for the thickness of the round to be up to 1.5 cm.
The saw cut surface is painted to your taste:

In order for such a Christmas tree toy to last more than one year, it is better to open its surface with two layers of varnish. This will not only extend the life of the jewelry, but also make it more attractive.
Adorable wooden animals, birds and other figures
 It's not bad if you have a special machine at home with which you can give any shape to wood cuts. So, Christmas trees, squirrels, horses, birds and even snowflakes are carved from an ordinary bar.
They are well polished to make the surface perfectly smooth, and then burned or painted on them. Although without it, such a toy is very beautiful and looks as natural as possible. 
Handicraft is highly valued at all times, including today. A set of wooden Christmas tree decorations, made by hand and beautifully packaged, will become a wonderful gift for the New Year holidays.
How to hang wooden toys on a Christmas tree?
 The blanks are done, the paint has dried, the toys are ready, and then the question arises - how to fix them on new Year's beauty? There may be several options for holders for Christmas tree toys. We suggest using the most common:

If there are no holes on the Christmas tree toy made of wood, they are drilled or an additional small ring is first screwed into the figure to attach the holder to the figure.
As you can see, making Christmas tree decorations from wood with your own hands is not difficult at all, and even children can make some models without the help of their parents. Such decorations are not only environmentally friendly, but also contain a fraction of the soul invested by their creators, because when working with a tree, the master gives him a particle of himself, as if breathing life into the tree. Our ancestors believed in this, and we will also. Let your tree come to life with fairy-tale characters, wooden in appearance, but with a living soul, and attract only happiness to the house. Happy New Years!
We create masterpieces - video
Turn on imagination and create - video
Hello! Many probably already know that I really love the technological, versatile decor that is quickly assembled. He is very helpful when I prepare for fairs or receive a lot of orders. Today I want to talk about the woven balls that I use in candy bouquets.
I wanted to make balls as a faster alternative to cones and berries to make. The decor with wicker balls has several useful chips that help not only to arrange the bouquet, but also to balance the colors.
- Choose the desired color and the ball in the bouquet can be an imitation of a pine cone, a Christmas ball on a Christmas tree or berries.
- You can make a braided ball in the same color as the main flowers in the bouquet. And the main color of the composition will also receive support in the decor.
- The spherical shape fits perfectly into any bouquet. And by quickly making these balls, you can improve the layout and fill in empty spaces.
- The decor can be made in any color and size, as well as from different materials.
- Well, and an important point - the decor is super-inexpensive!

Making a ball For work we need napkins, glue and corrugated paper "Cartotecnica Rossi". I took No. 562, but you can choose absolutely any color. For example,balls made of orange paper will resemble tangerines, from red - small apples or Christmas balls, from brown - cones, and from pale blue - snowflakes.

From paper, we need to cut one rectangle for the core 3x10 cm and three strips 50 cm long and 8-10 mm wide.

We turn all three strips into a bundle.

The tourniquet must be rolled up tight enough so that it is tight and does not unfold.

Now let's grab a rectangular piece of paper. Exactly in the middle, we turn it half a turn. It turns out a bow.

Use your fingers to stretch each half of the bow.

Feel free to stretch the paper further. The halves should acquire a rounded shape.

So that the middle of the ball is not empty and keeps its shape, we fill it with a ball from a napkin. To do it, just take one napkin, wrinkle it and roll it into a ball. I got a ball with a diameter of about 2 cm.

Now we put the ball into the rounded halves of the bow.

We glue the edges so that the napkin does not peep out.

We also glue the bottom to close the ends. corrugated paper

Now we twist the ends at the base so that the napkin ball inside crumples a little and takes a more rounded shape.

Cut off the excess paper.

We start decorating with braids with a drop of glue at the base of the ball, where we just cut off the extra ends.

We glue one end of the harness and begin to wrap the ball.

We place the tourniquet on the ball in the way that threads are usually wound into a ball.

When the length of the tourniquet ends, we glue its tip.

Then we take a new tourniquet and continue working.

An ugly protruding tip must be trimmed.

Glue the tip with a small drop of glue.

And with the tip of the scissors we will gently hide it under the neighboring tourniquet.

I made the winding of the bundles tight enough and I lost all three bundles. If you've done it more freely, two may be enough. We fix the third tourniquet in the same way and hide the tip. Our balloon is ready! Let's now figure out how to fix it in a bouquet. 
Methods for attaching to a bouquet A ball can be added to completely different bouquets with a static arrangement, and with a dynamic one, and in spherical bouquets, and in elongated ones.
In table compositions, the decor is attached to a skewer and a toothpick, and in manual compositions - to a wire.

Apply a drop of glue to the base of the braided ball.

With effort we stick the toothpick into the glue so that it gets between the bundles.

Wire attachment is very similar. Make a small loop at the end of the wire.

We put a drop of glue between the bundles at the base of the ball.

We put a loop of wire in this place so that the fastening is not visible.

The mountings are ready and the decor can be safely added to bouquets and compositions!

Material capabilities
As I already said, you can choose absolutely any color and size and simulate berries, fruits, cones, nuts ... For small sizes, you do not need to cook the core from a napkin. We simply roll up the bundles like a ball of yarn for knitting. 
You can also experiment with the material! Paper, thick threads, yarn, sisal, wire, even from natural herbs! In the photo below, I made the decor from linden bark.

Experiment, create and share your decor in the comments!

Your Maria Uskova
Factory new Year decoration will never be able to replace the warmth and soulfulness of products made with their own hands, and even if home hand-made is not quite perfect, but the whole soul will be invested in it, and this is worth a lot! Today we will show you how to make Christmas balls with your own hands, so that they would not be ashamed to decorate the interior of your beloved home. In addition to creative process You can attract children, firstly, such work is useful for the development of children's motor skills, and secondly, any common cause is very close, and thirdly, together you will have time to make much more unusual Christmas balls.
One of the legends says that the first christmas balls appeared in Germany in 1848. In those days, Christmas trees were decorated with real apples, but 1848 turned out to be a poor harvest, and local glassblowers urgently created glass "apples" that successfully replaced the real ones. The locals appreciated the idea of \u200b\u200bglass decorations, and so they gradually replaced fresh candy with apples.
Christmas balls from newspaper tubes.
We take a sheet of magazine, twist it into a bundle, if you need bundles, you can create several harnesses by gluing them together. Then we take a foam ball, glue the end of the magazine flagellum on top, and start winding around the ball's perimeter, as in the photo below, gluing each layer with polymer glue.


Christmas balls made of felt.
Draw flower patterns on paper, one larger than the other smaller. We take tracing paper, lay it on a pink felt fabric and outline a large flower, you will need a lot of such flowers, so we create the required amount. Then we take white felt, put tracing paper on it and circle a small flower, they will need exactly the same amount as pink flowers... We cut out all the details with scissors, sew two flowers together, and glue a bead in the center. We sew the rest of the flowers according to this scheme. We glue the resulting flowers with a glue gun to a foam ball.

DIY Christmas balls made of paper flowers.
Using a curly hole punch with a flower attachment, we create a lot of purple and white paper flowers. White flower put in purple, bend the edges to the center, then pin them to the foam ball with pins with bead heads.

Christmas balls in corrugated paper roses.
We create miniature roses from corrugated paper (the process of creating roses is captured in the photo below). We tie the flower leg with a thread so that the bud does not disintegrate, cut off the long legs, closer to the threads, glue the flowers with a glue gun or moment glue to the surface of the foam ball. Fill in the gaps with large beads.

Christmas balls from sequins.
Each sequin must be fixed on the surface of the foam ball using sewing pins (these are used by dressmakers). Sequins need to be overlapped.

Christmas balls decorated with beads.
On a pin of a carnation with a bead head, we string beautiful beads of different sizes, each such carnation is injected into the surface of a foam ball. Do not forget to glue or pin the pendant ribbon.

How to make paper balls.
First way. According to the template below, we cut out many parts, which we connect together as in the photo below, forming a ball.
 Second way. Cut the paper into strips (4 pcs.), Lay them crosswise, connect in the center with a nail, connect the ends together from below, forming a ball, fasten with a stapler. From the rope we create a pendant, which we attach to a carnation.

Third way. We cut the paper into circles, bend the sides of the circles to the center, it looks like a triangle. We glue the parts together to form a ball.

Balls on a Christmas tree made of cinnamon sticks.
We cut cinnamon sticks into segments of equal length, each of which is glued on polymer glue to the surface of the foam ball.

Christmas tree balls, decorated with paper scales.
With a large round hole punch, we create many circles, which, with the help of a glue gun, overlap to the surface of the foam ball.


DIY Christmas balls from branches.
Let's think of a ball (it is even better to take a thin rubber ball of a round shape that can be blown and inflated), cut dry branches into small pieces with a pruner, apply branches to the surface of the ball and glue them together with a glue gun. When the glue is dry, blow off the ball and pull it out through one of the wide holes.

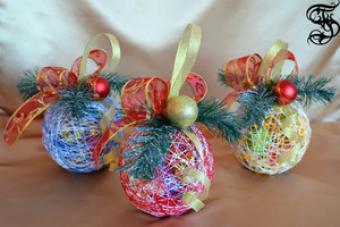
How to make a Christmas ball from threads.
We inflate the ball, wrap it with threads, then thoroughly soak it with PVA glue, hang it in a dry place to dry the glue. As soon as the glue dries, pierce the ball with a needle and pull it out through one of the holes. To make the ball of threads look more impressive, immediately after applying the glue, it can be sprinkled abundantly with coarse shine.

How to make a chocolate ball.
We take any unnecessary ball, cover it with glue from a gun on top, creating spectacular drips, when the glue dries up, paint the ball with paint from a spray can in a chocolate color. After the paint has dried, cover the spectacular chocolate drip with a layer of PVA glue and sprinkle with a large white glitter. Glue red decorative berries and twigs from above.

How to make a ball out of rope.
We inflate the medical fingertip, tie it with a thread, soak the rope in PVA glue, wind the rope around the fingertip ball. We leave the product to dry, after which we glue the hanger on top. Details on creating such a ball are in the article.

How to decorate a ball with acorn caps.
We paint the foam ball with acrylic paint in brown color, we take polymer glue, grease the acorn cap abundantly with it and glue it to the surface of the ball, according to this scheme, we completely cover the ball with acorn caps. Finally, the gaps can be masked with beads and particles of silvery sheen.


How to make a ball of cones.
We take dense garbage bag, tightly put cotton wool inside, tie a bag. Separate the tops from the cones, and glue them to the surface of the ball using polymer glue or a glue gun.

How to decorate a ball with cone scales.
Use nippers to separate the scales from the cones. Then we take a foam ball and use a glue gun to glue all the scales overlapping to its entire surface.

How to decorate a ball with decorative balls.
Such padding polyester balls are sold in the departments of everything for creativity, we glue them to the surface of a foam ball with a glue gun, alternating between simple white balls and shiny balls.

How to decorate a ball with lace.
We cut out details from lace, for example - flowers, glue the flowers to the surface of the foam ball with PVA glue. We paint the ball with white acrylic paint, then bronze, after which we take a sponge and dab it over the surface of the ball. The surface acquires the effect of aging, it remains to glue the pendant hat and tie a beautiful ribbon.


10 ideas - DIY Christmas toys (video)
How to make Christmas toys (video master class 21 ideas):
Today we showed how to make Christmas balls with your own hands, without unnecessary financial and time costs, such beautiful jewelry absolutely will not go unnoticed, and your friends will certainly appreciate all your efforts.