DIY lace herringbone
Today tutdizain .com has an excellent master class on creating a herringbone, only this time lace is used as decoration.
To create a lace Christmas tree, you will need:
A sheet of cardboard or thick paper
Barrel stick (30 cm long)
Small pebbles or grains (for weight so that the Christmas tree does not fall)
Lace, braid, sisal
Glue, glue gun
Acrylic paints (gold and white)
Golden spray for decoration (rich, opaque, so that you can completely paint the desired elements)
Small container, pot
Optional decor: beads, rhinestones, buttons, cutting, flowers (in general, everything that is suitable for decorating a Christmas tree)
Lace herringbone step by step:
Roll a piece of cardboard into a cone, glue and cut off any excess.

Assemble the tree. To do this, drop the glue into the inner tip of the tapered base and insert the "barrel". Make sure the stick is level and hold it there for about 30-60 seconds until the glue is completely dry.
Squeeze out the glue at the bottom of the pot, insert the other end of the "trunk", cover with pebbles or grains. The tree should be level, then fill it with glue again. Wrap the top with sisal, lightly press on the rump with glue.

Mix golden and white acrylics to a delicate shade and cover the cone with this mixture with a sponge. Wait for the acrylic to dry.

Spray a little gold spray on the tree. Do not forget to use newspaper or oilcloth for protection, so as not to stain everything around!
Sagging cheeks: how to restore the elastic oval of the face With age, the skin loses its elasticity, and many women face such a problem as sagging cheeks. Changes in the oval of a woman's face are not immediately noticed. Sometimes a bad angle in a photo, which emphasizes the flabbiness of the skin, becomes a shock. But, there is no need to despair - the problem can be solved with the help of exercises. What to do if you urgently need to get rid of the "bulldog cheeks"? The first advice is suitable for those women who have decided to take this problem seriously and are ready to spend not only money, but also time to solve it. Believe me, gymnastics works wonders if you do it! D Gymnastics for the cheeks Cheeks - round, high, strong make the face young. But what to do if over the years the cheeks become saggy, the face seems more and more flat, dull and aged? Exercise will help restore volume to your cheeks, remove excess skin and give your entire face a youthful look. We start at the top of the cheeks. 1 Inflate your cheeks, hold the air for three seconds and relax them sharply. Repeat 10 times. a) inflate your cheeks and move the air from side to side - repeat 10 times; b) inflate your cheeks, move the air from top to bottom and back (feel what happens to the neck) - repeat 10 times; c) once again inflate your cheeks and slowly, with effort, distill the air in a circle - repeat 10 times. 2. Inflate your cheeks and blow out air in jerks, through pursed lips. Repeat 10 times. a) inflate your cheeks again and blow air from one corner of the lips, and then from the other - repeat 10 times; b) now try to repeat the same thing, blowing air out of the upper lip - repeat 10 times. These exercises not only have a cosmetic effect, they also massage the gums and the inner surface of the cheeks. 3. Again inflate your cheeks and, clasping them with your palms, press on your cheeks with your hands, feel how strong they are. 4. Place the middle of your palm on your lips, fingers covering your cheeks. Begin to smile, cheeks rise, and fingers resist. Relaxation after each lift of the cheeks. After 10 smiles, change your hand and repeat 10 more times. Do the horse exercise 3-4 times. У Exercise for the lower part of the cheeks 1 Cover the lower lip with the upper lip, and then with the upper lip with the lower lip. Repeat 10 times. 2 Lift your face up, open your mouth and point your lower lip towards your nose. Repeat 10 times. 3 Open your mouth and, extending your lips forward, smack your lips. Repeat 10 times. The horse exercise will help you relax tense muscles. The second tip is for those who would like to improve the situation a little without spending special funds on it (you still have to spend time). By mixing 2 tablespoons of sour cream and 1 spoon of honey, you will get a good nourishing mask that will definitely help you.
The vintage lace herringbone is very cute and easy to make. So, how did our grandmothers do it?
For an unusual Christmas tree made of lace, we need:
- wide lace;
- narrow decorative ribbon with voluminous flowers;
- rhinestones or snowflakes to decorate the background;
- christmas tree garland, if the panel is backlit;
- a sheet of cardboard covered with fabric;
- glue and sharp scissors.
This lace tree hails from the last century, but still charming and sophisticated. Initially, such a Christmas tree was used as a decoration for the window, that is, it was glued directly to the glass, but you can make such a tree as a wall panel.

Cut the wide lace into separate strips of different sizes for the branches of our lace tree.
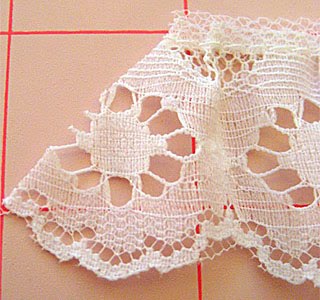
Cut the ends of the lace diagonally. Sew the edge of the lace and gather a little.
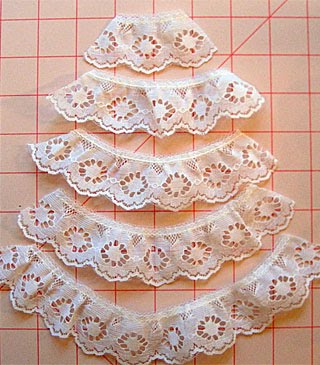
Lay out the finished lace in the form of a Christmas tree. If necessary, adjust the length of the individual elements.

Cut a rectangular piece of lace for the "trunk". Decorate the top of the lace with fabric flowers.
To assemble our wall panel, drip a drop of glue onto the lace fabric and fix it on the cardboard.
Glue rhinestones or snowflakes on the background.
If you are making a backlit panel, then before installing a lace Christmas tree on cardboard, you need to make holes in it for bulbs from a Christmas tree garland and then fasten the lace elements of the Christmas tree.
In this case, instead of a flat sheet of cardboard, it is better to take a lid from a cardboard box with low sides, so that you can hide the wires from the Christmas tree garland in the back wall of the panel.

Vintage herringbone made of lace and zippers.
If you are a sophisticated and romantic nature, then most likely you will like a delicate Christmas tree made of fabric and lace. It is quite possible that the process will seem clear to you without words, but maybe I will still be able to throw a couple of good tips on creating a Christmas tree with my own hands)
The most difficult thing for me was to make a paper cone. The difficulty was to cut a circle of a sufficiently large diameter (no compasses and round plates fit). Then I spread a newspaper on the floor and circled the round basin) In general, the circle turned out to be quite a decent size. Then I cut it out of the newspaper and folded it 4 times, thus getting a blank for the cardboard base of the Christmas tree.

I advise you to first make a pattern on a newspaper or any other unnecessary paper and only then transfer it to a good thick cardboard.

To make the cone smooth, you can glue the joint with tape
(I did so).
My cone turned out to be not very high (about 20 cm), because in the end it was formed from a quarter of a circle. If you want to make the Christmas tree taller, draw a large circle initially. If you come up with another way - write in the comments)

I decided to sew a felt tree. I chose blue to somehow match the colors of the coming year)

We transfer the same newspaper pattern to felt or any other fabric and cut out the blank:

The main beauty of creating a Christmas tree with your own hands is that you don't have to buy anything on purpose! Take what you have and fataze!
After a dozen different combinations, I settled on white guipure, lace braid, nylon ribbon bows and wooden heart buttons (how I like them !!!)

You can sew guipure to the base manually, you can use a sewing machine (in this case, first sew all the details with a basting line):

If you decide to sew on a typewriter, then here you can experiment. If you are sure that you can lay a perfectly straight line, then you can safely choose threads in contrasting colors. Then get an additional beautiful finishing stitch along the edge of the guipure and braid. I tried to sew with turquoise threads, but since I cannot boast of the ability to sew exactly, I had to dissolve everything)
Then I came up with the idea to sew on guipure not with ordinary machine stitching, but with a decorative one. Of course, for needlewomen who are familiar with sewing machines - this will not be a grandiose discovery, but beginners can safely take note.
In guipure, when cutting, the edges remain unprocessed, the decorative stitching will hide all the "notches", and as a result the fabric will not bend and puff up.

Sew the braid along the edge in the same way. In addition to the fact that all elements are sewn more thoroughly, you also get a kind of imitation of an embroidered line. I liked this effect so much that I decided to lay another such decorative stitch along the felt between the lace and guipure and at the top of the tree.

At this stage, the fabric blank looks like this:

The skilful eye of an experienced needlewoman will immediately notice that I am still sooooo far from straight stitches, but nevertheless I can assure you that in the end this curvature will not be noticeable, which is another big plus for novice seamstresses like me)
The next step is to make a cone from our already beautiful blank. Pin the cut and try on the paper cone and adjust the seam allowances. Ideally, the fabric should fit snugly around the paper cone.

First lay a basting line, and then sew on a typewriter, iron the seam in opposite directions:

Now you can carefully twist and try on the outfit)
If at this stage the paper cone is longer than the fabric blank, just cut off the excess paper and let the fabric be about 0.5 cm longer.

Front view

Back view
To arrange all the desired decorations beautifully, first pin them to the fabric (no need to pierce the paper cone!):


The only thing to do is to sew on all the bows, buttons and beads. I warn you right away that the pins begin to fall out as soon as you remove the fabric from the cone. Be careful - don't prick yourself! Begin sewing from the bottommost elements, gradually freeing from the pins and moving towards the top of the tree.

Bows are sewn with white threads, buttons - turquoise to emphasize the color of the main material, beads - with golden metallic threads. Sequins in the form of stars are glued to the "Moment Gel".


Back view

Side view

View from the other side)
To make the tree more stable, it is better to fill it with something. Alternatively, put a few small pebbles or expanded clay inside, as I did. To prevent the stones from rattling, wrap them with padding polyester or cotton wool.
I thought it would work out quickly, but lace turns out to be very rebellious in work. I did it all the same, and even two, but a little differently than in MK ...
I wanted them to be similar, and at the same time, slightly different from each other ...
It seems to me that this Christmas tree is vintage, but I could be wrong. I'm not very good at styles yet.

From all sides ... I decided not to overload with decorations ...

Gold also has different shades and at first I tried to attach buttons and beads, which were several tones different from each other. Did not like. Therefore, she decorated only with golden beads of one type and braid, which coincides in shade with the beads. At the last moment I thought about pearls. In my opinion, they are in the subject here ...

I can't choose a photo for a collage. Maybe you can see it better on a light background?

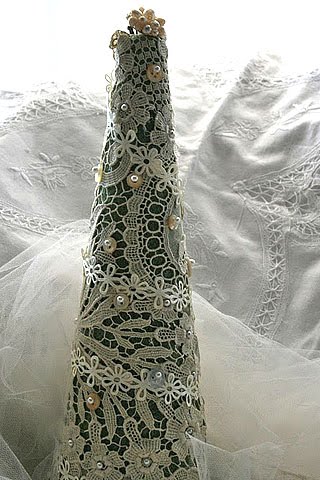
I have not come across plastic wine glasses in stores, which many use as a basis for Christmas trees. I make the cones from cardboard, inside is paper, i.e. the construction is quite sturdy. "Under the skirt" I also try to bring beauty. In this case, I made the relief a white outline.
The stand is also pasted over with lace and painted with white paint, and on top I made stripes with gold thread.

And so it all began ... At first I tried to collect lace on a thread, but it did not help much. Then she began to grab in different places with a glue gun, she did not want to puff up strongly. Twisted on a cone in a spiral. Then she covered it with white acrylic and gilded it with acrylic paint. Of course, it would be better to pshik out of the can, but I have already said that I can hardly stand this smell.

The second Christmas tree is made according to the same principle, but the lace was glued horizontally ... In a spiral, it's still better ... In the decor, it was repelled from the stand. This is a regular pile with a beautiful purple tint and a gold stripe ...

Let's spin a little ...

I softened the purple color on the stand with white to create a uniform style ... The beads are real. They seem to be called "tiger's eye". They are very cute on their own, and I also really like them on the Christmas tree ... I added lilac-purple buttons with gold veins, but all the same it was somehow "naked". I wrapped it with golden threads and calmed down on this :))