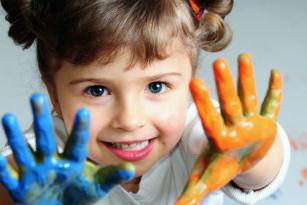
Plasticine molding is one of the first types of creativity for kids. Plasticine can be given to a child as early as a year. You can punch to form flagella, circles and just smear it on cardboard and, of course, make an application of plasticine. This definitely captivates the child for a long time. Of course, the older, the more difficult the figures and applications can be made. When modeling from plasticine, fingertips will always be involved, which stimulates the child's speech development well. True, this is another way to develop fine motor skills, as well as imagination, fantasy, helps to establish coordination of actions and improves perseverance.
Types of Technician
There are such main types of applications from plasticine:
1. The technique of smearing. With such an application, you can use a ready-made template or drawing, or you can give howling imagination. To fill the drawing, we knead the clay well and stretch it across the sheet, filling in separate sections of the drawing. Work should be done carefully, without leaving the contours.
2. Quilling technique or flagella technique. Plasticine applications made by this method will have a very unusual and original look. The picture can be arbitrary, or you can fill in the finished template. To perform, we roll thin plasticine flagella and twist it into the desired shape. For attachment, lightly press down on the cardboard.

3. Mosaic from plasticine. Perhaps the most common and fascinating type of application from plasticine for kids. This variation involves the use of a template. You just need to tear off small pieces of plasticine and fill them with a picture.

4. Technique of volume application from plasticine. Suitable for older children. Here you need only three things: a sheet of cardboard, plasticine and limitless imagination. The child himself comes up with a drawing and creates all its details from plasticine.
5. Combined application. Here you can use all the techniques listed above, using or not using a template.

I would like to draw attention to another very fascinating technique - applications from plasticine for the smallest. By the holidays, any picture made in this technique will make a splash. You can choose any thematic picture.
Plasticine "Cat"
We show on the example of the application of plasticine flagella on the template.
Necessary materials: prepared picture-template (preferably on cardboard), a syringe of at least 5 ml, soft plasticine of different colors, a glass of hot water.
1. We will prepare the first color with which we will work. We doubt a piece of plasticine so that it fits into the syringe.

2. Place the syringe with plasticine in hot water for about half a minute (depending on the temperature of the water and the quality of the plasticine), so the plasticine will become softer. Slowly squeeze the plasticine onto a smooth surface.
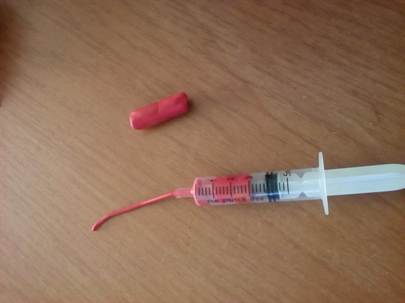
3. Repeat steps 1 and 2 for other colors. Using this method, neat, equal-in-thickness flagella are obtained.

4. We proceed to fill out the application. You need to perform each detail in turn, filling evenly. Gaps should not be afraid - we take the next piece and continue.
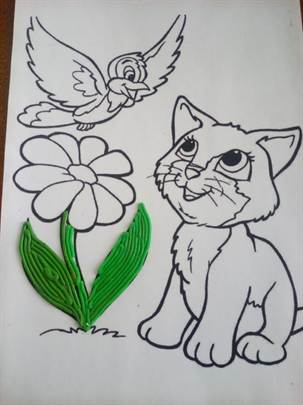


5. The bulk of the work is done. The background can also be made of plasticine using the smearing technique. In this option, we’ll just suggest using watercolor or gouache.

"Autumn in the forest"
Let us show one more example of a volume applique made of plasticine, rich in details - Autumn in the Forest. This is a vivid example of how the application of plasticine can also be trained: to show the time of year, forest inhabitants, species of trees, bird migration, varieties of mushrooms.
We need: a sheet of cardboard of orange or yellow color, soft plasticine, dostochka and a knife for plasticine.
Consider the implementation of the application for children in stages:
1. From white plasticine we make a trunk and we fix it approximately in the middle of a leaf. Next, we form the branches.

2. The tip of the knife depicts the relief of the cortex.
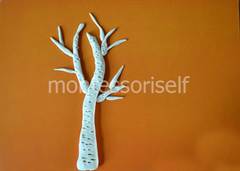
3. We finish the barrel with black plasticine by simply attaching pieces of black plasticine.

4. Now come in handy yellow plasticine. Tear pieces from it, gently pressing them, attach to the branches of a tree.

5. Add the fallen leaves to the ground in the same way.

6. From white, brown and red plasticine, we form mushrooms - boletus and mushrooms.

7. We make a Christmas tree. It should be formed from below with the overhead method. We do the "needles" with the tip of a plasticine knife. We attach the trunk to the Christmas tree.
How to keep the company of kids before the new year? You can make small Christmas cards "Christmas balls" in the technique of applique from plasticine on cardboard.
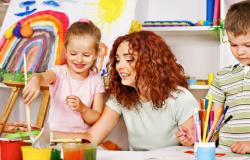
For kids from 3 years old, you need to prepare the basics of postcards in advance. The older the children, the more they can do most of the work on their own. In practice, it turned out that if you prepared the blanks in advance and prepared the necessary materials, then not only kids and younger schoolchildren, but also lyceum students and students are enthusiastically involved in the manufacture of New Year's cards. In general, this is an occasion to arrange a small family holiday.
Preparation of the basics for the Christmas tree mini-cards
1. We cut out rectangles 10.5 * 8 cm in size from white cardboard. We cut out rectangles in size 9.5 * 7cm from colored paper. Colored paper is better to take different calm light shades. If you plan to sign postcards, then cardboard should be taken in size 21 * 8cm and bent in half. Then the card can be signed inside on the side on which there is no application from plasticine. You can write congratulations on separate leaves and stick on the back of the finished postcard. Application from plasticine for children from 3 years old "Christmas balls"
2. Glue colored paper in the middle of the cardboard. At the same time, a 0.5 cm wide frame will remain at the edges.
 Application from plasticine for children from 3 years old "Christmas balls"
3. Roll the pieces of colored plasticine into cakes and cut out circles with a diameter of about 5 cm. To do this, it is better to choose a suitable cover in advance.

4. We select circles and blanks that are suitable in color. We stick the circles at the bottom of the card.
5. From a golden or beige plasticine we roll a flagellum. We make another flagellum to match the color of the circle.
6. Twist the flagella together, form a loop and stick it to the circle on top.
7. We flatten a piece of golden plasticine and cut out the cap for the ball with a clerical knife. We mask them with the junction of the flagellum and the ball.
 Application from plasticine for children from 3 years old "Christmas balls"
The blank for the card is ready. It is better to make such blanks twice as many as the expected number of children, so that everyone has the opportunity to decorate two balls.
Just in case, it’s useful to prepare a few additional pieces of cardboard and colored paper (in case someone elders wants to join you in the process). Such blanks can always be used to prepare cards for other holidays.
We decorate the Christmas-tree balls mini-cards with children
Now the main thing is not to limit the imagination of children. For decoration, you can use not only plasticine, but also beads, sparkles, pieces of colored paper, foil, confetti. By the way, confetti for this work can be made using a hole punch from any shiny packaging or wrapping paper.The technique of execution can also be anything you like: prints from caps of pens and felt-tip pens, decorative elements from plasticine, drawing with felt-tip pens and gel pens on light plasticine, trimming.
Plasticine for younger students, grade 3-4
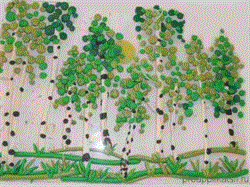
Needlework workshop: Plastinography. Application - a mosaic from balls of plasticine "Dolphin"
Member Information: Bulygina Julia Aleksandrovna, primary school teacher, MBOU secondary school No. 141.The purpose of this type of work.
The master class is intended for teachers working in grades 3-4 for any program "Technology", children 10-12 years old and for the creative work of parents with children. The work can decorate the interior of the room, it can be an exhibit of the exhibition of decorative art or a gift for relatives and friends.
Engaging in mosaic contributes to the development of fine motor skills of hands, developing imaginative thinking, imagination. Creating an image with the help of a mosaic, the child develops purposeful activity, volitional regulation of behavior.
Goal:Familiarization of children with the mosaic technique based on work with plasticine.
Historical reference:
Mosaic - This is a special kind of creativity, it is a way of creating pictures, patterns, images using small pieces (parts) of different colors. Pieces can be made of different materials (plastics, ceramics, pebbles, shells of mollusks and other things) and are chips of different geometric shapes, almost flat or on a “leg”, or voluminous figures.The homeland of the mosaic is called Greece, Spain, Carthage, Crete, Asia Minor, Syria and Sicily.
Since ancient times, mosaics have laid floors and walls. Mosaic images adorned baths, baths and fountains - places where other, less durable types of decor would be affected by moisture.
Mosaics are called "an unusual form of art", "one of the most durable forms of decorative art that has come down to us since antiquity."
And today we will try ourselves in the role of artists working with plasticine balls, and try to create a picture using the mosaic technique to decorate our room.
Materials and tools:
Plasticine
velvet paper
PVA glue
modeling board
stack
glue brush
scissors
simple pencil
album sheet
Devices for work: drawings for application.
Working process
1. Materials and tools are ready, get to work.
Application assembly
2. Select a picture for the application and transfer it to the landscape sheet (or make a photocopy of the picture you like).


3. In the figure, distribute the color scheme of the figure, signing the colors with a pencil.

4. Roll a few balls for a separate part of the picture between the index finger and thumb (or on the modeling board).
Attach the ball to the pencil outline of the drawing, pressing it to the paper, forming a circle. Put balls on the inside of the applique. Balls attach sequentially row by row.


5. Fill in all the small parts of the application (eyes, mouth). You can use flat sculpting, smoothing plasticine in the shape of an eye or mouth. Lay flagella lines separating various parts of the body.

6. Finish assembling the animal in the manner described in paragraph 4.

7. Make eyes and eyebrows in a similar way. Try to make them seem voluminous. To do this, place the balls partially on the surface of the circles of the body.

8. The application can be supplemented by indicating the habitat of the animal. Draw pebbles, algae and fill the plane of these application elements with plasticine balls.


9. The application is ready! It remains only to design the frame.
Measure the sheet with the application and measure the given length of the frame on the velvet paper from the wrong side. For example, build rectangles 25x2 (small side of the frame), 30x2 (large side of the frame)

10. Glue the details of the frame on the appliqué along the edges, starting from the big sides. The application is ready.
11. Samples of work of students in grades 3-4 MBOU secondary school No. 141


Note. Students in grade 3 only get acquainted with this type of work, therefore, they perform a subject picture. In grade 4, students can work on a plot illustration, adding their own vision of the picture, fill the background completely.
Thanks for attention!
Creative children always know how to surprise us, especially when there is material for children's crafts at hand. Plasticine also belongs to such material. Plasticine molding is done by both large and small children in kindergartens and schools. This is a very exciting process, in skillful hands the plasticine comes to life, turns into interesting paintings and crafts.
Plasticine painting Fish.
Before starting work, we prepare all the necessary materials: plasticine, cardboard, stack.

Blue plasticine completely fill the entire free surface of the cardboard. We pluck small lumps from the main piece of plasticine and spread them on the cardboard surface with a finger.

In the center we make a fish from multi-colored pieces of plasticine starting from the head. Roll up a small ball for the head. Make a drop from the ball. Flatten the droplet with your fingers in the form of a fish head. The body of the fish consists of several multi-colored parts. Roll up the ball, roll it into a sausage, bend it into an arc and flatten with your fingers. For the tail, we need to roll another ball, flatten it and use the stack to cut the tail for the fish.

To make the dorsal fin, we roll plasticine into a flagellum. Flattening the flagellum and using the stack, give the desired shape to the fin. For the lower fin, we roll up the ball, turn the ball into a droplet and make the fin out of the droplet already.

At the end we make eyes and decorate the fish with small balls of plasticine.


Application from plasticine Airplane.
As in the first application, fill the entire surface of the cardboard with blue plasticine. We make large flat cakes from green and red plasticine, cut out the outline of the upper and lower parts of the aircraft with a stack.

We stick the cut parts of the plane onto prepared cardboard, make wings.

The pilot of our aircraft will be a bear, also molded from plasticine.

We finish the remaining parts and the plane can fly.

Picture from plasticine Giraffe from hot Africa.
Another idea for children's creativity, an application of plasticine. Let's try to make a beautiful giraffe from distant hot Africa, where there is always summer and bananas grow on palm trees.

On cardboard, we make the sky and grass, smearing plasticine of the desired colors with a finger.

From the yellow plasticine we make a giraffe, as shown in the photo.

We also make a giraffe's face, ears and horns while helping ourselves with a stack. At the end of the brown plasticine we make giraffe specks and hooves. From an orange mane.

At the very end, we decorate a picture of plasticine with a banana palm whose trunk is made of flattened plasticine droplets. Leaves are made of green plasticine using a stack.

Cheerful clown.

We cover the entire surface of the cardboard with plasticine making the top blue and the bottom yellow. We roll out blue plasticine into thin flagella and stick vertically to a blue background. It will turn out something like a circus arena.
Creativity helps children learn and understand the world around them better. So, reflecting in their works the phenomena of nature and the changing seasons, children remember them well, learn to recognize and describe in words.
Therefore, thematic crafts will be a good addition to classes in kindergarten and even the youngest classes.
For example, an application made of plasticine will help kids get acquainted with the palette of autumn shades, will draw their attention to the change in color of foliage and grass, to birds flying away to the warm edges and to our permanent forest inhabitants, who make their own supplies for the winter.
The basis of the craft becomes a paper or cardboard sheet. This application of plasticine on cardboard is best obtained, since it keeps its shape well and does not bend under the weight of plasticine. We take cardboard of a golden hue.

We make a tree trunk from white plasticine.

We attach large lateral branches and thinner branches to it.

With a stack, we apply a drawing to the trunk and branches - like on a birch bark.

Large areas of the trunk are covered with a pattern of black plasticine.

We turn a piece of yellow plasticine into leaflets.

The same leaves cover the surface of the earth under a birch.

From white, red and burgundy plasticine we make mushrooms - one boletus and two fly agaric.

We place the mushrooms on different sides of the birch: boletus - on one side, fly agaric - on the other. We invite kids to show which of them are edible and which are not.

We take green plasticine and begin to make a Christmas tree out of it. To do this, cut a piece of the stack, turning it into a fringe.

On top we attach a few more pieces such as tiers of spruce paws. We draw the attention of the children to the fact that the Christmas tree, unlike the birch, did not change its original color.

Do not forget about the brown trunk of the Christmas tree and the pointed top.

We proceed to the creation of the main characters of the picture. The first is a gray silhouette.

We attach eyes and a nose, with a stack we turn a smooth back into a needle coat.

We fix a small fungus on this fur coat. It becomes evident that the hedgehog is preparing for winter.

On the other side of the birch, near the Christmas tree, we put a gray bunny.

The craft is almost ready.

But so that our application for children would be even more useful, we supplement it with a flock of birds flying away into the distance and saturated clouds.

It remains to put the picture in the frame - and the work is finished!

In the process of its creation, the children repeated everything that they knew about the fall, and made their knowledge visual.