The anticipation of the New Year holidays is always exciting. Of course, this is not only because of the fabulous New Year itself, but also because of the upcoming “vacations” that both adults and children are looking forward to. Many people go to festivities on the night from December 31 to January 1; an event next to the beautiful Christmas tree is also obligatory. Usually it is placed somewhere in the city center or in several places where the main celebrations will take place. Street Christmas trees are usually decorated in advance, but you can contribute to the decoration and make big toy on the city Christmas tree with your own hands.
At the same time, you don’t have to spend a lot, look for some expensive materials in stores, you can only show your imagination and make everything from improvised materials, which are often lying around unnecessarily in almost every home. It is especially interesting to do this with children. This fun will help develop imagination, improve motor skills and just have fun with your family.
Large New Year's toy - “Angel”
Option No. 1 – a toy made of tubes and a disk
You will need:
- computer disk - few people use them anymore, so you probably have 1-2 unnecessary ones,
- straws for cocktails (it is better to use thicker ones) - from 16 pieces,
- hot glue,
- aluminum wire (you can use thick wire),
- 2 mugs made of thick cardboard,
- thick thread.
Procedure:
- One of the tubes needs to be strengthened. To do this, insert a pre-prepared length of wire inside it. This is done so that the tube does not break. It will be the basis of the entire frame.
- Prepare in advance 2 “washers” of cardboard with a hole cut out in the middle so that you can insert a tube there so that it is held inside.
- Glue both circles on both sides of the disk in the middle, where there is a hole.
- Next, we put the disk on a reinforced tube and lubricate it with hot glue so that the structure holds. When it dries, you can continue working.
- Thread a strong thread through a straw with a disk, string 2 more straws on it and make a triangle from this structure.
- Add 2 more straws using a thread. You will get 2 triangles with one common side.
- Then continue in the same order, you will end up with a polyhedron.
If desired, you can use more tubes, depending on how many possibilities and your imagination are enough to create a figure
The joints between the tubes and the core where the cardboard mugs are glued can be covered with tinsel or something else in the New Year's theme.
Option No. 2 - a ball made of bags
This option is great New Year's toys DIY outdoor Christmas tree is suitable even for the little ones. The instructions are simple, and the bags can be found in any home.
Christmas tree toy “Ball”
You will need:
- paper (any),
- colored shiny bags,
- cake strings or gift bags,
- PVA glue.
Procedure:
- The inside of the ball will consist of crumpled paper. To do this, take absolutely any paper, you can even use old newspapers. Crumple them one after another, gradually “winding” the next one onto the resulting ball. To make the layers stick better, they can be periodically lubricated with PVA glue. Surely it will be found in a schoolboy’s briefcase, this necessary thing At school.
When the ball is already large enough, the right size for a street tree, then the elegant bags will come into use. It can also be wrapping paper, which is usually used to wrap gift boxes.
- Wrap a paper ball wrapping paper or colored bags, secure with glue.
- Tie the resulting shiny ball with fancy colored ropes and make a loop at the top so that the toy can be easily hung on the city Christmas tree.
If desired, the ball can be additionally decorated with beads, beautiful hairpins, bows, and snowflakes.
Option No. 3 – Christmas tree toy made from a plastic bottle
This option is suitable for creative people who know how to draw. Although children can leave their scribbles on this simple object. After all, the main thing is creative imagination and joy from the work done!
You will need:
- plastic bottle (any size),
- paints for decoupage.
Action plan:
We don’t take into account a glass bottle, although it would look more impressive, but for a Christmas tree this item is too heavy and can break the branches, so we discard it right away.
In this version of the street Christmas tree decoration, you only need your imagination. You can depict whatever you want on the bottle. It’s better if it relates specifically to New Year’s themes. For example, this is a fairy-tale hut dusted with snow. Or the face of Father Frost, or maybe the depicted figures of the grandfather along with the Snow Maiden. It could be an elegant Christmas tree, a drawing of a beautiful ball toy, or a snowman. Yes, whatever your heart desires!
The main rule when working with such a toy is that you first need to completely paint the plastic with one general background color.
Option No. 4 – “delicious” candy
This toy is one of the simplest and most standard toy to make with your own hands for the Christmas tree. It is done very easily. You will need paper or something soft, for example, cotton wool or foam rubber, padding polyester. This will serve as the inside of the candy. Make a “filler” in the shape of a thick sausage of the desired size. Wrap it on top with shiny colored paper intended for wrapping gifts. Roll the paper tightly on the sides and tie with bows. Don't forget to attach a loop.
Large Christmas tree toy “Candy”
Option #5 – penguins made from a burnt out light bulb
You probably have burnt-out incandescent light bulbs piling up in your home. You collect them, and then take them all at once to a special bin for such things. But don’t rush to do it, because soon New Year, but making a toy for the Christmas tree is a must. To make this you will need regular incandescent light bulbs and decoupage paints. In fact, you don't need any special artistic skills to draw a penguin, it's very simple. Paint the light bulb in front White color. Make, as it were, 2 circles - on the top of the light bulb (below the base) and on the bottom, most convex part. As an association, mentally imagine the number 8, and you need to draw it with white paint on the front. The top will be the face, the bottom will be the stomach. Paint the rest of the unpainted surface of the light bulb with black paint. All that remains is to make a cute penguin face: eyes and beak, everything is ready! Glue the loop to the base. Alternatively, you can wrap the base with rope or twine.
Conclusion
Show your imagination, create, and then you will remember the New Year holiday highlights. If you want to do something more unusual and intricate, then look on the Internet for a photo of the toy at street tree. There are plenty of options, and you don’t need to limit yourself to these five. You can use papier-mâché, soccer balls, and even hats as a base!
Decorating a Christmas tree for the New Year with various toys and candies is already a common thing, which is very popular not only with children, but even with many adults. However, hanging caramels and gingerbread cookies on the Christmas tree is somehow “boring”. To add some variety to the decorating process and keep the kids busy, you can make origami in the form of candies.
New Year's crafts made from caramels can become a good gift or decoration not only for the New Year, but also for other holidays. There are quite a lot of options and schemes regarding candies on the Internet. This article will present the easiest and beautiful crafts made of paper in the form of caramels. How to make candy out of paper? There has been an answer to this question for a long time!
How to make paper candy with your own hands
Even as a child during labor lessons we were taught to make various crafts from paper and more. Remembering these lessons, everyone understands that no one taught us candy origami, but it’s never too late to learn how to do something. Below you will find options and patterns of candy origami that will decorate your home and give good emotions.
Option #1
I would like to start with instructions for making a surprise candy, in which you can put sweets or a small gift. This craft is quite easy to make, and you don’t need a lot of material. Prepare in advance:
- A toilet paper cardboard.
- Wrapping paper approximately 30 x 30 in size.
- Scissors, tape, tape.
 You need to put a piece of cardboard in the middle, closer to the edge, and secure it with tape.
Wrap the cardboard with wrapping paper, and close the seam with tape.
Tie one side with a ribbon and leave the other side untied. Pour some sweets, candy bars there, or put a small gift, for example, a chocolate bunny. After this, carefully tie the other side with ribbon.
This candy is shaped like a box. Such gifts can be given to children at school for the holidays: it’s economical, and you can put together an assortment of candies yourself, taking into account the children’s tastes.
Option No. 2
This option is also easy to implement, but the result will please you. For these sweets you will need:
- Corrugated paper (choose the color at your discretion, but it’s best to take several).
- Scissors, silicone and regular glue, thread (to match the color of the paper), toothpicks.
- Balls of the same size (1.5–2 cm).
 You need to cut out a rectangle measuring 10 by 8 cm from paper. Place a ball greased with regular glue in the middle, closer to the edge. Wrap the ball in this paper.
After this, you need to take the threads and tie the edges of the paper close to the ball. If the ends are very long, you can trim them a little.
The caramel is ready. Some people also coat the edge of the toothpick with silicone glue and stick it to the caramel, but this is not necessary. These crafts can be used as a decoration, for example, by pouring them into a candy bowl.
Option No. 3
 This time the caramel will be made according to the scheme. Prepare colored cardboard, scissors, glue, pencil, ribbons and small candies (edible).
Stepping back from the opposite edges by about 1.5 cm, you need to cut out three diamonds. There are two edges left, on which we also cut out diamonds, but this time there are two. It looks like this.
Then you will need to fold the template along the lines drawn on it so that you get the following.
To make the caramels seem more realistic, you can stick some stickers on them or cut out some parts from the candy wrappers. You need to tie the edge of the candy with ribbon, pour the treats inside and tie the second edge.
You will get a very beautiful do-it-yourself candy wrapper or gift wrapping that is not inferior to store-bought options.
Option No. 4
 For this craft you will need paper, scissors, tape, pencil, glue and a little perseverance. Transfer this diagram to paper
You need to carefully cut out the diamonds as shown in the picture above. It is best, of course, to use a stationery knife for this; with it this process will be more accurate. This blank needs to be bent along the fold line, in the end you will get something similar to a cylinder. The edges must be glued together with glue, and the ends must be tied with ribbon or thread. The product will resemble a homemade candy wrapper, which may well fit a small candy bar, since the craft is voluminous and there is room.
Option #5
Origami from paper according to the scheme. You won't need anything other than paper. So, take a square-shaped sheet and fold it as shown in Figure 1. After that, fold the paper into three more parts (Figure 2). Find the middle of this blank and then make two folds (Figure 3). Mark the future fold lines (4), you need to fold along the lines inward (5). That's all, the beautiful origami in the form of a candy is ready! If desired, you can somehow decorate or paint it.
Option #6
- Cardboard.
- Silk (small piece).
- Braid, ribbons and sequins.
 Take cardboard and divide it into 7 equal parts. Bend the cardboard along the drawn lines. You should get a hexagon; the cardboard needs to be fastened with glue or a stapler. Wrap this blank in fabric and pull it off one side. After placing the gift inside, tie the other side as well. After this, we proceed to “designing” the box. Glue braid or ribbon onto it and decorate with sequins.
Make a big candy with your own hands.
It is not necessary to make candies in the shape of squares or rectangles. Just look at the folds of a candy of a different shape and transfer them to paper, only ten times larger. Just imagine how many emotions the children will have when they receive such a surprise candy as a gift. It's amazing that you can make paper candy so easily and simply. Some craftsmen manage to weave this sweet from rubber bands.
Attention, TODAY only!
What would New Year be without sweets and candy?! We've been good all year, so on the last day of December we look forward to some sweet treats to make the coming year as sweet as these candies.
However, candies in the New Year can be used not only as a sweet treat, but also as decoration, for example, you can use them to make an original Christmas tree. By the way, a DIY Christmas tree made from candies can completely replace the usual one. forest beauty, and after the holidays are over, you don’t need to think about how to put it away :) In addition, a candy tree will be a wonderful themed gift for friends and family, and the fact that the gift is made with your own hands will certainly delight the recipient.
When making a Christmas tree from candies, you can use sweets of your choice: these can be either chocolates or lollipops. You should not ignore soft gelatin candies: they will turn out very original Christmas tree. If you are preparing a Christmas tree as a gift for an adult, you can make it using a bottle of champagne!
However, there are plenty of ideas, all that remains is to find the time and realize your potential!
#1 New Year tree made of candies and tinsel
The easiest option for a New Year's tree made of candies is to combine candies with New Year's tinsel. To make such a Christmas tree you will need candy, a thick sheet of paper, glue or tape, and tinsel.
#2 Golden Christmas tree made from candies
The Christmas tree is magical and doesn’t have to be green. Although in winter time year, any tree in a green robe looks magical! But we will create our own magic - a golden Christmas tree. For this we will need: candies in gold wrapping, a thick sheet of paper, glue or tape, beads on a string for decoration.

Making this Christmas tree depends on whether you want to give it as a gift or simply use it as a decorative element. If the New Year tree is being prepared for a gift, then the bottle must be full, otherwise it won’t turn out very well... In any case, you will need: a bottle of champagne, candy, tape, ribbon for decoration.

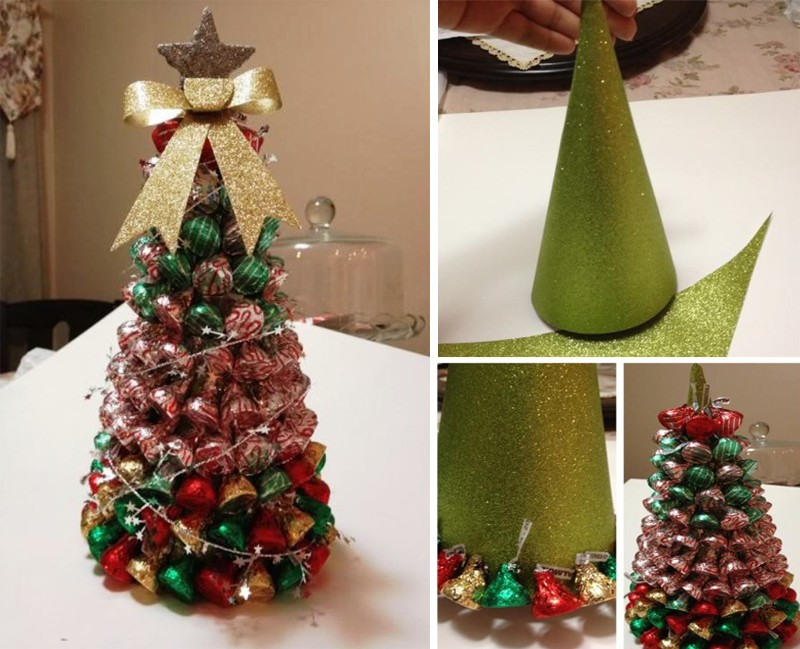
#4 Christmas tree made of chocolates
You will need thick paper or cardboard to create a base cone, chocolates, tape or glue, ribbon or bow for decoration.
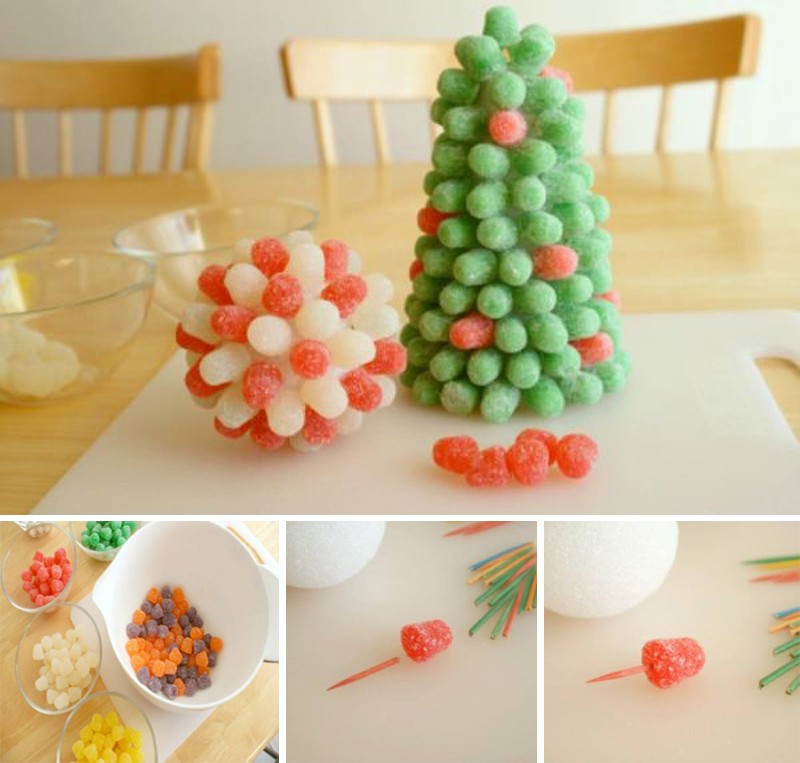
#5 Christmas tree made from gelatin candies
A Christmas tree made from soft gelatin candies will be original. You will need: foam for the base cone, gelatin candies, toothpicks.
#6 Christmas tree made from Candy Cane candies
No less interesting is the idea of creating a New Year tree from candy canes in the shape of a stick. In our country, such sweets are not usually associated with New Year holidays, but in American films you can often find them. However, the idea is quite original, so if you want, it’s worth a try. You will need: a lot of lollipop sticks or Candy Canes, a foam cone, glue or you can melt some candy and glue it on.

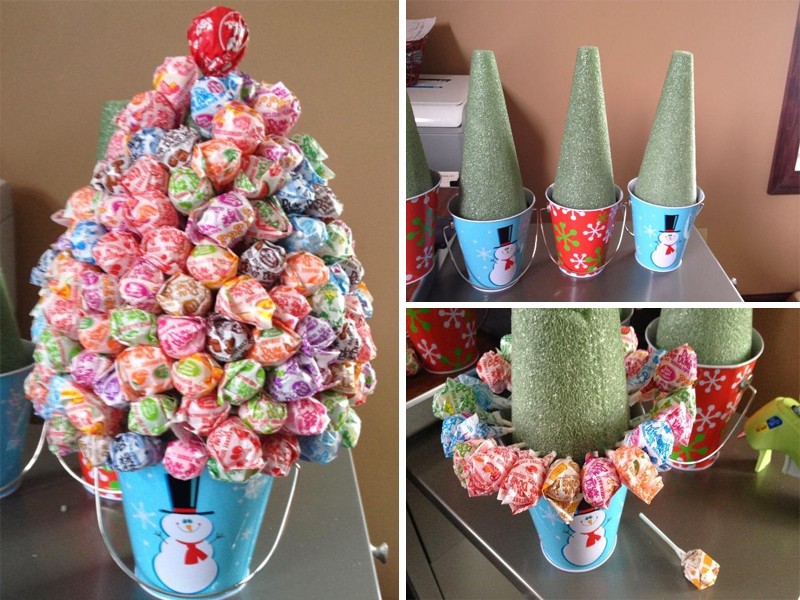
#7 Christmas tree made from lollipops
For such a Christmas tree you will need a foam cone, lollipops (for example, lollipops), and any decorative elements.
#8 Christmas tree made from candies in original packaging
You can make a Christmas tree out of candies in the most different ways, including packing candies in a box in the shape of a Christmas tree. An excellent decoration for the table and a wonderful gift for loved ones!

Now that the technology for making a Christmas tree from candies with your own hands is clear to you, all that remains is to turn on your imagination and make a unique Christmas tree that will fill the holiday with joy and add a little miracle to it.
Well, we have selected for you 10+ more ideas for New Year trees made from candies, looking at which you can be inspired to create a new masterpiece. And who knows, maybe in next year the entire Internet will be talking about your incredibly cool DIY Christmas tree.


Useful tips
Almost all people love sweets, even if for some reason they have to give it up.
And yet an unexpected surprise in the form of sweets in beautiful box, which looks like one big candy, will please anyone.
Standard packaging is boring, but the packaging... handmade unique.
To create such paper candy, you won't need much time.
Here are just a few manufacturing options beautiful packaging in the form of candy.
DIY paper candies

You will need:
Thin cardboard
Colored paper
Pencil
Ruler
PVA glue
Scissors
1. Prepare a sheet of thin cardboard and, using a pencil and ruler, draw three parallel horizontal lines - the distance between each line is the same.
2. Add a fourth line, which is 0.5 cm from the edge of the paper.

3. Now you need to draw lines perpendicular to those you have already drawn. To do this, measure from the left and right sides 5 cm each and draw vertical lines.
4. From vertical lines step back another 4 cm and again draw 2 parallel vertical lines.
5. In the place where the lines intersect, draw diamonds and, using scissors or a stationery knife, cut them out.

6. To make it easier for you to glue the workpiece, on one side of the future candy you should cut out the edges of the outer rhombus and you need to do this in the shape of cloves.
On the opposite side, the edges of the diamond need to be cut off (see image).
7. Based on the horizontal lines you drew, make the folds. Make sure that the candy does not lose its shape.
8. Now glue the workpiece, but leave the ends free.

9. Decorate the paper candy. Scrapbooking paper or plain paper with a design printed on it will help you with this.
Use your imagination - you can decorate with glitter, stickers, etc.
10. Fill the candy bar with sweets. Do this through one of the sides of the package.
11. Prepare a satin ribbon and tie the ends of the paper candy with it.

*This gift is safe for children.
* Such candies can also decorate christmas tree.
Paper candy. Option 2.


Corrugated paper candies
This origami candy can be used to decorate gifts, cards, home or Christmas tree.
It's very easy to do.

You will need:
Corrugated paper
Decorations
1. Prepare a sheet corrugated paper and bend it in half vertically.
2. By eye, divide the paper into 3 equal parts. Horizontally bend the 2 extreme parts towards the middle.
3. Now turn the workpiece over and create 2 folds on each side towards the center.
4. Turn the workpiece over. Fold its edges into triangles (see image).
5. Pull the ends of the candy.
6. You can decorate the paper candy with ribbons (with which you can hang it on a Christmas tree, for example) or draw various patterns with felt-tip pens.
Paper candy (video)
You will need:
Double-sided paper
If desired, paints and/or markers
Decorating a cupcake with paper candies

You will need:
Corrugated paper
Glue stick
Toothpicks
Small foam balls
Scissors
PVA glue
Thick thread

1. Cut out a piece of corrugated paper so that it can be used to wrap a small foam ball, and at the same time remain long ends at the paper.

2. Apply glue to the ball.

3. Place the ball in the middle of the cut piece of paper and start wrapping it.
4. Set the ball aside and let it dry.
5. Thread or satin ribbon tie the ends of the candy.

*If the paper is too long, you can shorten it with scissors.

6. Apply glue to a toothpick and insert it into the future candy.
* You can make a garland and several similar candies and decorate your house with it.
Useful tips
For the New Year, you can surprise your friends and family by giving them beautiful gift, made with your own hands.
Since the Christmas tree is one of the main symbols of the New Year, it is ideal as a gift.
You can make just a beautiful Christmas tree, or you can decorate it with candies, so you get not just a decoration, but a useful element of the New Year's sweet table.
On our website you will also find:
Here are some of the most interesting ways make a Christmas tree from candies with your own hands:
Christmas tree made of candies and bottles of champagne

You will need:
Empty bottle of champagne or wine
Scissors
Lots of small candies
Bright ribbon.
1. Place a piece of tape on each candy.
2. Start sticking the candies to the bottle using tape, starting at the bottom and working your way up to the neck of the bottle.
*Make sure that one end of the candy touches the end of the adjacent candy.
3. Glue each next row slightly higher than the previous one so that the candies overlap each other - this will make the tree more magnificent.
4. There should not be more than 4 candies on the top of the head. You can also add a bow or tape a star on it.
5. Pull the curled ribbon down from the top of the tree.
Christmas tree made of sweets and tinsel (master class)

You will need:
Double-sided tape
Regular tape
Small candies
Cardboard and scissors (for making a cone)

1. Using simple tape, glue candies to the cone, leaving small spaces between the rows of candies for tinsel.
2. Place double-sided tape in the gaps between the rows of candies and begin gluing tinsel to it.
3. Glue 3-4 candies to the top of the cone and also wrap them with tinsel.
DIY golden Christmas tree made from candies (photo instructions)

You will need:
Cardboard and scissors (to create a cone)
Double-sided tape or glue (PVA or hot glue)
Candies wrapped in gold foil (other candies if desired)
Beads on a string.
1. Cut out part of a circle from cardboard, twist it to form a cone, and secure the ends with glue.

2. Using double-sided tape or glue, begin gluing (from bottom to top) the golden candies to the cone. They should fit closely together to hide as many empty spaces as possible.


3. The gaps between the candies can be covered with beautiful beads on a string or tinsel of a suitable color.

4. You can make a star, and, if necessary, paint it or cover it with foil. You can add a bow.

DIY chocolate candy tree (master class)

You will need:
Thick cardboard and scissors (to create a cone)
Glue (PVA or hot glue) or tape
Scissors
Chocolates (truffles) in shiny wrapper.

1. Roll a cone out of cardboard and secure the ends. Cut off any excess so that the cone sits evenly on the table.
2. Using tape or glue, begin gluing the candies to the cone. Cover the entire surface of the cone with candy.

3. Start decorating the tree to your liking. You can use beads, tinsel, bows, ribbons, “rain”, and you can attach a star made of paper or foil to the top of the head.
How to make a Christmas tree from soft candies

You will need:
Foam cone
Lots of soft (jelly) candies of different colors
Toothpicks.

Use toothpicks to attach the candies to the cone.

You don't have to use the whole toothpick - you can break it into two pieces.
Simply insert one end of the toothpick into the candy and the other end into the cone and fill the entire tree with candy.
How to make a gift tree from candies with your own hands

You will need:
Several candies
Green cardboard
Scissors
Red ribbon
PVA glue.
Text instructions after the video.
1. Cut a strip of green cardboard measuring 25 cm x 5 cm.
2. Divide this strip into three parts, which will then need to be bent - make marks for future folds at 8 cm, 16 cm and 24 cm.
Also divide this strip in half lengthwise.
3. Fold the strip in half lengthwise, apply PVA glue to one half and glue both halves together.
4. Using the marks made in step 2, fold the strip into a triangle. You have now created a frame for your future candy packaging in the shape of a green Christmas tree.
5. We make shelves for candies inside the packaging:
5.1. Prepare paper strip size 25 cm x 5 cm, and make marks on it every 2.5 cm (i.e. 2.5 cm, 5 cm, 7.5 cm, etc.).
5.2. Cut the strip in half lengthwise.
5.3. Cut one of the halves in half crosswise at the 10 cm mark.
You will have 3 stripes: 10 cm, 15 cm and 25 cm.
5.4. Fold each strip as shown in the image (zigzag) to create several triangles.
6. Insert your shelves inside the frame (Christmas tree): the long strip is folded into shelves for the bottom row, the middle one for the middle row and the small one is folded into a triangle and inserted into the top of the “Christmas tree”.
7. Start inserting candies into the cells of your Christmas tree.
8. Take a ribbon 45 cm long and tie it to the Christmas tree.
If you wish, you can make a trunk for your Christmas tree out of brown cardboard. You can also put sweets in it (see video). It can be glued using double-sided tape.
*You can decorate the Christmas tree as you like.
A simple candy tree (step by step photo)

You will need:
Paper cone
Corrugated paper
Candies
Decorations to taste (ribbon, beads, artificial flowers, Christmas tree decorations).