Shellac is an innovative development that combines gel and varnish. The material is popular among women of different ages, as it has some advantages compared to conventional home manicure and acrylic extensions. Shellac can also be used for pedicures, which will look perfect for a month.
Shellac benefits:
- Save time and effort. Shellac lasts about 2-3 weeks. Its durability will allow you to do manicures much less often and quite quickly.
- Naturalness and grooming of nails.
- Shellac gel polish costs less than acrylic gel extensions.
- Variety of colors. Create spectacular designs (over 250 shades).
- It does not harm the nails, quickly allows you to grow and strengthen your nails.
- Suitable for nails of any length.
- Gel polish dries quickly, so manicure is done very quickly.
Now let's look at the shortcomings of Shellac, which are not so many:
- The considerable cost of the necessary tools and equipment, without which it is impossible to make a gel polish coating. Of course, with constant use it pays off very quickly and the costs will be much less than a manicure in the salon.
- Removing Shellac is a rather difficult process, which is better to entrust to the master for the safety of damage to nails.

Not all women can use shellac. Causes:
- thin and weakened nails. If you accidentally bend the nail on the coating, cracks will form. Manicure period is noticeably reduced.
- features of work - a long stay of hands in the water or daily hours of work on the keyboard.
Not all women will cope with its independent application, you need to have such qualities as accuracy, accuracy and some skills in creating manicure.
What do you need for a manicure?
To apply Shellac at home on your own, you need to carefully prepare and purchase all the necessary tools for the procedure. To do this, below is a list of what you need to buy.
Independent manicure with Shellac gel polish will cause some difficulties, therefore for beginners we recommend the creation of a plain design. Having learned the skill and procedure in creating a simple manicure, you can begin to try combinations of colors, a jacket, the use of drawings, stickers and sparkles.
List of required materials:
- Manicure set.
- File for grinding.
- Degreaser or acetone.
- UV lamp or LED lamp.
Attention! UV lamp should be from 36 watts. See the lamp manual for exact drying times. Professional LED-lamp is much more powerful, note that the drying time of the varnish is significantly reduced.
- Shellac base.
- Shellac color.
- The final coating (finish Shellac).
- Sponges or napkins.
- Means for cleaning and removing the upper sticky layer.
Shellac: the procedure for coating nails with gel polish at home
For success in creating an excellent manicure, thorough cleansing and preparation of nails for painting with Shellac gel polish is necessary. Without grinding and degreasing, Shellac will lie unevenly and will have to redo everything. Apply the layers only in a specific order and act carefully. Trying to apply gel polish without using a UV lamp is not worth it; it is impossible to wait for it to dry without ultraviolet radiation.
Shellac application instruction:
- Nail preparation. It is necessary to cut, file nails, remove the cuticle with cosmetic fluids or by cutting.
- Grinding. Using a soft file for polishing, you need to grind the plates of nails. You need to remove only the top shiny layer of the nail.
- Degreasing procedure. Wipe with acetone or special disinfectants.
Tip. Using lint-free napkins is a must! Vata is not suitable!
- The nails should be covered with thin layers of Shellac base and sealed (painted over) the end face of the nail. Dry for a minute.
- Coat the nails with the first thin layer of colored gel polish. Dry for about 2 minutes.
- The second thin layer of colored shellac. 2 minutes drying.
- To cover the nails with a finishing coating, applying it with a thicker and even layer, it is imperative to seal the end of the nail. Dry in the lamp for about 3 minutes.
- Remove the sticky layer with a cloth or sponge soaked in acetone or thinner.
- The process of shellac application is completed.

How to erase shellac gel polish?
The procedure for removing Shellac is quite simple and safe for nails, it can be done at home. Shellac is, first of all, a varnish, therefore it is easier to remove it than an acrylic gel coating, there is no need to file away anything.
A special professional tool for removing gel polish will help remove manicure without unnecessary trouble, but you can do without it. To do this, we take aluminum foil, cotton wool or discs, acetone, orange or wooden sticks.
Removing gel polish from nails step by step at home:
- Wash your hands well with soap.
- Cut the cotton pad in half and peel. Cut the foil for wrapping the nails.
- Moisten cotton in acetone and apply to the nail, wrap with foil.
Attention! Make sure that fluid from the cotton wool does not get on the cuticle or skin near the nail. This may cause an allergy or burn.
- Repeat the wrapping procedure with all the nails and wait 10-15 minutes. At this time, you need to do a light massage of nails for easier removal of gel polish.
- Next, remove the foil and cotton and remove the softened gel. If varnish remains in some places, use an orange or plastic stick to clean the surface of the nail. Grind if necessary (if there are visible small residues).
- Treat with nutritious oil to avoid brittle and brittle nails.
When buying materials and equipment for manicure using Shellac, carefully monitor the quality of products so as not to harm your nails. Now ready-made kits for home use are sold, but you can buy all the items separately.

A simple procedure for applying gel polish will allow you to show the beauty and neatness of your hands, give time to grow your nails and strengthen them. Shellac does not lengthen the nails like an acrylic gel, but simply simplifies the process of manicure, making it more resistant and immune to most of the factors that wipe away ordinary varnish.
So that Shellac does not begin to exfoliate ahead of time, do not neglect to carefully remove the cuticle and degrease the nail. Detachment of varnish is also possible with health problems: vitamin deficiency, taking medications, hormonal disorders.
Shellac should be stored in a dark place, tightly closed. The result of work depends on the correct storage and application. With the help of gel polish, you can create good options for a perfect manicure that can last on nails for 2-3 weeks.
Gel Polish at home: video
A bright, brilliant shellac manicure that lasts on the nails for at least two weeks can be done at home without the help of specialists in expensive salons and without giving a tidy sum each time for this procedure.
The process of applying shellac is done in stages, including the preparation of nails, applying varnish, protection and drying. Let us dwell on them in more detail.
Step-by-step instructions for applying shellac gel at home
1. Removing old nail polish, shaping nails
Before the procedure, it is necessary to remove the old nail polish and give them the desired shape using a nail file. In this case, try not to steam your hands before the procedure so that the nails do not peel. Also, if possible, do not use scissors.
- If you need to shorten the nail by a short length, buy special sapphire or sand files for strong nails and fine abrasive files for thin and weak. Fortunately, metal files are the last century.
- Keep the file at an angle, sawing from edge to edge of the nail, without affecting the periungual skin. The free edge can be left long enough, as shellac will strengthen the nail plate. If the edge of the nail remains rough after the procedure, treat it with a fine abrasive file.
2. Cuticle processing

3. Nail polishing
- Carefully remove the gloss from the nail with the soft side of the grinder, but try not to cut the nail. Brush away the dust with a stiff brush.
4. Degreasing
- Wipe the nail plate with a special degreasing agent, paying special attention to the end face - the area near the nail rollers and the inside of the free edge of the nail.
- Degreasing will allow shellac to stay on the nails for a long time.
5. The first (base) coverage
- Apply a thin layer of basic nail protection. For example, today the blues gel varnishes are very popular. This is a special tool that can protect your nails from shellac pigments and improve the adhesion of the varnish to the nail. The base should not fall on the side rollers and cuticle.
- After application, dry this layer under a special UV lamp (power \u003d 36 watts) for about 10 minutes.
6. Applying shellac
 The technology for applying Shellac color gel polish is simple.
- Roll the bottle several times in your palms.
- Cover the nail in two thin layers, each of which is dried under the lamp for 2 minutes.
- Do not seal the sides and ends. The layers should be thin so that the coating does not swell.
- For the experiment with colors, you can apply different layers of Shellac - the first with one color, the second with another. When mixed, unexpected results are obtained.
7. Application of the sticky layer
- After applying the color, the nail is “sealed” with a thick layer of topcoat. In this case, the free edge, the cuticle area and the area of \u200b\u200bthe lateral ridges are necessarily sealed. Color remains between the base and the finish.
- And after this procedure - again ultraviolet.
8. Removing the sticky layer and moisturizing
- Using a lint-free cloth and a degreaser, remove the last sticky layer and apply a special moisturizer (for example, oil) to the periungual skin.
Remember that shellac must be stored at room temperature with a tightly closed jar. So, your manicure and the brightness of the nails will last up to two weeks.
Every woman who takes care of herself pays special attention to the beauty of her hands and their grooming.
In addition to the usual manicure, shellac coating will help to decorate and add personality to your nails.
Shellac is a hybrid of gel and nail polish that is used for design in the nail industry. This type of coating has gained its popularity because of its long-term wear-resistant action, unlike simple nail polish, and in addition, with it you can create a variety of types of designs on the nails.

Any of your ideas of manicure with shellac will help to realize a professional master of nail service.

There are a huge number of types of nail designs. You can choose the color and design for any image, whether it is evening or office. And also reflect in it your mood or a certain theme of the holiday.

Currently, monophonic, matte finish and the modest design of several marigolds are popular. It can be beautiful stems of flowers, soft ornament, bitmap.

Modern materials and a palette of colors, as well as methods and design elements, will help you choose a shellac coating that will reflect your style and mood.

Shellac manicure with short nails
Huge demand and popularity received manicure on short nails with shellac. This helps to make the nails natural, but at the same time well-groomed.
In some situations and places, a large length of nails may be completely inappropriate, for example, an office dress code, an event at the highest level, or if you are a senior person or medical worker. In such cases, coating on short nails is suitable.

A huge palette of shellac colors will help you choose the design for the right occasion. Choosing solid colors in pastel, natural shades will make your hands beautiful, well-groomed, and will not attract much attention.

Choosing bright, red or dark colors can complement your image.


So that the monophonic coating is not too boring, you can dilute it by highlighting one or two nails with a different color. It can be a glitter coating or a small pattern.

In the warm seasons, saturated, vibrant hues are popular, and in the cold season, the choice falls more on the colors of dark tones.

French shellac design
French manicure is a classic. It has been universally recognized for its practicality and beauty.
French is a type of nail design in which the nail plate is covered with a camouflage shade of natural color, and the free edge is highlighted in white in the form of a so-called “smile”. This is the most common design suitable for any situation, event and will always be popular.

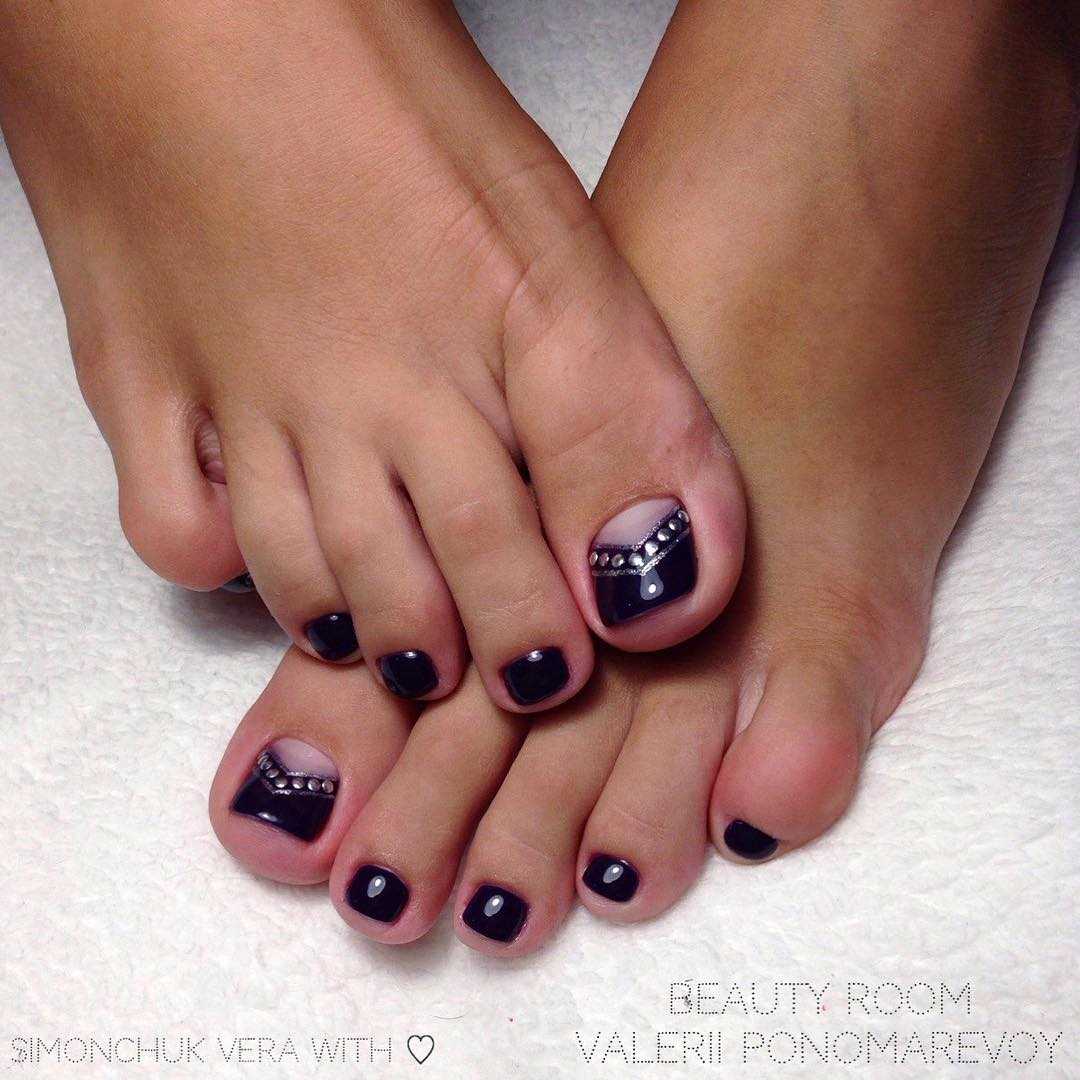
For women who want to stand out or attract attention, French manicure will help with shellac in bright or dark colors. For example, a design where the free edge is made in black with a spangle border will not leave indifferent lovers of black and dark colors.

In addition, a special piquancy will add a jacket made with a non-standard smile, and in the form of an angle, square, slanted line.


Lunar design with shellac
Lunar nail design has become popular not so long ago. In this method of nail manicure with shellac, a line of the hole is located, which is located at the base of the nail.
There are a huge number of hole design options. For example, you can cover the nail with one color and highlight the other hole.

The lunar design, in which the hole remains uncovered in color, also received great practicality. The nail has the ability to grow back, and in such a design it is almost imperceptible.

The holes can be highlighted in a natural oval shape, as well as in the form of a corner or decorated with shiny edging, monograms and a dot pattern.

Popular nail design ideas
Fashion in the nail industry does not stand still. And all the new design elements also appear in shellac-coated manicures in 2017.
The manicure with a matte finish was very popular, it looks stylish and unusual.

For lovers of glossy surfaces, there are various types of design. Refinement and romance will give the nails a design made using watercolor technique.

In this way, various flowers are painted on the nails. Broken glass, specular gloss and cat's eye are in great demand.

Gentle or wedding manicure with shellac
The image of the bride usually involves light and white shades of shellac coating. Manicure in the form of a white jacket or moonlight design in light colors will look natural and harmonious.
The use of openwork drawings, monograms, as well as sequins and rhinestones will add a festive mood design and complement the wedding theme.

The length of the nails is usually chosen from the preferences of the bride, but most often they choose a long form of nails, since any design will look better on it.

Nail Design with Sparkles and Rhinestones
A special attraction in women appears to everything shiny and sparkling. This does not bypass the choice of nail design. With the help of its diverse palette, this design can be made with shellac.

There are colors with the addition of small, large spangles, they can be of various colors and shapes.

Dilute the plain shellac coating by adding rhinestones to several nails. They can be laid out in the form of a picture, a square, a small ornament, a triangle or inlaid with them the entire nail, which looks very impressive on the nails.

Gradient shellac design
One of the designs of shellac nails is gradient or ombre. This is a way of applying two or three combining shellac colors on a nail, in which they create a smooth transition from one color to another.
This unusual design is difficult to do.

This technique is not even performed by all manicure masters. But with the help of a special tool - Airbrush and paints for it, the gradient is easy to execute.

There are several types of gradient - it is vertical, horizontal or mixed. Designed with light shades of shellac, this design will add romance and lightness to your image, while bright or dark tones will help to attract attention and complement your image.

Nail design photo with shellac


Coating with this composition helps to maintain an attractive and well-groomed manicure much longer than when using regular varnish. A practical, convenient and persistent tool has long been appreciated by many girls, because it can be applied on its own without expensive beauty salon services.
How to apply shellac
Before you understand how to make shellac, it is worth understanding the features of this coating. The tool is an invention of an American company, the main components of which are ordinary nail polish and gel. The coloring matter can last up to four to six weeks, and then requires removal and renewal. Thanks to the resistance, hand care is greatly simplified, because with the help of the composition, it is necessary to apply a color coating on the nails much less often.
There is nothing complicated in coating with this substance, because the procedure is almost identical to painting with ordinary varnish, only in this case you must follow the safety rules when using electrical devices. Removal is carried out with a special liquid that does not injure the nail plate like cutting. The range of colors of the super-resistant coating allows you to choose any color for manicure. A feature of the material is that it must be dried in a UV lamp.
How to make shellac at home
Many girls are interested in how to make shellac at home? It is not so difficult if you buy all the necessary tools and materials for painting. Applying only gel polish will be wrong; you will also need a base and topcoat. Another condition is the purchase of a UV lamp or LED-drying. The first device is cheaper, but it dries longer than the second device. If you will do manicure only for yourself, and not work on the flow of customers, then you can buy a regular UV lamp. Additional tools are:
- file for shaping natural nails;
- buff, which is designed for grinding and polishing;
- special shellac remover;
- degreaser;
- orange manicure stick;
- special strips, if you plan to do the jacket not by hand.
Putting shellac at home step by step
Before applying shellac, you should carefully consider the design - from the form to the choice of color of the main coating. It must be remembered that all the decor elements in the form of spangles, rhinestones, sand are applied to the color layer just before the finish fixer, painting can be done on the basis or on shellac. Be sure to keep in mind that acrylic paints spread on a gloss, so they need to be made thicker and not abuse water. Covering the nail with a fixative follows a completely dry pattern. The procedure for applying the composition does not do as much harm as coating with gel or acrylic.
So, after preparing everything necessary for the implementation of manicure with gel polish, you should understand how to apply shellac in stages:
- First of all, you need to prepare your nails: treat the surface, giving shape, getting rid of the cuticle.
- After that, you can already apply a color layer and fix the gel polish.

Preparatory technology for applying shellac at home
Even a girl who is not familiar with the features of manicure art can prepare her nails for shellac coating. Here is a step-by-step guide. how to apply shellac:
- Initially, you should remove the old varnish with acetone, if the nails were previously made up. If the previous painting was done with shellac, then a remover solution is applied to the nail plate. A small amount of liquid is poured onto a cotton pad, and after it the nails are processed. For convenience, the masters in salons put on their own kind of clothespins.
- Next, you need to proceed to remove the cuticle, which is carefully pushed aside with an orange stick.
- The next manipulation is filing the nail, giving it a suitable shape.
- Then - leveling the surface of the nail plate with a buff. Movement should be from the cuticle to the free edge.
- Having started the final stage in preparation, do not forget to degrease the nail plate so that the base coat firmly holds the nail and gel together.

How to paint nails with shellac at home
Before direct application of the substance, there is no need to grind the nail plate too carefully, as is the case with the extension. After the preparatory phase, it is the turn of the foundation, which should not be smeared with a thick layer. For a successful procedure, you need to understand how to do shellac correctly, a phased lesson will help this novice master:
- Apply the base with a thin film, and then dry in the lamp, following the instructions. A sticky base will help to better adhere the main material to the nail. Depends on the base how long shellac will hold.
- When the base is dried, it's time to apply color gel polish. If you are not sure how to make shellac, try so that the coloring matter does not fall on the cuticle and sides of the fingers. If you are inaccurate, then the gel polish will begin to chip and lag behind the nail.
- It is important to know: apply no more than two layers of the product, each of which should be thoroughly dried, following the instructions. If you decide to apply more than two layers, then the nails will be too thick, which will ruin the whole aesthetics, and the coating will quickly crack.
It is worth noting that many now prefer a matte effect on the nails. You can use both ready-made Bluesky gel polish and make the desired effect yourself at home. The glossy finish turns to matte with the help of special tops or through the skillful use of steam baths. Everyone can learn the secrets of nail art, if she has at hand a phased guide.
A varnish that does not crack after contact with water is not washed off with detergents and even shines for 5 days, how fresh is a dream? No, because shellac manicure guarantees just such results, it allows you to design any design, embody all the latest fashion trends on nails.
Views and ideas
Shellac is a gel polish that withstands almost all known aggressive factors. It can stay on the nails for 2 weeks, sometimes longer, it all depends on the growth rate of the nails. At the end of its term, shellac should not break off or peel off - just the hole near the nail demonstrates the transition from a natural plate to painted areas, which is not an aesthetic sight.
Shellac can be matte, glossy and with sparkles. Now some companies have also introduced the original varnish, in which the coating changes texture after hardening. It becomes velvet, grainy or sand.
Shellac manicure options are so diverse that it is almost impossible to select any of them. Every day new ways of marigold design come up. Consider the most popular of them:
This type of varnish has a huge amount the benefits. Firstly, with it you can easily grow nails. Together with the varnish, the technology of strengthening the plates is used, which prevents the appearance of peeling, eliminates brittleness and lamination. Secondly, it does not require care. You painted your nails and walk like this for two weeks, completely not worrying about their appearance. Thirdly, any girl can do it. All you need is sets of varnishes, an ultraviolet lamp and a little patience.
But there is one drawback. Many girls like the eclecticism of the water style of design, but, alas, it is impossible to make a water manicure with a gel - it drowns in water due to its high density.
Let us consider in more detail the various shellac techniques.
Short Nail Manicure
Ideas for designing small nails are very diverse. You can draw a pattern, glue liquid stones, add plates with rhinestones, sparkles, stripes, etc. step by step how to make a gentle gradient manicure with shellac (ombre) on short nails:
- We suggest using white and red, which are very suitable for the festive decoration of nails with gel. First, a degreaser is applied to the nails, then they are lubricated with a base and dried in a lamp;
- After that, the most interesting part begins - drawing a gradient. A feature of working with the gel is that every shade will need to be dried in a lamp;
- The base is applied first, it is dried. After that, the extreme gradient is painted. To do this, a few drops of varnish are applied to the sponge. After drying again. This is repeated until the full sketch;
- Materials can be applied immediately - if, for example, the gradient is not complicated. In other words, smear all the varnishes one by one on the sponge, and then attach it to the nail. This will save a lot of time, although the pattern will not turn out as beautiful as when separately drawing each level of the gradient;
- After you need to fix the design and dry it with a lamp. The sticky layer is rubbed off with alcohol.


You can also make mirror manicure shellac, it is perfect as a wedding or just festive. This is the easiest technique for beginners. To do it for yourself, you will not need anything except a lamp, foil and a varnish fixer. The nail is cleaned with a buff, after which the base is applied to it. A foil is glued to the base. It is trimmed around the perimeter and leveled. The second layer needs to be applied fixative. After the nails are dried in a lamp.
Lunar manicure with shellac
The lunar version of the design of nails does not go out of fashion. It can be done on nails of any length, moreover, the holes can be located on the tips or in the depressions of the nails, painted over or not. To select the desired type of hole, you need to look at examples and take into account some features:
- A non-filled hole grows less noticeably than a filled hole. So, such a manicure will last longer;
- In the application process, several transitions are formed, so if 2 holes or more are made, then the latter will rise slightly above the rest - not everyone likes this;
- It is best to do this design in contrasting colors: red - black, blue - white, etc.


How to make a moon manicure with shellac at home:
- It is necessary to clean the plate and apply a base on it, then dry it under the lamp;
- The contour of the future hole is drawn. This is done either with a thin brush or with a stencil. The first "frame" of the hole is made of the primary color;
- After drying is done;
- A hole looms. Professionals prefer to work “live”, without cliches;
- It remains only to fix the varnish, dry it and wipe it with alcohol.
Any salon performs this technique, because of all the design options, it is the simplest and most elegant. In the same way you can do a pedicure.
Video lesson: how to make shellac manicure at home
French shellac
Shellac-coated jacket is a recognized classic of manicure. It is suitable for any season and holiday. Consider how classic French manicure is done with shellac varnishes:
- A nail is processed by a buff and a base. Then it is dried under the rays of a UV lamp;
- The main part of the plate is painted in pink or beige. Of course, you can use black or red, but it is recommended to leave dark colors on the cold season (autumn-winter), when the contrast with the skin will be more noticeable;
- Next, a brush draws a dot of the selected shape. It can be straight, oval, triangular. Drying is done;
- On the contour, you can stick rhinestones or draw a pattern. After the fixative is applied.


You can complement this style with any pattern or stickers.
Winter and New Year
New Year and winter shellac is a stylish holiday manicure that seems to bring a holiday closer to us. Its difference from other options is variations on the theme of drawings. Patterns can be very different: Christmas tree branches, cones, balls, bows and others.
Consider how to make a cool manicure "beads" for the new year:
- Beads are made of black, red and white varnish. The base is applied and dried, after which the base is painted over in white;
- Red dots need to draw a kind of moon at the base of the marigold. Also, the point is located in the center of the plate. Everything is dried out;
- After that, a brush and black polish are taken, which around the center point need to evenly draw the petals. Inside, these petals are painted white, but so that a black border is visible;
- Dots are drawn around the petals;
- This is done on one of the fingers. The rest are drawn in dots. Your goal is to draw a rhomboid pattern with a dotter, where the four tops of the rhombus are larger than the side points;
- If desired, this manicure can be used for summer or spring, just with other colors.


If you prefer to draw patterns, you can make a simple jacket, and draw a Christmas tree or a snowman using the white tip.
Knitted
Photos of knitted manicure shellac surprise with its beauty and grace. But it seems that it is almost impossible to fulfill. In fact, this is a very simple technique, for the implementation of which you do not need to be a super-master of manicure. You will need varnish, brushes, a lamp and powder (sand for nails). Steps:
- Gel polish is applied to the prepared nail. The first strip should be thin, but voluminous, i.e., rise above the plate. If the varnish begins to spread, then you need to quickly apply a strip and sprinkle it with powder or sand;
- The following patterns are located symmetrically on both sides of the plate. Draw a few letters "Z", how to draw them becomes clear after watching the video;
- Further, powder is poured on shellac. It is very important that the varnish is unpaste;
- The nails are dried, after which they are cleaned of the remnants of the powder with a brush. That's all, fixers or repeated drawing of a pattern are not required.


The price of shellac depends on where and by whom the manicure is performed. Naturally, the services of fashion salons will cost much more than home masters. Novice specialists often offer to issue nails for free or literally for consumables, which is relatively inexpensive. But if you buy a lamp, you can conduct sessions at all for free.