Strong and sparkling manicure that did not crack with every wrong movement is the dream of any woman, and gel polishes become salvation, but many do not want to visit beauty salons weekly and wonder: how to apply shellac on nails at home and is it fraught with unpleasant the consequences? We will talk about this in this article. 

Materials you will need
It should be borne in mind that this procedure for the first time may seem rather complicated and intricate, because you need excellent eyesight, a strong hand and a lot of accessories, without which you will not get the desired result and there will even be a risk of infection.

Before you start applying shellac, make sure that you have everything you need, namely.
UV or LED lamp
Many are afraid of this subject and try to find a way to do without it, but in fact it is impossible. If the nail plates do not give in to radiation, the varnish simply does not absorb and spreads. In fact, there is practically nothing to fear here. In two minutes, a bluish light will not do any harm to your hands.

It basically looks like an ordinary colorless liquid and protects nails from gel irritation. It contains some useful substances that nourish the nail plate.

Cotton pads, lint-free cloth
It will be needed to cleanse the nail of fat and in the case of leakage of varnish on the skin.

Colored shellac itself
At first, it is advisable to do only one-color manicure, do not experiment, create contrast and patterns on the nails, until you learn to apply the gel accurately and without errors.
Alcohol-based degreaser
At the very beginning of the procedure, it cleans the nails of the sticky layer, as a result of which shellac will lay down even strokes and the desired thickness.

Ordinary soft file
It is necessary in order to give the nails the correct shape and to polish the nail plate before painting, which will eliminate roughness and roughness. In the second case, a special synthetic file is used.
Shellac varnish instruction
After making sure that all of the above items are on your table, you can safely proceed directly to the process itself.

First stage
- Round off your nails, removing all sharp edges and making a perfect semi-oval using a regular file.
Next, with a hard synthetic polisher, swipe the nail surface several times in one direction, try not to touch the skin, as if broken, wounds will form - the “entrance gate” for any infection, dirt and dust. If the skin is still injured, be sure to treat this place with an antibacterial agent.

- After that, be sure to apply liquid to the nails to remove the stickiness or use ordinary diluted alcohol. Nail plates should shine and not have a single greasy speck, otherwise even the most resistant gel will begin to crack ahead of time and even peel off.

- After cleansing, touch the nails with only brushes, so as not to contaminate the plate again, do not touch your fingers. If there are wet traces of alcohol, you can wipe the nails with a lint-free cloth or cotton swabs.

Main stage
- Carefully cover the nails with a thin layer of the base product. It is advisable that the cuticle remains an untouched surface with a size of 2-3 mm. Then, for 2 minutes, place your hands under the lamp. If you feel a burning sensation during drying, it means that the varnish is sagging on the skin or you applied it too greasy. Remove unnecessary liquid with a special orange stick. You should get a transparent dry surface of the nails.

- Now proceed to the application of shellac itself. Carefully cover the entire area of \u200b\u200bthe nail with it, leaving no gaps and making vertical lines in one direction. Use the lamp again for 2 minutes, as in step 4. Alternating hands is a good option: first, the little finger of the left hand - drying - the little finger of the right hand, etc. This will save time, and also the likelihood that you hook the still-dried varnish with your hand will decrease. It is recommended to apply two layers of medium density, and after each again place your fingers in the lamp.

Final stage
- When the shellac is completely dry and evenly distributed throughout the area, fix the manicure with a special finish gel. It is recommended to apply a layer of medium thickness so that the color does not fade and there are no streaks left. Dry again for 2 minutes.
- When all of the above actions are done, complete the procedure with an alcohol-containing grease remover. Do not worry, all shellac will not be completely removed, only the sticky, unnecessary layer formed after the lamp.
Security measures
Do not forget that shellac is a rather difficult substance and, if used improperly, can cause significant harm. For example, when you remove it. Many make a gross mistake: they hook a piece of varnish and begin to delay it, hoping that the product will be removed by itself without unnecessary trouble, but this is far from the case. You risk seriously damaging the integrity of the nail and lose the top surface.

It is also necessary to pay attention to the condition of the nails in the first days after applying the gel. Because of the color layer, you are unlikely to be able to consider blueness, cracks, but if soreness, swelling, redness of the cuticle occurs, immediately consult a doctor. Do not close your eyes to skin lesions around the marigolds, since all this is dangerous by the penetration of bacteria, and because of the close location of the capillaries, by infection in the blood itself.

Conclusion: if you did everything correctly and clearly, you should get beautiful nails with a perfect, rich and fresh manicure that will delight its owner with durability and save you from daily correction of peeling varnish.

Video on how to apply shellac:
Well-groomed hands with a beautiful manicure are every girl’s calling card. Your interlocutor pays attention to them first of all, so the nails should be in perfect condition. Today, there are many different manicure creation techniques, one of which is shellac. Unlike building, shellac can be made on your own at home
Shellac - a new word in manicure
Relatively recently, a few years ago, american company CND Launched Shellac's Brand New Nail Polish. This varnish had a special composition and could stay on the nails for two weeks. Women, tired of the usual varnish, which could not live even five days, gladly met a new coating.
There is total 12 tones of shellacbut over time, other colors and shades appear.

In addition to its decorative function, Shellac has the ability to exert a beneficial effect on weakened nail plates, strengthening them and eliminating such unpleasant phenomena as brittleness and peeling.
How to apply shellac at home?
Unlike helium building, shellac can be made at home independently. This is a good option for those who do not like to visit salons and trust their nails to unfamiliar masters. So, before applying shellac, you need to prepare for the procedure.
You will need: ultraviolet lamp, shellac set (base, top, any color from the palette), sponges, dahlia stick, gel polish remover, manicure set, cuticle and nail oil to soften the skin.

![]()
Degreasing
Tidy your nails: cut them to the desired length. Then remove the cuticles with a special tool. To make the helium coating better go down, remove the shine with a nail file - carefully polish each nail. After that, the nails are treated with an antibacterial agent and degreased with alcohol.

![]()
The main layer (base)
When the nails are ready, they apply a thin layer of the base base. Nails need to be dried not naturally, but under a UV lamp. It can be bought at any specialized store. After covering the nails with varnish, hold them for about two minutes under the lamp. Each base layer must be dried separately.

Application of colored varnish
Then comes shellac - it is applied in the same way as regular varnish. Dip a brush in a varnish and gently paint a nail. After the first coat, dry under the lamp, then paint over your nails and dry again. You can apply no more than three layers!

Topcoat application (topcoat)
When the color layer is dry, a top coat is applied to fix the effect. It is painted in one layer so that there are no stains. This layer should completely cover the colored varnish. The fixer is also dried under the lamp. When applying it, you need to make sure that this product does not get on the skin, otherwise the manicure may deteriorate.

How to remove shellac at home?
Removing shellac is as easy as applying. It does not need to be filed off nails, like a helium coating. Take cotton pads or sponges and generously soak them in a special nail polish remover. Wrap each finger in such a sponge and wrap it with foil. After 10 minutes, massage your nails, and then remove the sponges. All varnish should remain on cotton. The remaining coating can be removed with a wooden stick.

Pros and Cons of Shellac
 Start with the benefits this cover. Shellac contains a whole set of components that nourish and strengthen the nail. Also, this coating is completely hypoallergenic, so there is no need to worry that an allergy can begin after a manicure.
Shellac is suitable for owners of very brittle and thin nails, its special components give the nail plate special strength and protect it from external damage.
Shellac is very convenient to work with. If the gels need to be applied with a spatula, which requires special skill, then shellac, like ordinary varnish, is applied with a brush. An important advantage of shellac is that it needs to be dried under a lamp. And this means that it will not be greased and not damaged, as is the case with ordinary varnishes during drying naturally.
The procedure for applying shellac does not require much time - only 30 minutes and you become the owner of the perfect manicure. But it is especially pleasing that this coating is removed easily and without harm to the nails. It takes 10 minutes to remove it. It is important that the varnish does not need to be cut off, which means that the nail is injured.
Shellac holds well - for two weeks you do not have to think about manicure. With this varnish you can wash the floors, cook, wash and do other housework - the coating will remain perfectly smooth and will not peel off like a regular varnish.
If shellac is applied to the nails, then you can completely safely put on leather or rubber gloves - the coating will remain ideal.
A rich palette of colors provides a huge field for creativity. Nails can be made in restrained tones, or you can choose a defiant red, glamorous pink or calm blue. Varnishes of different colors combine perfectly. Therefore, you can make not only monophonic nails, but also come up with various ornaments and patterns.
 Shellac has practically no shortcomings, and, nevertheless, it not perfect. For many girls, the existing palette of colors seems too boring - there are only 12 of them, however, new shades constantly appear. And yet, it is not always possible to choose the right color.
Compared with conventional varnish, the application of shellac is quite expensive. Even if you decide to make it at home yourself, you will have to buy a lamp, gel base, colored varnishes and a fixing agent. Separately, you will have to spend money on liquid to remove it. Despite the fact that many are advised to remove the varnish with ordinary liquid, it is worth investing in a special one - it removes the coating easier and works more carefully with the nail.
Before buying a kit for applying varnish at home, do one procedure in the cabin and see how the varnish will lay down and hold on your nails. It lays down perfectly on some nails, but does not hold on others at all - it all depends on the individual characteristics of the body.
 Shellac is an ideal tool for those who dream of a beautiful manicure, but do not agree to build up nails or do other salon procedures. Shellac strengthens nails and makes them strong, it holds well for two weeks and is not afraid of mechanical stress. The main thing is that such a coating does not spoil the nails and looks very stylish and presentable. Shellac can be applied and removed at home - for this you will need a UV lamp and a set of specials. funds.
Educational video
Nail design with shellac: 30 photos
Fashionable ideas of French, wedding, manicure with shellac. Gradient NEIL ART, moon manicure, shellac with drawings, glitter, rhinestones. Shellac (Shellac) for short and long nails.


The question of how to make shellac nails at home, today many women of fashion ask, because the procedure in beauty salons is quite expensive. Each girl dreams that her manicure lasts as long as possible and does not upset her chipped edges at the most inopportune moment. That is why many manufacturers of products for these manipulations offer innovative resistant coatings. Truly impressive gel polishes - they stay on the nails for up to three weeks.
The most popular gel polish can be called a product of the Schellak brand - many fashionistas have their favorite shades from the shellac palette. But the application of gel coatings is accompanied by one difficulty - for their drying a special UV lamp is required, so most often such a manicure is done in salons. If you are satisfied with gel polishes, and you plan to do such a manicure regularly, it is worth considering the purchase of a UV lamp. And we will tell you how to make shellac nails at home, a step-by-step instruction with video will help to understand all the intricacies of this process. It is also described in detail about how to remove shellac varnish at home without much difficulty and without harm to the nail plate. 

What do you need for shellac at home - what can you save on?
In addition to the aforementioned lamp, you will need a whole set of tools and tools that can fly into a pretty penny. Let's find out what is needed for shellac at home, and whether it is possible to reduce the cost of manicure. So which lamp to choose and what can you save on?
It is not necessary to buy a lamp from the same manufacturer as the varnish. You can buy a less expensive lamp that will cope with its task no worse than equipment from well-known brands. In salons, often before starting coating, the nails are treated with a special cuticle preparation. It is quite possible to do without it by making the usual trimmed manicure or by moving a small neat cuticle with an orange stick. 


By the way, an orange stick can be replaced with a plastic one - it will be cheaper. To polish the surface of the nail plate, a buff is used, this tool is a rectangular parallelepiped with abrasive sides. Instead of a buff, you can take the usual small file. 


Before applying the gel coating, the nails must be degreased. In salons, this is done using a proprietary primer, and to coat the nails with shellac at home, it is enough to wipe the nails with acetone-containing liquid to remove the varnish. 
After applying shellac, you need to remove the sticky layer, a special liquid also exists for this procedure, and we also successfully replace it with the aforementioned acetone-containing agent. Remove the sticky layer with a lint-free cloth - a cotton pad or swab will not work. 
What else you should not save on - color (tinting) coating, base coat and top coat, all these products must be from Schellak. At least one color coating is required. If you are going to realize an unusual shellac design at home, choose several contrasting shades. 
Step-by-step instructions for applying shellac on nails (with video)
The procedure for creating a manicure using shellac differs significantly from the procedure for staining nails with ordinary varnish - it is much more complicated. Therefore, the first few times we recommend that you strictly follow when applying shellac at home with a step-by-step instruction explaining all the steps.
- Put your nails in order, as usual - adjust the length, shape, take care of the cuticle, but do not use any creams and oils.
- Sand the surface of each nail with a nail file or buff. This will increase adhesion - improve adhesion of the coating to the surface of the nail, which will positively affect the durability of the manicure.
- Apply the primer and wait until it dries, or wipe the nails with an acetone-containing product using a lint-free cloth.
- Apply a basic coat of shellac in a thin layer. The end face of the nail must be sealed - the coating is applied to the end of the nail, and a little to its reverse, lower side. This technique will help prevent the formation of chips, it can be used when applying ordinary varnish.
- After applying the base, dry the nails in the lamp for one and a half minutes.
- Apply a thin layer of colored shellac.
- Dry the nails in the lamp for one and a half minutes.
- Apply a thicker layer of colored shellac, sealing the edge of the nail.
- Dry your nails under the lamp for two minutes.
- In a dense layer, apply the finish coating, capturing the end of the nail and the cuticle area.
- Dry the nails in the lamp for at least two minutes.
- Remove the sticky layer using a lint-free cloth and a special tool.
If you are doing manicure in more than one color, but are doing drawings on the nails, you need to place your fingers under the lamp for a minute and a half each time after applying elements of the next shade. The step-by-step application of shellac at home will take you about an hour, but, having caught it, you can spend about 40 minutes on a manicure. After applying the base and the color component, sticky layers also remain, but they do not need to be removed - thanks to them, the manicure lies evenly and more densely, lasts longer. If you want the color of the varnish to be slightly transparent, you can apply the color varnish in one layer.
Look at the video with shellac manicure at home - this is useful information for future masters:
How to make French design jacket shellac at home?
French design jacket shellac can be called universal, it is suitable for both office and party. How to make it beautifully and accurately - we will consider further. Many fashionistas have adapted to do French nail art using stencils, but we hasten to upset you - shellac jacket at home is done manually. The use of stencils is unacceptable, since they will leave sticky traces, and the finish coating will not be of high quality, which is fraught with the appearance of chips and cracks for several days. In order to draw a white or colored edge of the nail, you will need a narrow brush. For a perfect result, first practice drawing a smile line with a regular varnish. 
 Before you start creating a jacket, you should not carry heavy bags or wash by hand. If the arm muscles were tense, the arms would tremble and a steady smile would never work. Pour some white lacquer onto a piece of foil to make it easier to dip a thin brush into the lacquer. Squeeze the brush well against the edge of the bottle and make two strokes from the lateral edges of the nail to the middle, drawing the border of the smile. Draw a solid line exactly along the strokes. Now color the smile zone with dotted motions, minimizing touching the original line. After applying white varnish, keep the nails in the lamp for one and a half minutes.
How to remove shellac varnish at home: you can remove and erase it in different ways
And now you fully appreciated the benefits of gel coatings, and the design honestly served several weeks. It's time to learn how to remove shellac at home and at the same time not to spoil the nail plate irrevocably. This can be done in different ways.
Special kits are sold, which are used by masters in salons. These are pieces of foil with small fragments of sponge. These expensive sets can be successfully replaced with cotton pads and baking foil, cutting both into pieces of the right size. Schellak recommends removing the gel coating only with a special proprietary shellac remover, but practice shows that a conventional nail polish remover, which costs several times less, is quite suitable.
Before removing shellac varnish at home, soak cotton pads and attach them to each nail. Now wrap the fingertips with pieces of foil and firmly press the cotton pads to the nails. Soak the foil on the nails for 15 minutes, periodically pressing on the cotton. Remove the foil and remove the shellac from the nails with an orange or plastic stick. If you applied shellac too thick, you may need to repeat the procedure how to remove shellac at home. If this does not help, and in some places the varnish remains, cut it off with a manicure file, after which do not forget to lubricate the nails and the skin around the nails with cuticle oil to avoid drying out. 
Now you know how to apply and how to erase shellac at home. Perhaps soon this kind of manicure will become your favorite way of nail design. Finally, we suggest watching a video of manicure with shellac at home in order to finally fix in memory all the subtleties of this process.
Due to the fact that now on the Internet you can find many video tutorials "how to do at home manicure with shellac coating for beginners," each girl can make a stylish and fashionable manicure on her own.
Shellac coating has many advantages. Firstly, the manicure turns out to be durable, secondly, it can be used to realize a wide variety of ideas, and thirdly, shellac coating has now become available, multi-colored bottles and all auxiliary materials can be bought at every shopping center.
Shellac coating features
The emergence of shellac is a huge breakthrough in the nail art industry. Despite the fact that only 5-7 years ago they learned about the new product in large quantities, the history of the company that gave the fashionable world such a convenient product begins in 1979. Shellac was able to embody the qualities of a gel and varnish.
The principle of fashionable shellac manicure is ease of application, durability, impeccable appearance, quick removal.

The application technology is identical to ordinary varnish. However, there is one caveat. In order for the coating to "set", it must be dried in a UV lamp. It takes no more than two minutes to dry one nail.
The peculiarity of shellac coating is that it does not lose its glossy gloss even when exposed to detergents. The colors are saturated and deep. Using this coating, it will be easy to grow your nails, even if they were previously layered and had increased fragility. Shellac manicure can have any design. Using gel polish there is a unique opportunity to combine various techniques, create interesting images with moon, Japanese, French manicure.
We make manicure with shellac at home
In order to make a beautiful manicure with gel polish, you need free time, accuracy and suitable tools. What is needed for beginners? Be sure to buy a UV lamp, as well as a standard set of tools, colored gel varnishes.
Shellac manicure set can be purchased through a specialized online store or ordered in any retail salon that sells manicure accessories.
There are various ways to make shellac manicures at home. The standard way is as follows:
- Dry manicure is performed. If there is an old coating, it is removed. A few drops of emollient are applied to the cuticle. After a few minutes, the cuticle must be pushed back with an orange stick. With the help of files, the nails are given the desired shape. After carrying out the above procedures, the surface of the nails must be degreased.

- A transparent base is applied, which is dried in a UV lamp (approximately 1 minute).

- After the base is prepared, you can begin to apply the color layer. The technique is exactly the same as when applying ordinary varnish. The application of shellac begins with the little finger. After that, the little finger is placed for 5-6 seconds in the lamp. Each layer with shellac must be dried in a lamp.

- Finishing stage - a fixing varnish is applied. It is also dried in a lamp for about two minutes.
- The sticky layer is removed with a napkin and clinser.

- Grease the cuticle area with nutritious oil.
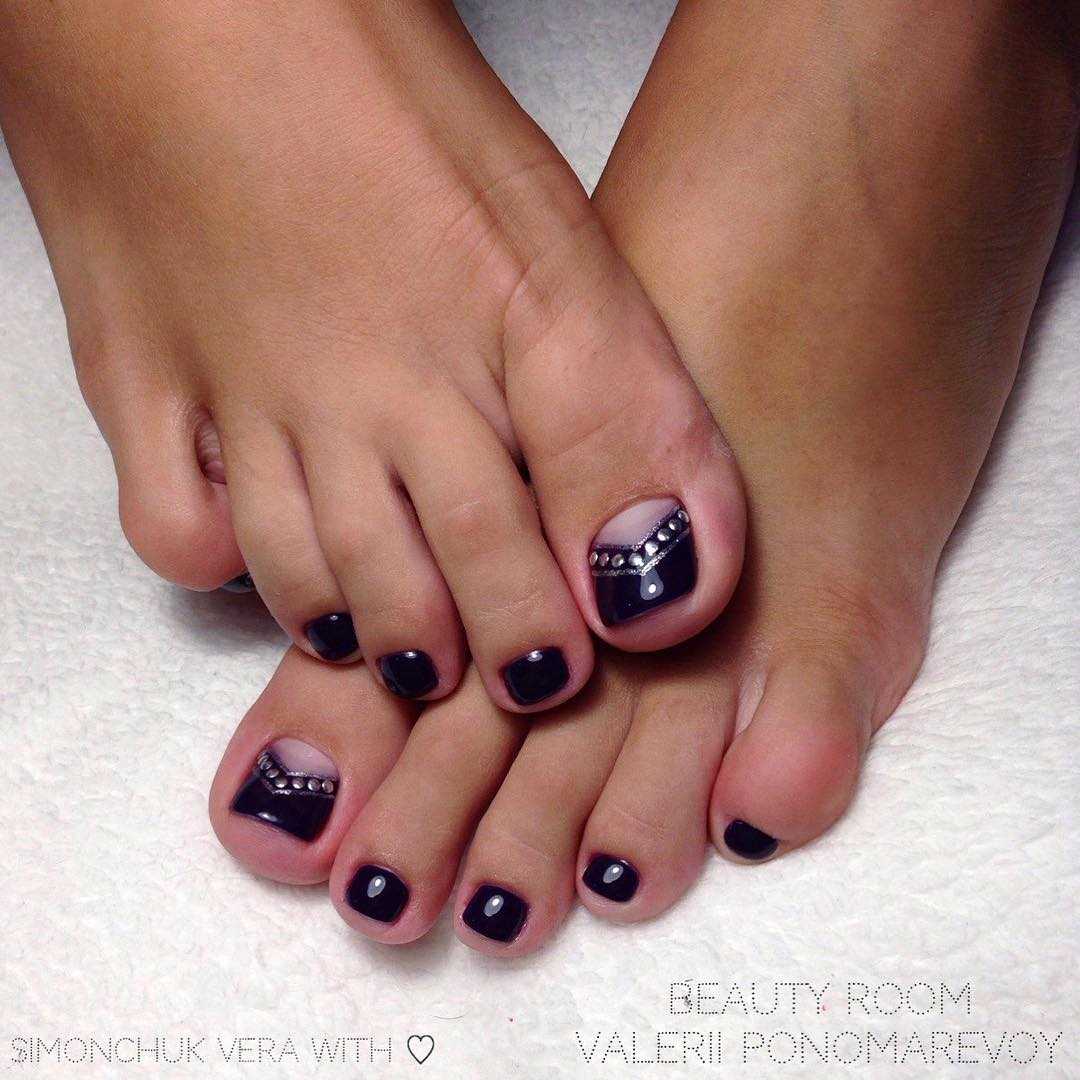
Shellac manicure: design features for short and long nails
To create a beautiful, original design with shellac will work on both short and long nails. This can be an interesting painting, drawing, various elements from rhinestones, sparkles, comifibuki, colored and velvet sand, etc. This season matte manicure is incredibly popular. Its feature is that it can be combined with gloss. Such a combined technique will look harmoniously at any length. On short nails, a solid color coating looks good: wine, purple, blue, emerald, etc.

Shellac manicure: design on short nails
Short nails are not only practical and convenient, but also very fashionable. Fashion trends of shellac manicure for short nails are very diverse. Today you can not limit yourself to anything, just follow the main rule: observe the measure in the decor.

The gradient in any manifestations looks insanely beautiful on short nails. It can be horizontal or vertical. For spring manicure, a gentle combination of shades is suitable.

Original looks oblique service jacket. The contrast line can be made in any color scheme: black, red, blue, lilac, pink.

On short nails, the effect of “cat's eye” looks amazingly beautiful. Usually the shades of such a gel polish are saturated, juicy and noble.

The design of the manicure short nails may contain various decorative elements. The “drop effect” or pattern sprinkled with velvet sand looks creative.

Nail design shellac on long nails
Shellac manicure on long nails can combine various techniques, color schemes. Owners of long nails can apply absolutely any design technique. Lunar manicure looks good on long nails. Its essence is the selection of the hole. It can be left colorless or, on the contrary, highlighted with a contrasting color gel polish.

Painting is always appropriate on long nails. It can be combined with sparkles, rhinestones. Necessarily will cause admiration among people for the design, which used the "aquarium" technique. Also, to create an original design, you can use a design called “broken glass”.


Classic types of manicure with shellac
Nail design options are numerous. Despite this, the classic types of manicure never lose their relevance, because they are appropriate for any occasion.
French manicure with shellac (French)
This is an ageless classic that has been and will always be in demand. True, now modern girls prefer to add different decor to the French. A jacket with sand, with a variety of patterns, with inlaid stones, with foil “broken glass”, which creates beautiful overflows of light, is popular now. There are a lot of decor options. A classic jacket with a reasonable decor is a great option for manicure for every day, because such a design can be universal "in a feast, and in the world."


A great alternative to the classic jacket. For design, both delicate and catchy, bright shades are used. The trend is geometry (for example, holes in combination with triangles) or shellac manicure with negative space. No less popular is the lunar design of rhinestones, sequins and microbeads.


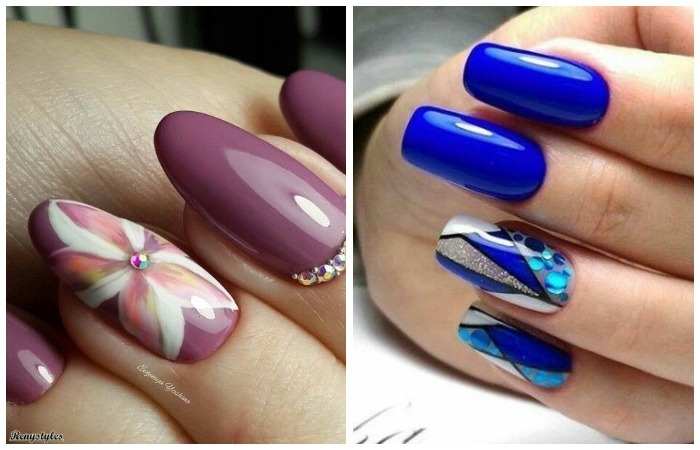
Shellac manicure with a pattern
The fashion trend of the new season is a manicure with a drawing in the style of impressionists. The design consists of colored or plain blots. Also, various geometric shapes do not lose their popularity. In summer, bright floral prints are relevant. You will find the most fashionable and relevant drawings on the nails in the photo.


Design shellac by season
A small overview of seasonal trends in nail design gel polish. What is relevant in the summer, and what is in the winter? Popular drawings, shades, techniques, etc.
Spring shellac manicure
Spring is always associated with something gentle, light and airy. Therefore, most girls in the design of nails choose delicate colors. As drawings, floral motifs, abstract patterns are chosen.


Summer manicure shellac
Summer is a wonderful time. Season of holidays and rest. A beautiful manicure can have various thematic drawings. Going on a cruise not a boat? Try the à la Sailor design.


Autumn shellac design
With the onset of autumn, I want brighter, more saturated colors. The autumn manicure in red, orange, yellow is relevant in this season. It can be red-yellow, lilac-black, black-yellow, orange-green gradient.


Winter (New Year) design
Winter manicure may include various design elements. If we are talking about a beautiful manicure for a New Year's party, then in this case, you can use techniques such as broken glass, mirror shine. Mirror red metallic luster will look stylish and winter-like, while in the design you can add white or golden dusting. Shellac design “Sweater” is relevant for winter, as well as the use of various thematic stickers (snowflakes, deers, Christmas trees, Christmas ornaments).


Shellac manicure: collection of photo nails
Shellac manicure ideas and their implementation is shown step by step in the photo. Having decided to make shellac manicure in the salon, be sure to take a photo with you. This will make it easier for the master to understand exactly what you want. The price depends on the chosen design. Masters working at home will be able to make a stylish manicure inexpensively.


Take it to your wall:
Shellac gel polish splendidly and over the past years has been confidently leading in popularity among cosmetics for manicure from other well-known brands. All the latest news of this year’s nail design that you saw in photos in fashion magazines (custom jacket with airbrushing, broken glass manicure, patterns and drawings by stamping on gel nails that have been extended with gel) can be easily and quickly implemented at home using the kit for shellac with a UV lamp.
The simple technology of applying shellac to the nail plate, fast polymerization (drying of the applied layer) in a UV lamp allows you to independently do almost any manicure at home and achieve a result no worse than in a beauty salon. This gel polish has a unique combination of components, thanks to which the created design on short or long extended nails will last for several weeks.
Shellac does not have such a destructive effect on the nail plate as many other gel varnish analogues, but it is important to follow certain rules. If you used shellac several times in a row to create a home manicure, be sure to take a break of at least 3 weeks to restore the structure of the nail plate. Your nails will never be overdried and brittle from applying gel polish if you organize nail care at home with regular restoration, strengthening of the nail plate (therapeutic baths, oils, nourishing masks, as well as creams with amino acids, creatine, proteins). In addition, try to avoid contact with water during the day after the procedure and do not use acetone in the gel remover.
♦ NEW Nail Designs with Shellac Manicure
beautiful manicure in a French style with a square edge of the nail, painted in red with black and white stripes. An interesting design option for the fall of this season for short or long nails. 
- in the photo: red shellac on a manicure in a French style
Black French manicure is perfect with an evening gown on the floor. On long nails, the jacket in nude tones with a black painted edge is especially elegant. In winter, contrasting combinations of black with white or red will be relevant for nail design. 
- in the photo: black shellac on a French manicure
A wonderful idea of \u200b\u200bmanicure for this spring is a smooth glossy shellac coating in a saturated shade in the style of "cat's eye". Bluesky's magnetic gel polish is used for this design. 
- in the photo: cat's eye manicure
shellac can be decorated with any nail art ornaments, and the finish will reliably hold even rhinestones on the nail. An interesting idea for the summer is manicure in pastel colors about rhinestones. 
- in the photo: shellac on short nails with rhinestones
♦ WHAT DIFFERENCE GEL VARNISH FROM SCHELLAC
It is no secret that shellac differs from gel varnishes of other companies in its consistency, composition, structure, method of coating the nail plate.
Shellac manicures are distinguished by a deep shine and an ideal surface due to the uniform coating of the nail plate. The original appearance without scratches and chips remains for two weeks;
There is no need to apply a primer, as when using other gel varnishes to adhere to a natural nail plate;
The composition of shellac does not include aggressive substances that have a noticeable destructive effect on the nail plate. At the same time, all the unique qualities of gel polish are fully preserved;
After using many brands of gel polish, the coloring pigment of the gel enters the nail plate. The probability of staining a natural nail with a pigment after shellac is applied is minimal even if you apply too thin a base coat to the nail plate.
♦ START KIT FOR LAMPS WITH LAMP
▪ ultraviolet (36 Watt UV lamp) or LED (LED lamp) lamp for polymerization of shellac layers;
▪ the main coating is colored gel polish (there are primary colors in the starter kit, so you need to regularly replenish supplies with new colors and shades);
▪ base coat to prevent the appearance of yellowness, protect the structure of the nail plate from destruction, as well as to align;
▪ finish coat to protect manicure and to securely fasten decorative ornaments (rhinestones, sequins, sequins and other elements of nail art);
▪ a degreaser cleans dirt and greasy stains from the nail plate before applying an even base coat;
▪ orange sticks to remove excess shellac, to move the cuticle;
▪ sponges and special acetone-free liquid for removing shellac manicure.

- in the photo: shellac manicure set
♦ WHICH LAMP IS BETTER FOR POLYMERIZING SHELLAC LAYERS BETTER?
The polymerization of the applied layers in the lamp allows you to speed up the drying process of the coating, gives the manicure strength and reliable protection against mechanical damage. In an LED lamp, the polymerization rate is several times faster than in a UV lamp, but the cost of such a device is much higher. In beauty salons, a LED lamp is usually used, since the speed of manicure with gel polish allows you to serve a larger number of customers.
If you buy a lamp for use at home, then a UV lamp is quite suitable for the polymerization of shellac layers. And it is also important to consider that almost all LED models are not replaceable.
We recommend that you purchase a 36-watt UV lamp, in which you can place all five fingers, and the polymerization process occurs quite quickly and efficiently, including on gel-extended nails. Also pay attention to the latest UV lamp models, equipped with a fan and a timer (it is very convenient to immediately set the set time for polymerization). 
- in the photo: LED and UV lamp for the polymerization of gel polish
♦ HOW TO MAKE SHELLAC ON NAILS IN HOME
Tools and materials:
36 watt UV lamp for polymerization;
Buff for polishing the nail plate, brush;
Orange sticks, remover (for removing cuticles);
Standard set of tools for manicure (nail files, pusher);
Colored shellac with shades for the intended design;
Base for nail protection;
Transparent top coating;
Klinser (to remove the sticky layer after polymerization)
Liquid for degreasing the nail;
Lint-free wipes for easy correction around the nail.
Step-by-step instruction:
❶ carefully inspect the nails and, if necessary, remove the remnants of the old coating. Give the nails a neat shape with a sapphire (or sand) file, treat rough edges with a file with less abrasiveness. Remove dust with a hard-bristled brush;
❷ Remove the cuticle with a special fluid (remover). To do this, distribute the remover with an orange stick on the cuticle and after a minute with the same stick remove the easily separated cuticle remnants;
❸ buff buff. Evenly polish the nail plate with a buff until you remove the gloss. Remove the crushed remains with a brush;
❹ treat the nails with a degreasing liquid to improve the adhesion properties of the surface of the nail plate before applying the first layer;
❺ base layer. Apply the base in a thin layer on the nail plate, sealing the free edge. Try not to go on the side rollers and cuticles. Hold your fingers in the UV lamp for no more than 20 seconds. It is not necessary to remove the cling formed clinker from the base;
❻ color gel polish. Now evenly apply several thin layers of shellac on the nail and each time we do polymerization in a UV lamp for 2 minutes. Sealing the ends and sides is not required. At this stage, you can decorate the nails with rhinestones or other decorative elements;
❼ top layer. The topcoat is applied in a thick layer and the nail is sealed on all sides. Then hold your fingers in the UV lamp for 2 minutes;
❽ after polymerization it is required to remove the sticky layer with a lint-free cloth soaked in clinser;
❾ left to rub in the periungual skin special emollient, moisturizing oil.

- click on the photo and expand the step-by-step master class with a photo of each stage
♦ HOW TO REMOVE SHELLAC WITH NAILS IN HOME
Remove gel polish from each hand in turn.
√ with special fluid:
▪ soak cotton pads (or special sponges) with shellac remover;
▪ wrap each finger on one hand with a cotton pad and securely with foil;
▪ after 10 minutes, remove the cotton pads, massage the upper phalanges of the fingers and remove the remaining shellac with an orange stick;
▪ make a bath with a tool for strengthening nails and treat your fingers with a moisturizing, nourishing hand cream.
√
without special fluid:
▪ remove the finish coating up to the shellac layer with a saw file with an abrasiveness of less than 180 grit;
▪ we take the usual nail polish remover and soak paper towels;
▪ wrap napkins around the upper phalanges of the fingers and fix with foil;
▪ after 15 minutes, remove napkins from the fingers, remove residues and lumps with an orange stick;
▪ we process the surface of the nail with a soft file, polish with a buff;
▪ Be sure to make a bath with a means of strengthening and restoring the structure of the nail. Apply a nourishing cream, carefully rubbing it into the periungual skin.

- click on the photo and expand the step-by-step instructions - how to remove shellac

- nails after shellac removal (before and after treatment)
♦ VIDEO LESSONS FOR BEGINNERS