19.11.2013
In my little black box
I have been repeatedly asked in the comments where and how I store my makeup supplies at home. In truth, I'm still in the process of organizing and equipping new storage areas, but I can show you something. Not so long ago I bought a very successful thing, as a result of which my lacquer collection was finally successfully placed and practically systematized. Here is where it is currently located:
I have already shown two press kits - with varnishes and - and they are filled with the same varnishes that arrived in them.


Some pictures are enlarged - I draw your attention if you want to consider in more detail.
The next container is a case for L'Etoile cosmetics ( general form I already showed it in):


In it, I placed varnishes of those brands that I have a relatively large number of copies. it Estee Lauder, China Glaze, Essence Top Coats:

Sally Hansen(Nail Prisms series, rarity), O.P.I. (one lacquer missing - I lost it somewhere), Rimmel, Sally Hansen (Xtreme Wear series) and a lone Nubar in its separate nest:

At the bottom of the boxes laid out tools for manicure.

Separately - a box with top coats (not dryers) and nail art products (I don’t know why I bought them - I didn’t start painting on my nails):


The box with bases is the most popular one: there are both healing bases and leveling bases.


Separately - a box with various accessories:

These are magnets for magnetic varnishes with different patterns, a Dior craquelure set (last year I had it on my nails), a strange set ring for coloring Essence, their own french stencils and a bunch of nail files, which for various reasons I don’t use or use inactively:

Lacquer dryers live in a separate transparent suitcase, as there are a lot of them.

Here's what I have on this moment is in the range:

I have another such suitcase, where I stuffed rarely used varnishes of non-standard sizes, but I did not take it off.
But the most important and interesting thing is my big suitcase, which contains the main part of the varnishes.

A little preface is needed here.
The fact is that I always wanted to store varnishes exactly “on their side”, as in the large suitcase shown above: it is in this position that their shades are most visible, while when stored vertically, only the caps (or bottoms, depending on how you put it) are visible. but the color is not visible through the bottom). The ideal box for storing varnish for me was the L’Oreal “bottle” box, which I already showed, but I only have one, and the nests there are made exclusively for Loreal varnishes, that is, of a specific shape.
As it turned out, the chest simply opened, and the suitcase of my dreams was easily accessible. You just had to look not at all among cosmetic accessories. The solution was a suitcase for storing miniatures used in board games. It is very large (in a standing position it reaches my knees), but at the same time it is very light (so far empty, of course), as it is made of plastic. Closes with convenient snaps

Wide, thick shoulder strap included:

And most importantly, here's what's inside:

These are foam inserts with cells. There are six of them, forty cells each:

cells different size, although at first it is imperceptible. I will demonstrate with the help of varnishes in bubbles of different heights:

Here's how they fit into the cells - you can clearly see that M.A.C. and Vivienne Sabo, which are very different in size, each fit into its cell almost perfectly:


In fact, cells with largest size I really miss - most of my varnishes are just that height. I laid out the varnishes in accordance with colors, although not too strictly - the main thing was to place them as conveniently as possible.
All subsequent photos are enlarged.
Here is the bulk - red:

Here - golden, orange, light:

In this sector - dark and blue (with a small amount of green):

The intermediate "ribs" of the cells are easily cut, so for Orly and Sally Hansen of the Salon Manicure series, we made three cells in a row - two by cutting out the partitions and then inserting them in a new place:

The same was done for Dance Legend (I lost one of their bottles somewhere, so the cell is empty) - I think I will buy a lot more of their varnishes, so this is not the final:

And here are separately collected those polishes that I haven’t worn yet and haven’t shown on the blog, respectively (but only those that fit in size - the rest are on my shelf and diligently callous on my eyes):

The fact that the suitcase is not completely filled does not bother me: Intercharm is coming, and it remains to be seen how many varnishes I will pick up there, as usual.
I am very pleased with the suitcase, although I had to work on the size of the cells. I highly recommend it - few people have heard of such things, probably, but the thing is convenient.
What do you think of this kind of storage?
Was it interesting to see the collection (more precisely, most of it)?
And how do you store varnishes if you have a lot of them?
Rolled off lipstick and can't find eyeliner? You urgently need an organizer for cosmetics. No need to spend money and buy an expensive acrylic cosmetic organizer, in this article we will look at many options on how to make a DIY cosmetic organizer.
Improvised means, a little imagination and order in cosmetics are provided to you. Let's get started.
A brief overview of the types of organizers
The organizer, whatever it is, solves the problem of organizing your cosmetics and your Have a good mood: everything is in place and at hand. Let's look at what materials organizers can be made of and where they can be used.
Organizer materials
Organizers for storing your decorative and can be made from:
- boxes;
- cardboard;
- newspaper tubes;
- plastic trays;
- tin and glass jars;
- plywood and wood;
- fabrics and felt;
- oilcloths;
- bamboo rugs.
Types of organizers by functional use
The organizer can be:
- stationary home- stand on a bedside table or dressing table, or can save space and hang on the wall;
- travel case- the product is rolled up and tied with a ribbon, which is very convenient when traveling.
Now we will consider in detail and make organizers for cosmetics with our own hands.
How to make an organizer for cosmetics from boxes with your own hands?
Box storage system various shapes and sizes, standing on a bedside table or dressing table or hidden in a chest of drawers, will help to put things in order in cosmetics and other small things.
For the organizer of the boxes we need:
- a dense shoe box (for sure there is in every home);
- smaller cardboard boxes, and if they are not there, then cardboard to make with your own hands;
- wrapping paper or leftover wallpaper;
- scissors;
- glue gun or just glue;
- Ruler and pencil;
- various decorations: ribbons, buttons, pebbles, lace, dry plants (everything you would like to decorate your boxes with).
Getting Started:

There is another way to make an organizer from cardboard box, only the filling will be from cardboard tubes that remain after using foil, cling film or baking sleeves. Let's do:
- We wrap the box and decorate it beautifully.
- We cut the cardboard tubes into pieces of the same height.
- We coat them with glue and glue them to the bottom of the box.
- The organizer is ready.

DIY cardboard cosmetics organizer
Organizer made of corrugated cardboard with two drawers is very roomy. For its manufacture you will need:
- corrugated cardboard (you can disassemble the packaging from any equipment or other);
- paper for gluing (it can be white or colored, at your discretion);
- stationery knife;
- glue with a brush.
You should get these details.

Here is a drawing of an organizer for cosmetics:


Making a wooden organizer for cosmetics
Of course, without certain skills, working with wood and plywood is difficult. But you can connect male half and work together. Wooden organizers are.
Most often they consist of:
- corps;
- internal dividers;
- drawers.

- For a chest of drawers with a size of 300x400x300 mm, you will need a sheet of 10 mm plywood with a size of 1525x725 mm. The hull will look like this:
- We choose the shape of the case from our preferences: radius or curly. Appropriately, we make out the internal insert-divider.
- Drawings and detailing are presented:


You can decorate such an organizer with paint, varnish or self-adhesive. It can also accommodate the cosmetics of adult fashionistas.
Organizer for cosmetics from newspaper tubes
The organizer from newspaper tubes that are prepared in advance. It can accommodate both nail polishes and various makeup tools.
Let's try to make an organizer of the simplest form. For this you will need:
- any cardboard box that suits you in size;
- prepared tubes from the newspaper;
- scissors;
- PVA glue;
- pencil;
- awl;
- paper or fabric to decorate the inside of the box (optional).
Getting Started:
- We cut off the top of the box so that it does not close, or we take it ready from under the shoes.

- On the entire perimeter of the bottom, apply markings for the racks with a pencil.

- Poke holes with an awl.

- Take long tubes and bring them out from the inside.

- Start weaving from the corner with a tube folded in half. Attach others as needed.


- From the inside, the box can be completely decorated with paper or cloth, or you can close only the bottom.

- It is convenient to store your cosmetics in such an elegant box.

Travel organizer for cosmetics
The travel organizer is a case made of fabric, to which many pockets and departments are sewn. It easily rolls up and unfolds when needed. This organizer takes up little space and is very convenient when traveling.
We will sew an organizer from felt. It is easier to work with for beginners, since the felt does not require additional processing of the edge. We will need:
- 2 pieces of felt. First piece: length - 30-50 cm, width - 20 cm. Second piece: 2 cm longer than the first piece, width - about 10 cm.
- Velcro or braid;
- scissors;
- needle and thread.
We sew a travel organizer:
- Join two pieces of felt so that one edge is the same length and width.
- Sew the smaller piece to the main piece along the edge of the width.
- Sew the pockets without stretching the fabric (so that you can put mascara, lipstick or a brush there).
- Sew the remaining sides of the pocket along the length and width.
- Sew on a ribbon or Velcro to close the organizer and you're good to go.

Plastic organizer for cosmetics
Under the transparent organizer for cosmetics, you can adapt plastic trays for storing office paper. The tiered design of the office organizer will help accommodate a huge number of cosmetics. The fact that the design is transparent will allow you to easily find the desired item.
Master class on creating an organizer for cosmetics with your own hands
We make an organizer from a cardboard box. We decorate it beautifully and get the right thing and interior decoration.
Original organizer for cosmetics on the wall. Excellent decoration and comfortable item.
We make a chest of drawers for cosmetics. original ideas for pens.
In this article, we told and showed in detail what are and how you can make organizers for storing cosmetics with your own hands. I think that you definitely wanted to clean up your cosmetics and make an organizer with your own hands. Well, how did it work? Write and share your ideas, tell us what you got.
Cosmetics in the women's arsenal as well as jewelry or underwear, there is not much. Powder boxes, glosses, lipsticks, shadows, mascaras, blush - this goodness is becoming more and more every day in a fashionista's cosmetic bag. How to organize the storage of cosmetics at home?
Today we decided to answer this topical question for many and show 35 unique examples of how this can be done. The owners of these homemade organizers can't take away their imagination and ingenuity!
1. Correct sorting

First of all, putting things in order in your cosmetic bag, you need to sort cosmetics by type - lipsticks, shadows, blush, mascara, brushes. This will help save time looking for the right bubble in the future.
2. Jars

Jars are great for storing all kinds of brushes and pencils for eyes and lips. These can be special decorative containers or simply tin or glass containers that have attracted their attention. interesting design. If desired, they can be decorated with lace, repainted in your favorite color or decorated with decoupage.
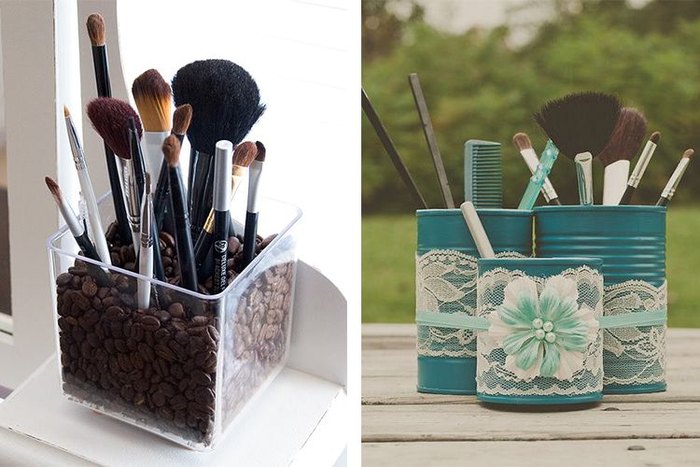
To make it more convenient to store and use brushes, just pour coffee beans or decorative pebbles into the container. Then, just insert the cosmetic tools - the original organizer for storing cosmetics is ready!


3. Improvised means
From improvised means, a transparent organizer for storing office paper can also come in handy. Its multi-storey compact design allows you to fit a sufficient amount of cosmetics. At the same time, it is always convenient to get it at the right time.

Moldings and skirting boards left after the next repair are also able to do a good job. All you have to do is mount them on the wall. It is convenient to store nail polishes and oversized lipsticks or shadows here.

Even a vintage suitcase that was inherited from your grandmother can be an excellent storage for cosmetics.

Dividers for storing cutlery and decorative buckets are also useful as organizers.


4. Storage as an art
And why not make a cosmetics holder part of the interior? For example, take a beautiful baguette, provide it with several narrow shelves and place nail polish bubbles on it. If desired, it can always be repainted in any color to match with other interior items.

Interesting idea, decorate one of the compartments of a bookcase with varnishes, build small showcases from the most ordinary cardboard boxes, or store varnishes in a candy jar.


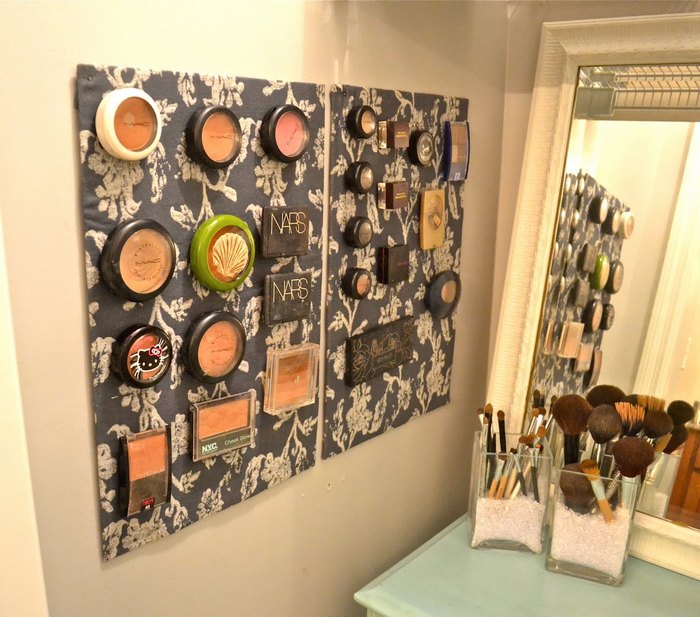
Textile or magnetic boards look great in the interior, on which you can fix cosmetics with Velcro or magnets pre-glued to the bubbles.

5. Additional helpers
Fortunately, today cosmetics manufacturers make sure that their products are convenient to store. Many brands produce special organizers for storing cosmetics.

These are vertical holders with convenient dividers, stands with space for a tablet and a phone, hanging polyethylene organizers with convenient sorting and inscriptions. With such a variety, you can not reinvent the wheel, racking your brains on how to organize the storage of cosmetics.
.
For the girls following the latest trends in fashion, it is important to have beautiful manicured nails. French chic nail design with gel coat effect or precious stones Now you can easily do it at home.
All this beauty requires a whole arsenal of varnishes, after which the question arises of how to place them with maximum convenience and save them so that the precious bottles serve their mistress for as long as possible. A stand for nail polishes, which can be purchased at a store or made with your own hands from improvised materials, will help in this matter.
Stands are divided into two types depending on whether they are used at home or intended for professionals.
Stands for home
You can bring the lacquer economy in order with the help of various stands, drawers or shelves. Buying a ready-made holder or applying a creative approach by making a stand from improvised materials is a matter of taste for every owner of multi-colored bottles. Options may be different depending on the size of the collection of varnishes.
Finished coasters
Many cosmetic companies offer to purchase ready-made stands for varnishes. You can order your favorite stand in an online store specializing in manicure accessories.
Types of supports for varnishes:
- hinged shelf
- Multi-tier stand (slide, steps)
- Horizontal single level
- Vertical stand
Stands are available in various materials:
- Polycarbonate
- plexiglass
- Acrylic glass
- Tree
- Plastic
Each material has its own advantages and you should choose a stand based on personal preferences. Plexiglas stands can withstand a good load and are suitable as an exhibition stand. Transparent synthetic materials look stylish and allow you to see the entire color palette of varnishes.
Wooden delivery in the form of vertical shelves is convenient in terms of practicality and durability, as well as the fact that it can be painted in any color. Such a stand can be hung on the wall using mounts or set on the table.
Handyman of all trades
The question of where to store nail polishes can be solved by making a rack from improvised materials. For this you will need:
- Cardboard
- Gift wrapping paper
- Narrow fabric ribbon
- Glue (or glue gun)
Cut out blanks from cardboard in the form of 8 strips (21x4 cm), 1 strip for the bottom (20.5x6 cm) and two sides (height according to right side 14.5 cm, on the left - 5 cm, diagonal - 15 cm, base width - 17 cm). Paste all the details with color wrapping paper, connect the strips together in the form of steps and attach the sidewalls. Close the joints with a narrow silk ribbon.
Creative approach
With a little imagination, a nail polish stand can be made from various containers that are in every home. It can be as simple practical option, and a beautiful art object designed to serve as an interior decoration.
1. Glass jar with lid
As a container for storing varnishes, a glass jar left over from sweets or other goodies is suitable. good decision there will be an empty cereal jar. Tightly closed with a lid, it will look great on a women's dressing table and will help keep varnishes fresh longer.
A simple and original stand for nail polishes will turn out from a round vase of plain glass. Multi-colored bottles will look exquisite in it, becoming a noticeable colorful accent on the dressing table.
Fans of the glamorous, doll-like style in the interior will love the stand in the form of
a multi-tiered vase on a leg for fruits, sweets or cupcakes. On it comfortably
bottles with varnishes will be placed, which will always be at hand.
3. Open shelves
Shelves for varnishes various types made from scrap materials. You can use small products with sides, designed for spices or other household items. A decorative shelf for varnishes will be obtained from the remains of ceiling plinths, which can be repainted to match the color of the interior.
Practicality first
If you don’t want to put varnishes on display, but just keep them in order, simpler and practical ways storage.
1. Plastic boxes
Under storage for varnishes, it will be convenient to adapt rectangular plastic containers with a lid, sold in hardware stores. There you can also find transparent boxes for shoes or chests of drawers with several drawers.
2. Hanging organizer
The usual hanging organizer for small things is useful for storing varnishes. It can be moved from place to place or kept in a closet, pantry. In order to see all the shades, it is better to choose an organizer with transparent pockets.
3. Shelves
Varnishes can be arranged on small narrow shelves with sides attached to the inner door inside a wall cabinet or dressing table, hidden from sunlight.
Beauty Salons
Professional manicurists working in hairdressers and beauty salons own a large assortment of nail polishes. This is necessary to please any, the most demanding taste of clients and help them create a complete, harmonious image.
The entire collection of nail polishes should be placed in such a way that visitors can appreciate the whole variety of colors.
How to store varnishes in beauty salons? For this, ready-made stands, stands and displays are used, which are produced both in standard sizes and according to customer sizes.
Stand types:
1. Wall shelf for open type varnishes
Hanging shelves are mounted on the wall directly next to the working manicurist or, if desired, can be installed on his table.
2. Shelf-tray made of transparent plexiglass
The trays are made of transparent plexiglass with the possibility of mounting on the wall and are equipped with a back wall with a side in front.
3. Wall chest of drawers with shelves closed with transparent doors.
This type of storage is suitable for salons that not only provide manicure and pedicure services, but also sell varnishes.
4. Multi-tiered shelf (slide)
Transparent coasters for demonstration and storage of varnishes in the form of a slide with several tiers-steps are placed on the table of the manicurist. There are direct types or with an inclination, which allows you to clearly see the shades of varnishes and use them to the last drop.
5. Display for varnishes with a showcase type lid (closed with a lock)
Displays with a lockable lid are needed for retail outlets or for storing expensive varnishes in salons.
6. Direct stand (shelf) for varnishes
Stands (shelves) for straight-type varnishes with several tiers are designed to organize the workplace of a manicurist. Manufacturers offer options equipped with a wide bottom shelf for bottles of creams and liquids. The bottom tier is required to limit the space on the table.
Some manufacturers produce small seasonal collections of lacquers (4-12 pieces), which come with a stand for them, equipped with an insert with a company logo. It is better to store such collections separately so that visitors can see all the fashion news.
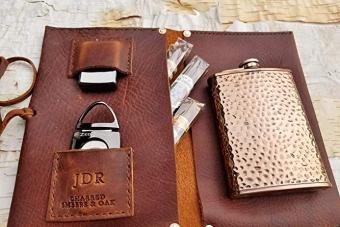
For manicure masters who work on the road, it will be convenient to have a special portable box or suitcase that will fit not only varnishes, but also tongs, files and other necessary accessories.
Rules for storing nail polishes
High-quality nail polishes are not cheap, and the primary task of every owner is to keep them so that they remain usable for as long as possible. To do this, you need to follow simple rules and know some secrets.
Note: you should not buy varnishes in large quantities and vials of solid volume.
Nail polishes cannot be kept:
- near the radiator and other heating devices
- on the refrigerator door
- in the bathroom
- in places exposed to direct sunlight
For proper storage of nail polishes, it is best to choose a dark, cool place and keep the bottles upright.
Little secrets - we extend the life of the varnish
Knowing little tricks, you can make the varnishes stay fresh and usable for a long time:
- After use, wipe the bottle neck with a cotton swab dipped in nail polish remover
- Before closing the bottle with a cap, breathe into it - carbon dioxide will displace oxygen, which destroys the varnish
- Put a small bead or metal ball into the varnish
- Roll bottle between palms before use
If you figure out how to store nail polishes correctly and make a suitable stand, they will please you much longer.