I do not claim to be an expert in this area, my article is more for beginners. I will try to tell you about all the nuances of this needlework and teach you several techniques for creating flowers from ribbons.

The uniqueness and simplicity of this needlework
If you look at photographs of flowers from ribbons, beauty and sophistication flower arrangements, then this skill will seem incredibly difficult. I hasten to please you, this is not so.
The flower you have conceived will always work out, of course, depending on the experience and skills gained, the end result will be different.

Artificial flowers are made from various materials, knit, weave from macrame, mold from polymer clay All these methods require talent and special skills.

In our case, it will be enough to carefully study the step-by-step instructions for beginners on how to make flowers from ribbons and you will succeed.

I will say a few words about the strength of products made of nylon tapes. It all depends on the functionality of the future product, if the flowers decorate the interior, then special reliability is not necessary here, but if the flower decorates a children's headband or headband, then you need to try to make a very high-quality thing.
Methods for making flowers from ribbons
I want to tell and show you some basic ways to create flowers from ribbons. Having mastered this simple science, you can create any kind of flowers.

My advice to you, try to make any fantasy copy using one of the techniques, and you will feel all the nuances of the method you have chosen and master it faster.
Preparation for needlework
- Any tape you like different colors and sizes
- Needles and threads
- sharp scissors
- glue gun
- Tweezers
- Centers for flowers or beads, sequins
- Floral sleeve (or tube to thicken the stem).

Also prepare a desktop with a table lamp.
Kanzashi
With the kanzashi technique, my acquaintance with flowers from satin ribbons. This technique came to us from Japan, kanzashi are decorated with hairpins or hairpins.

Girls' hairstyles bloom with chic flowers, thanks to such hairpins. Due to the fashion for kanzashi, more and more needlewomen are mastering this completely simple technique.

In addition to the prepared materials mentioned above, take a ruler, pattern chalk and a candle for singeing the tips.

Three types of leaves are used in kanzashi: round, long and sharp.
- First, cut a 5 cm wide satin ribbon into squares, naturally the same.
- We take a square and fold the corners to each other, as shown in the photo and lower the extreme corners to the lower central corner.
- Then we wind the side corners back and clamp with tweezers.
- The lower cut, if necessary, is cut off and melted over the candle.
- Thus, a round petal is obtained, of which several pieces need to be made.
- We collect the finished petals on a thread, fold them into a flower and glue them to the base, attach a bead to the middle with a glue gun.

Congratulations on your first kanzashi flower!

I present to you a few video tutorials on how to make flowers from ribbons.

Creating a more lush flower.
Note!


Creating double petals using the kanzashi technique, from which the cutest butterflies and beautiful snowflakes are obtained.
melted petals
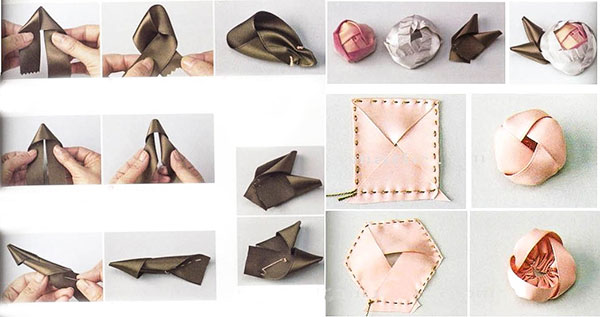
Another way to create flowers from ribbons is melted petals. This method is good for making large flower arrangements, for example, I made a basket of roses.

However, there are some nuances here:
- Not all ribbons are well suited for such colors;
- Melted petals do not look as neat as kanzashi;
- It may not work right away, you need to “fill your hand”.

A more suitable material for creating these colors is nylon ribbons.

Manufacturing instructions.
- We make a pattern in the shape of a half heart, as shown in the photo;
- Next, cut out the petals of 7 large pieces, 7 medium pieces and the same number of small ones;
- The edges of each petal you cut are melted over the candle, after such processing the petals become voluminous;
- We collect the petals on a thread in a checkerboard pattern, with a slight overlap, then the flower will be lush;
- We attach beads to the core.
- The flower is ready.

Note!


Charming ribbon embroidery
Yes, they also embroider with ribbons! In embroidery, ribbons of different widths are used, which, with proper drapery, creates volume and beauty of the embroidered picture.

This technique is good for several reasons:
- Quick result;
- Ribbon embroidery looks very rich and is appreciated among lovers;
- Not complicated schemes, if desired, everyone can do it.

I have prepared several master classes, watch and learn.

Now they sell a lot of kits for embroidery with ribbons, such kits are very good for beginner needlewomen, there is a pattern, a canvas, a set of ribbons, threads and everything that is used to create a picture.

If you want exclusive work, you can draw up schemes, choose colors and textures yourself.
Note!


Photo of flowers from ribbons with your own hands


Modern directions of piece needlework in the hand made style are so diverse that you do not have time to close your mouth in surprise at one product, as it opens again in admiration when you look at another. We also decided to study the subject of products manual labor and could not contain their admiration for flowers from satin ribbons. Making such beauty with your own hands is not as difficult as it seemed to us at first glance! The editors of the site offer to decorate your life with wonderful flowers, the secrets of making which you will find in this article.
Where can I use flowers from handmade ribbons
If you think that the range of applications for artificial flowers from satin ribbons is small, then we will surprise you!
The variety of decor depends only on the imagination of the author
In addition to the above products, you can make topiary from ribbon flowers, decorate flower pots, clothes, shoes, bags with them. This is a boundless manifestation of imagination and the creation of comfort in your home.
What you need to make flowers from satin ribbons
If you are interested in embroidery and want to try working with satin ribbons, then you will need:
- a set of silk and satin ribbons of different colors;
- needles with a wide eye;
- scissors;
- base fabric with a hoop;
- lighter or matches to cauterize the tip of the ribbons;
- beads, beads for decoration;
- simple pencil for drawing.
If you want to try yourself in the kanzashi technique or just to manually make flowers from satin ribbons with your own hands, you need to stock up with such tools:
- ribbons, beads, beads, sequins, base fabric;
- scissors, tweezers;
- glue gun.
Much depends on the width and length of the tape.
How to make flowers from ribbons - a master class for beginners
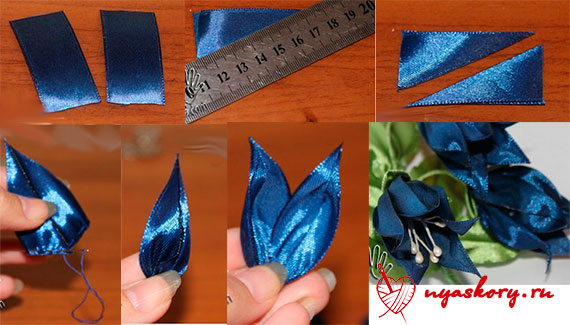
You are ready? Let's first watch a video tutorial where you will understand all the nuances of creating fabulous beauty. So, we make a gentle lily:
Here is another tutorial for making ribbon flowers for beginners.
Follow all the steps in the pictures in sequence. The main thing is to make the same petals. It remains only to fold them and flash them.
Do-it-yourself ribbon flowers - a master class on making complex compositions
We offer a master class on making flowers from ribbons with your own hands:
| Illustration | Description |

| We will get such a rose after 40-60 minutes of hard work. |

| We need a wide satin ribbon: it needs to be cut into 12 pieces of 19 cm each. We measure 12 cm and put a mark with a pencil. |

| Fold the tape along the mark. It turns out two identical pieces. Let's fold the tape a few more times. It remains only to cut the folds with scissors. |

| Rule: so that you do not cut off, the edges of the tape must be seared. The fire should not be located under the product, but slightly to the side. |

| For the manufacture of leaves, prepare a wide satin green ribbon. We will make leaves of two types. |

| We measure 5 pieces of 7 cm and 6 pieces of 4 cm. |

| Cut out a few circles for the sepals. |

| Fold one half of the leaf, and then wrap the edge inward. With a needle and thread, we pierce the petal from the side of the wrapped edge. |

| On the other hand, we bend half of the petal in the same way and bend the edge. |

| The entire petal must be slightly collected and secured, as it should, with threads. |

| Cut the leaves for the leaves fold in half and cut out the shape of the leaf. Don't forget to burn the edges! |

| We should get such neat leaves. |

| Prepare the wire that will hold your rose. Lubricate the edges of the petal with hot glue from a gun. |

| Wrap the first petal around the rounded end of the wire. |

| Glue all the petals one by one around the first one. |

| To keep the rose tightly on the wire, turn it over and fill it thickly with glue. Let it cool down completely. |

| We attach the sepals and the remaining petals. |
Kanzashi: paintings from satin ribbons - master class
The aesthetic Japanese came up with an unusual direction in making flowers from satin ribbons with their own hands - kanzashi. Initially, this word was used only in the meaning of hair ornaments. Today it is a popular trend not only for hair accessories. Kanzashi is used to decorate caskets, frames, jewelry, and topiary creations.
INTERESTING!
In total, there are two forms of kanzashi details: round petals and sharp ones. The rest are made from combinations of these forms.
 Accessory in kanzashi technique
 And here is a small MK for creating paintings using the kanzashi technique.
Material: ribbons of yellow and Green colour 2.5 cm wide, felt for the circle under the base (Ø7 cm), black (1 × 40 cm) and brown (1 × 50 cm) tape for the center.
| Illustration | Description |

| Cut the yellow ribbon into equal pieces 5 cm wide. |

| Take the yellow piece and fold it right side out. |

| We grab the edge of the petal along the oblique line and cut it off. We do not let go of the flap! |

| We immediately burn the cut edge with a lighter, soldering the remaining edge. |

| We straighten the petal and fold the lower edges inward towards the center. To fix, use a lighter, pressing the edge with your fingers. We do such manipulations with the rest of the yellow shreds. The number of petals of the first row - 18, the second - 14. |

| We string the brown ribbon onto a thread with a needle and weave it together. |

| With black thread, repeat the procedure. You should get two tight accordions. |

| We collect a flat snail from a black accordion, twisting it in a circle and sewing it together with threads. |
Step-by-step instructions for making different types of flowers from ribbons with your own handsWe have prepared several step by step photos for making flowers from ribbon with your own hands. If you do not rush and do everything consistently, then the result will be impressive. DIY roses from satin ribbonsAs in the world of living roses, there are several varieties of tape compositions. From satin ribbons, these are relatively easy-to-make flowers with your own hands. Now we can make two more sunflowers, green leaves according to the described instructions and collect them into one summer picture!
This rose was obtained by alternately folding a wide ribbon in half. The petals are prepared separately and come together only on the stem. Making peony flowers from satin ribbonsNow we will tell you how to make another flower from a ribbon with your own hands - a peony. Prepare a lighter, a 5 cm wide ribbon for kanzashi flowers (choose silk, satin or organza), a needle, scissors.
 The peony will turn out lush and like a real one! The peony will turn out lush and like a real one! Do-it-yourself bouquet of hyacinths from satin ribbonsFor hyacinth, we take a pink and green satin ribbon, scissors, a needle and thread, wire, beads, and a heat gun.
|

Greetings to all gathered on my blog on this sunny (or maybe not so) day. If you want to learn how to make cool ribbon flowers, then I highly recommend reading this article to the end.
Flowers made of satin (and not only) ribbons can be used both for decorating gift wrapping and as a gift itself.
Especially if you collect such flowers in an elegant bouquet.
The most amazing thing is that sometimes the most beautiful of these plants are so easy to make with your own hands that it takes 10-15 minutes even for a beginner (believe my experience).
Recently, I have been making different flowers quite often and now I will share with you excellent workshops on making them.
DIY satin ribbon flowers
I'll show you 15 cool (and easy) ways to create amazing flowers. You can “take away” each of the photo master classes with you by copying the corresponding image.
Let's start, perhaps, with the most romantic and popular plants among girls - roses.
Ribbon roses
Stop buying expensive roses from the store! Let's learn how to make them ourselves and save the lion's share of the budget.
We have several roses today. The first of these is a rose, obtained by folding triangles as you progress. To make it, prepare a piece of ribbon at least 2 cm wide and at least 50 cm long.
unblown
Form the center by bending one tip as shown in the photo. Roll it up, fasten it up.

twisted rose
Remotely, in terms of the way it was created, it resembles the previous one (at least the beginning). After forming the center, alternately turn the ribbon, twisting it and applying layer by layer. Fasten at the end.

Kanzashi
The peculiarity of this rose is that all the petals are processed separately.

From braid
Finally, a rose, which is obtained by interweaving two wavy ribbons. After weaving, they need to be swept along the edge so that they do not fall apart. And then just roll over.

Flowers from kanzashi ribbons
In general, kanzashi is originally a “hair decoration” from Japanese. It has gone since the time of geishas, who differed, among other things, in the ability to skillfully needlework.
There are two forms of petals in kanzashi - round and sharp. The rest is subspecies. So all flowers to some extent can be attributed to this type of art.
Hibiscus
An exotic guest for which you will need a wide ribbon (about 5 cm wide), base and stamens.

Just a flower with 5 petals
To make spiky elements, sew the center. Fold the future petal in half and hem the inside. Prepare 5 pieces, then string on a thread. Decorate the center.

Bell
For the bell, prepare the petals according to the photo. To roll them, fold the petals with high straight edges to each other and sew the edge (glue the top a little). Pull the thread, collect the resulting parts, decorating with stamens or beads.
Semitsvetik
For it, you need to prepare 7-9 petals using the classic method used in kanzashi. Then all the petals are collected on a thread, if necessary, glued together on the sides.

Aster
Just a dream, not a flower in terms of ease of execution. To make an aster, take your ribbon and sew a line of running stitches in a zigzag across the entire width. Pull up, roll up. All

Peony
For a peony, take three ribbons: two for the petals, one for the green leaf.
Please note that the peony consists of two parts - a more closed bud and opening petals.
Master classes on flowers in video format
Not everyone likes to study photography, so I have prepared for you some flower-making tutorials in video format.
Gone are the days when self-made artificial flowers were considered ugly and unfashionable, and the owners were not able to buy them in a store. flowers today self made deservedly occupy one of the main places in interior design and decoration evening dresses, as well as chic wedding dresses .
Graceful flowers, made with skill and love, adorn any thing - starting from greeting cards And gift boxes ending with elegant bridal bouquets. Decorative flowers are used to decorate hairpins, headbands, they can be fixed on elastic bands. Bouquets of ribbon flowers are fashionable - not only for weddings, but also simply for decorating the room. The production of flower arrangements and large paintings is practiced.
If everything is done according to the rules, then the resulting buds will be of high quality and will not crumble in a couple of hours.
They are quite easy to make, you just need to have on hand the right materials, know the manufacturing technology and do everything very carefully. What you need for making your own hands:
- Important tools for craftswomen are tweezers and a candle. They help create the petals of the desired shape.
- Ribbons for manufacturing are an affordable material, they can be found in stores in any area, the assortment is quite wide, there are always different colors.
This hobby takes a minimum of time, any modern woman can devote himself to an exciting occupation.

If you are making a brooch, use bright colors to draw all the attention to him. If you are compiling compositions, paintings or bouquets, choose the appropriate shades, the source material should not cause disharmony.
By the way! There is embroidery with ribbons. They are draped and embroidered with them. This method leads to a quick result, it looks very profitable and expensive and at a great price among amateurs.
What are the petals?
Flowers from satin ribbons are a design of petals.
You can fold them in kanzashi style. Apply two common shapes - with a sharp end and rounded. Flowers with long narrow petals are made from sharp-shaped blanks. These are aster, chamomile, dandelion, sunflower, bluebell, gerbera. With rounded petals, you can make a rose, lilac, peony.
There is another type of petals - melted. They are cut out of satin and nylon ribbons according to patterns: in the shape of a flower, round, in the shape of hearts. You need to make more than 10 units per product. The edges are melted by placing the workpiece over the fire of a candle or lighter, as a result, a volume is obtained. You should work using tweezers, so the possibility of getting a burn is excluded. They also melt long petals for daisies and sunflowers and blanks cut out according to patterns for roses, peonies and other large-petal ones.

There is also a technique for making flowers from a whole tape by twisting the tapes in a special way in a circle, forming petals as you work.
Petals can be made by yourself in a simple way: fold narrow ribbons 7-10 cm wide in half. They are good blanks for making a flower for a brooch. As a variation - tie a knot in the middle of the workpiece and fold it so that it is on the fold.
What flowers can be made from ribbons?
- IN different techniques execution and from a variety of tape material, almost all types of flowers found in nature can be made. Most often they make roses, daisies, sunflowers, asters. Less often - bells, daffodils, callas. Craftswomen even create dandelions and lilacs.
- And they also do different type stars, seven-flowers, winter and snow tales and other interesting products.
- Flowers are also made from lace and propylene tape, zigzag braid, packing tapes.
- Special skill requires very similar to real natural flowers, such as peonies, roses or ranunculus.

Master classes step by step
The algorithm for the execution of flowers is described in any master class to choose from. The main thing is to find everything you need: ribbons, thread with a needle, glue, beads, flower bases and scissors. The first time the product may turn out to be clumsy, but skill, as in any other business, comes with experience.
If this exciting activity is to your liking, then you can decorate everything that you need.

Quick simple flower
If you want to make a pretty flower, choose this quick and easy method:
- You need to cut out a circle of the required size from cardboard as a base, then start gluing the tape of your choice, making folds half a centimeter deep in centimeter increments, and do this in a spiral in several layers.
- When you reach the center, cut the ribbon and fold the neatly cut end inwards.
- Then take the glue, drip inside and glue the beads. The product is ready. They can decorate anything.
Important! The glue gun should not be kept on all the time. Extremely hot glue is dangerous when working.

This option of manual production is not difficult, the main thing is to master the algorithm for performing work. The size of the resulting roses depends on the width and length of the ribbon. It doesn't matter which source tape you use - the flower will always be beautiful. In addition to the tape, prepare scissors, a thread with a needle, instead of the latter, you can take a hot glue gun.
Rose is performed like this:
- Place and fold the edge of the tape in half diagonally.
- fabricate central part roses. Fold the tape over a few turns and glue or sew on the bottom.
- The formation of rose petals. Fold the tape diagonally outward and wrap it around the finished workpiece, at the same time hold from below, if necessary, glue or sew from below.
- Continue to increase the number of layers of "petals". Do this: fold the tape out - wrap the bud - fold the tape out - wrap the bud. Do not forget to fix the bud from the bottom at the base with glue, you can sew. The task is that the tape should be fixed and not unravel. Over time, you will learn to fasten the layers of tape only 3-4 times.
- Once you know the rose is ready, connect the end of the ribbon to the base and pin or glue it.
By the way! Make some roses different sizes. Try changing the width and length of the ribbon, bending it at different angles, changing the number of folds - all in order to get the rose you want. You can find videos and hone your technique.
Photo example:

Chamomile
It is clear that chamomile, like any other flower, can be made using different technologies.
- For this version of the flower, take a white ribbon with a width of 0.6 to 1 cm. Cut it into pieces, according to your pattern. You will need a circle of felt with a diameter of 2.5 cm for the base.
- Preparatory work. On the one hand, we cut the petal with scissors, giving a sharp tip, like a real chamomile, first melt the cuts with a lighter, then heat the tip from below until the tip takes on volume and bends down. We pinch the other side in half and fix it by firing with a lighter.
- flower assembly. Glue the petals to the base around the circumference at a distance of 0.5 cm from the edge. Having glued one circle, we continue to glue further until we get 2-3 circles. The petal should be glued with the pinched side so that the other edge is bent down.
- Making the middle. Chamomile stamens are yellow. You can glue a half-bead. The second option is to make the middle of a yellow narrow ribbon. We bend it along the length, sew along the edge with a thread with a “needle forward” seam, tighten it on a thread and put it in the center of the chamomile in the form of a spiral. Glue carefully.
- If desired, glue green leaves to the bottom of the felt base.

Almost a real flower
Making a real aster is quite simple:
- On a colored ribbon of yellow or other suitable color lay a continuous seam "forward needle", the stitches should be 2-3 mm. The direction of the stitch from one side to the other at an angle, looks like a zigzag.
- Then pull off the thread, fold the flower and that's it - you can sew or glue the aster anywhere.
- Optionally, complete with green leaves.

A flower of melted petals
A very stylish bud is obtained from a satin or nylon ribbon. The main active tool is a candle:
- On cardboard, draw the outline of the flower and cut out the resulting pattern.
- Then cut off the tape and prepare 10-12 blanks.
- give them volumetric form, for this, grab the workpiece with tweezers and, bringing it to the candle, melt the edges of the petals. The distance to the fire should be optimal, if you bring it too close, you can ruin everything.
- Fold the voluminous petals into each other, sew a stack with a thread and sew or glue a bead, button or other core inside.
Such a ribbon flower is used as an additional decor, to decorate a gift and as a gift itself. It takes effort, patience and free time to learn this interesting kind of needlework.
Attention! Melted flowers should not be used to decorate a strict outfit. They look good with flying silk dresses.

simple flower petals
- Cut 5 or 7 pieces of tape 8 cm long.
- Take a thread and a needle, bend the workpiece lengthwise, facing outward and stitch the center with stitches.
- Then you need to fold the petal in half, making the tips sharp, for reliability from the inside, attach the sides to each other with small stitches.
- When all the petals are ready, it remains to string them on a thread, pull them together in the shape of a flower and decorate the middle with a bead or a small button.
If you make several flowers of different sizes and fasten them into one, you get the original voluminous flower. You can take the tape as the same or different shades.

Valeria Stepanova
Master- manufacturing class flowers from satin ribbons using kanzashi technique
Being engaged in needlework, you can create incredible things yourself. The most common product is kanzashi flowers. Such flowers, can be made from any available material that you have at home, at work, be it paper, satin, felt or satin ribbons. By asking parents to respond to the acquisition of a group of different fabrics or tapes, it will be possible to assemble an excellent collection, because each house has a couple of rags lying around in a box or ribbons. But our Master Class(mk) for beginners, will show us how to make satin ribbon flowers. There are many ways to do flowers of this technique, I will show the easiest way, in my opinion.
Do satin ribbon flowers, you can at any time of the year, and they will always be relevant. IN summer days, satin ribbon flower, will complement and decorate the look of your handbag, headband or hairpin. It will also fit into the interior of your home, a group in a preschool educational institution, in the form of a picture from colors or tapestry holder, and even new Year decoration will be simply amazing and unique.
You can also add kanzashi elements to the costumes of children on matinees.
We'll need: satin ribbon, scissors, glue gun, candle (if children make, then we use PVA glue, thread with a needle, jewelry

we cut tape on squares, take one square and fold it in half (corner to corner)

then fold in half again (corner to corner)

then again corner to corner

got a petal (not completed)


gently burn the edge (it will stick together by itself, if children make it, then we grease it with glue and wait for it to dry

cut off the corner at the bottom of the petal

and also burn (lubricate with glue)
got a petal


we make several of these (can be different colors

we connect all the petals with each other with a thread and a needle

we fix by tightening

you can add other elements

put on the glue gun "middle"

on reverse side resulting flower we make a round substrate to hide not beautiful view by gluing it


flower ready!
Related publications:
Today I want to present to your attention a master class on making a flower from satin ribbons. I saw the making of a bouquet of ribbons.
Flowers to replenish the barbershop in the group, hairpins and elastic bands. We need a satin ribbon two centimeters wide and thirty long.
I present to you my new master Class. Hope you enjoy! To make a flower, we need: a satin ribbon of the one you like.
Master Class. Making headbands for dancing. Hello, today I wanted to show you what tapes I have for performances for children.
For the manufacture of Christmas ball you will need: - a foam sphere (I have a diameter of 14 cm); - short carnation pins (about 350 pieces);
After the repair in the "Butterflies" group above the corner of nature, I decided to do something unusual, not from paper, but from satin fabric, ribbons and ribbons.


