Winter is the time for the spread of bacteria and colds, so it is very important to eat a lot of healthy fruits and vegetables. They store vital health vitamins. Therefore, in many houses for the winter season they store pumpkin and dishes from it. But this is far from the only purpose of using the vegetable. With the help of skillful hands and extensive imagination, you can turn an ordinary vegetable into a masterpiece of art - an ornamental pumpkin craft - to decorate the interior of the house.
The purpose of using the vegetable
Pumpkin has been used since ancient times for crafts. For this purpose, decorative types of vegetables were specially grown. The fruits were stored at home for such purposes:
The popularity of a vegetable is determined by its properties.
DIY Pumpkin Properties
Pumpkin fruits are not just so popular. They have certain properties and characteristics:
- The hard shell of the vegetable makes it easy to apply a picture or paste applications.
- It retains its shape, color and freshness for a long time without much care.
- Bright shade and round shape look attractive.
- It happens in different heights and widths.
But not all pumpkins can be suitable for crafts. There are pumpkins for dishes, and there are also decorative fruits. Consider whether it is possible to eat a decorative pumpkin:
- When processing almost always use chemicals that, when ingested, can cause serious consequences.
- From the garden you can eat some fresh decorative pumpkins. These include: a chalmovy variety and lagenaria.
For quality crafts, you must choose the right product. Consider what you should pay attention to:

Choosing a fruit, you can determine the method of drying.
Drying Methods
 You can dry the vegetable naturally through the outer shell or the remaining stem. To do this, place the pumpkin in a dry, well-ventilated place. Humidity inside the fetus gradually decreases, and it becomes much easier. To make sure that it is completely dry, you need to shake the vegetable. The sound of dry seeds should be heard from the inside. Usually this method of drying the vegetable takes a whole year.
Can be dried in a different, accelerated way. For this it is necessary: \u200b\u200bwash fresh fruits with soap; carefully cut the crown of the head with a sharp knife; take out all the flesh, but so as not to damage the integrity of the peel; sanding the interior of the residues; disinfect with alcohol or bleach; let it stand in the fresh air for several hours, while inside you need to put a lot of paper newspaper, which absorbs the remaining moisture well.
There is a way to dry a pumpkin in the oven: rinse the fruit, preheat the oven to sixty degrees, put the whole pumpkin on baking paper and place it in the oven, periodically check and turn over for uniform drying. This method will quickly dry the product.
Varieties of Decor
Pumpkin is a great option for decoration. Consider options for decorating the garden and home using this fruit.
Pumpkin soups, cereals, mousses, pumpkin, baked with spices ... In the gastronomic plan, this vegetable has been underestimated for a long time, although now it can be found on the menu of every second restaurant. Moreover, for a long time, pumpkin was actively used not only as the basis for the dish. Hundreds of years ago this vegetable was used as tableware. Today, of course, we do not need this. But in terms of creativity, this pot-bellied is invaluable, especially on the eve of Halloween. We offer several options for simple crafts that can be done in an hour.
Crafts and figures of pumpkin: option with sparkles
You will need:- one pumpkin (it is desirable to use white color, so the craft will look more effective);
- one tube of PVA glue;
- several bags of sparkles;
- soft brushes;
- a few sponges.
Advice! Get creative when creating patterns. This must be done at the glue application stage. Make it intricate lines, draw unusual figures.


Crafts from pumpkin on the theme "Autumn": make a vase
You will need:- one pumpkin of any kind (medium size);
- glass (glass or plastic);
- flowers at your discretion (the composition can be any, it all depends on your taste and imagination).


Insert the glass into the cut-out recess, do not forget to pour a little water into it. Do not forget to make sure that the cup is sufficiently tightly located in the vegetable. The edge of the glass should not peep out.


Crafts from pumpkin: make a candlestick
You will need:- one pumpkin (medium size);
- candle (preferably tall and thick, color of your choice);
- one tube of glue;
- one felt-tip pen;
- some real or artificial autumn leaves;
- several branches with a berry (for example, mountain ash);
- a few small cones.
The base is ready, you can proceed to the decor. Decorate the candlestick with autumn leaves, cones, branches with mountain ash.
Advice! Choose a candle quite high: it will be located a little higher above the decor items and they will not be able to light up.


How to make funny little pumpkin men
You will need:- several pumpkins of various sizes (preferably white);
- some felt;
- one tube of PVA glue (if possible, superglue);
- scissors;
- details for the decor at your discretion (it can be hats, mustaches, eyes, wigs and much, much more);
- some artificial flowers (at your discretion).


We start the craft with the use of felt: first we cut out the details. It can be glasses, antennae, bows. In general, everything that can be useful to the future man. All cut details are gently glued to the pumpkin in the right places. By the way, it is not necessary to buy new accessories. Most likely, the necessary things will be found in your apartment. Use, for example, unnecessary glasses. Also, accessories can be cut from thick paper in different colors.


Unusual Halloween decoration: make an owl out of pumpkins
You will need:- one medium-sized pumpkin;
- scissors;
- some felt of different colors;
- very good glue.


How to decorate a pumpkin with wax crayons?
You will need:- white or orange pumpkin;
- several wax crayons of different colors;
- sharp knife or scissors;
- tube of thick PVA glue;


Making a gorgeous pumpkin carriage
You will need:- one pumpkin (it is desirable that it be short and wide);
- four small pumpkins (they will be needed for wheels). If these cannot be found, then purchase cardboard or wire;
- sharp knife;
- marker or felt-tip pen;
- wire (thick);
- wire (thin).
We make the wheels. It is best to make cardboard wheels. On the sheet, you can draw four circles of small size, and on them - depict the corresponding drawing (see the photo). If you use small pumpkins, then choose not fully mature vegetables (this way they will last longer). The most difficult option is to make the wheels of dense wire. For aesthetics, they can be wrapped with foil at the end of the work. You can attach the wheels to the carriage with wooden skewers.
Advice! If you want the carriage to please you as long as possible, we recommend that you fill it with pieces of newspaper. You can use, for example, toilet paper or special disposable towels. Make sure that the pumpkin gets as little sunlight as possible.


For inspiration, watch a few videos on how to make a pumpkin do it yourself on Halloween:
A photo: at the request of Yandex and Google
Autumn can become colorful and fun if it is often more imaginative. In addition to golden foliage, this time of year gives people unusual shapes and colors of vegetables. The most popular vegetable for autumn crafts is pumpkin. But many associate it only with Halloween. And so, a few suggestions for using this wonderful vegetable.

1. Of course, the "Evil Lantern" on All Saints Day
You will need a large pumpkin, a sharp knife and a spoon, a marker, a straw, a glass jar of baby food, glue and candles. First you need to gut all the flesh and seeds out of the pumpkin, so it’s better to cut off the top of the vegetable and scrape out all the contents with a spoon. If there is a stalk on the pumpkin, then it will be appropriate.

Tip: do not rinse the pumpkin itself and the inside under water, as moisture is absorbed into the walls and eroded for a long time, and because of this, the vegetable can rot. It is better to leave the pumpkin in the sun, so it will dry out of its juice.


When the base is ready, the future eyes and mouth of the “Halloween monster” are drawn with a marker on it. The easiest option in this business is to cut out triangles instead of eyes. A smile is made in the form of a crescent. At the bottom of the pumpkin you need to fix a glass jar with glue - this will be a candlestick. Hair is made from straw: they need to be glued to the inside of the cut top of the pumpkin. The lantern is ready. We insert candles, light, wait for the night and put in the right place. Only the resulting “hat with hair” does not need to be fixed to the main part, otherwise it will be difficult to change the candles.
2. A carriage for Cinderella or an unusual toy for a daughter
You will need a small diameter pumpkin, 4 small pumpkins or wheels from an old toy carriage, wire, marker, glue, beads and ribbons, shreds of tulle or chiffon, a knife.

The cleaning procedures are the same as for the first crafts and also through the top of the pumpkin. Marker places to cut windows and doors, do not throw out the cut-out door.
Tip: the marker is poorly washed off the pumpkin, so either a pencil is used or parts are cut out beyond the contours.


Curtains are made from shreds of tulle or other fabric, and then they are attached from the inside to the appropriate place. From the wire, you need to make rings, but do not close them, because subsequently they must pass through the door on one side and the wall of the carriage on the other. So the door can open. Now go to the wheels. In order for the wheels to spin and the carriage to move, the wire needs to be threaded through the bottom of the pumpkin back and front. Small pumpkins or other wheels are attached to the protruding ends of the wire. Glue the top of the pumpkin with the base, and decorate the stalk with batik from shreds and ribbons. Stick the beads on top in any order, the door handle can also be made of beads.
3. Vase for the autumn herbarium
In this case, the upper cut part of the pumpkin is not saved, it will no longer be needed. In order for the pumpkin vase not to look simple and pretentious, you will have to show zeal and scrupulousness.

You will need a hammer drill with a thin drill or a scalpel. It is better to take a large pumpkin, pre-gutted and dried, because it is easier to work with a drill with a large diameter. And tools are needed for cutting openwork and perforated drawings.
Tip: pumpkin, although a thick-cut vegetable, but fragile. Therefore, sharp, well-sharpened tools are required for cutting. Otherwise, the pumpkin will crack and break.


Patterns can be completely different, as fantasy will allow, the main thing is not to cut too much. Leave the edges intact. The vase is ready and now you can put in it a bouquet of branches of mountain ash, maple leaves and dried flowers.
4. Unusual country clock
Such a clock cannot be wall. It will turn out a kind of huge alarm clock, but very exclusive and original. You will need a wall clock mechanism, pumpkin seeds, glue, adhesive tape, and a drill.

First you need to disassemble the clock, i.e. to separate the mechanism itself from the part closing it. In other words, leave only the skeleton from them. In modern watches, the hands are easily removed from the dial and remain in working condition, so that it is not difficult to separate them. The upper part of the pumpkin needs to be cut to such a diameter that only a hand with a mechanism crawls there. A hole is made on the outside of the pumpkin where the dial pin from the watch will be inserted. Then, with the help of adhesive tape, the mechanism is fixed inside, and the arrows dress back only from the outside. From seeds you can make numbers. The top does not need to be glued, because the watch will require a power change. It is better to make it in the form of a cover.


5. Pumpkin House
Another simple idea for pumpkin crafts is a fairytale house for the princess or toys that your child plays. The idea is the same as in the manufacture of the carriage - you will need to cut through the windows and doors in your house, make a frame, attach a porch, chimney and any other elements of the house. Plus, you can add a fence of matches, toothpicks or ice cream sticks.


6. Pumpkin animals with children
Why not make some kind of animal out of pumpkin, at least ordinary, really existing, at least fabulous - these can be characters from Smeshariki, a fish or a hedgehog. (What else can you make a hedgehog). As well as owls and peacocks, chickens and sheep, fish and hares, caterpillars of several pumpkins that can decorate your garden, funny alien creatures, a family of pirates, cats, dogs, bats and much more.
Hello! Soon autumn competitions will be announced in kindergartens and schools, which will require bringing crafts from vegetables and natural materials. I think those who have kids probably know this by hearsay. Since every year, educators and teachers ask parents and their children to participate in such exhibitions.
In connection with the upcoming event, well, since my child goes to a preschool institution myself (so we will also need all this), I decided to make it easier to find crafts that should not be bought, but done on my own. I thought it would be great if a bunch of ideas were gathered in one place, do you agree with me ?!
In today's post, I will show you what it will be possible to make children's crafts with my own hands from pumpkin. This is a very popular vegetable. And you can’t even imagine what can be created from it. A bunch of original souvenirs. Moreover, everything is insanely easy and simple, which even the smallest child can handle.
I’ll tell you a secret, I have prepared for you the largest selection of autumn pumpkin crafts for boys and girls. Here and now you will find real masterpieces that will definitely allow you to take prizes. So do not leave the page and save it as a bookmark so as not to lose! I’m sure you will find what you are happy to build with your children.
We will start with products that are the strength of the smallest. Of course, you can’t do without the help of parents. But how cool and valuable when moms and dads are engaged with their children. Remember, co-creation not only develops your baby, but also strengthens your entire family.
Probably the easiest way to make autumn souvenirs from such a sunny vegetable is to draw muzzles on it and decorate with additional attributes. Look what a cool boy and girl turned out. Just take two good fruits, one smaller, the other larger and draw eyes, nose, mouth and handles. Complete everything with a straw hat and your work is ready.

You can take not a whole pumpkin, but its half. From above, draw a shell like a turtle, and from the potatoes make paws and a head. Your tortoise tortilla is ready!

Do not forget that orange carriages are especially popular. For this product you will need a small fruit. In it, you need to cut out the windows and pull out all the flesh. Make the wheels out of carrots.

And you can make such a house by decorating everything with autumn leaves. And the inhabitants will be small peeled onions. Cool idea!

And how do you like such a house for a spider from potatoes, well, just a class. Make a spider web from ordinary woolen threads. Collect herbs, rowan branches and decorate everything as you wish.

Now I propose to make you such a beautiful snail. And you will need not only a pumpkin, but also a yellow zucchini. Plus sequins, sequins, ribbons and other decorations.

If you have your own garden, and the harvest is successful, then select two large fruits and create just such a graceful owl. Of the work, only cutting wings, faces and gluing them.

Or just cut it out. Right on the pumpkin, draw what needs to be removed and proceed. That's what a cat can do!

I also really liked the composition with the leaves. You can make a very cute chicken. Just little kids will cope with this task.

Or make a whole family of pumpkin men with your child.

Now I suggest you look at the master class on making a candlestick in the form of a cat. Such work will deserve a lot of applause, and after the contest do not rush to throw it away. After all, Halloween is ahead, so the candlestick will look great in the country house or in the fence of your house.
Cat candlestick

You will need: big pumpkin, black gouache, brush, spoon, knife, cardboard for ears and tail, pen, fishing line for antennae.
Work process:
1. Take a pumpkin and cut off the bottom from it so that in the future your craft is stable.

2. Use a spoon to scrape all the inside of the fetus.

3. Now draw a cat's face with a pen.

4. Carefully, using a knife, cut the muzzle along the contour.

5. Paint the pumpkin black.

6. On black cardboard, cut out the ears and tail. Attach the parts to the pumpkin with glue or toothpicks. Cut a mustache from the fishing line and glue it to the face.

7. Well, inside, place and light a small candle.

Well, isn't it beauty? Just a masterpiece!
Options for DIY handmade crafts using pumpkin

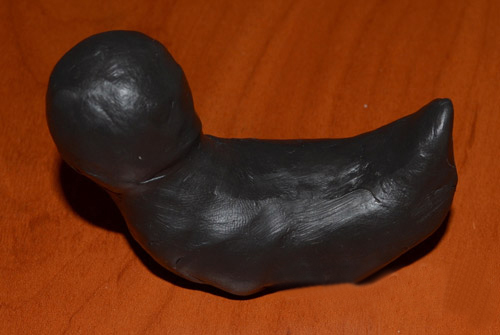
Look at what a funny freak, I don’t even know how to call it right. And it is also made of pumpkin and plasticine.

I also really liked the idea of \u200b\u200ba vase for fresh flowers. To make such a product, you need to take a small and smooth pumpkin. Cut a circle from above and pull out the insides using a spoon. Put a glass inside and pour water into it. Then, in the resulting vase, set a bunch of fresh flowers. This autumn craft is ready. 
You can create such a Winnie the Pooh with a barrel of honey. Well, this is if you have nowhere to put the fruits). 
And here is the idea with a hedgehog. Well, everything is also very simple. Plasticine, toothpicks, olives or grapes and a pear, that’s all the details.

You can also stain the fruits in different colors and make the faces of any animals from felt. It turns out very beautifully and effectively. A whole fairy tale can be made like that.

Kids can make their favorite characters from cartoons and fairy tales. For example, from improvised materials and a small pumpkin, you can get such a fuss.

And fruit baskets look great too. Making it easier is simple, well, you yourself see everything from the photograph.

Crafts from pumpkin and zucchini on the theme of Autumn
Now let's take a closer look at what can be created not only from the orange fruit, but also with other vegetables.
For example, make such a vegetable machine with a trailer. I think the boys will definitely appreciate it.

But what a big mushroom. A cauliflower directly to the topic. Schoolchildren can easily cope with this craft.

Here are some more beautiful mushrooms!

And how do you like such a boat from a vegetable marrow? Just a sight for sore eyes. Well, pumpkin as an attribute of decoration.

Here's another fun company you can build. If you need the presence of a pumpkin, then make wheels for the car from it.

Popular fabulous carriage. Wheels from zucchini fit very well.

And here is another pumpkin house for a spider from a vegetable marrow!

Well, to be honest, here are a lot of crafts from pumpkin and zucchini in a joint form could not be found, but individually there is plenty to choose from.
What can be done from pumpkin seeds for the autumn contest
Now I want to show and introduce you to such material as pumpkin seeds. You can also make different souvenirs from them. So keep ideas for your exhibit.
I will show and tell in detail how to make such a beautiful chicken.
Pumpkin and Sunflower Chicken

You will need: plasticine, pumpkin seeds, sunflower seeds, a small basket, dried grass or strips of colored paper.

Work process:
1. From plasticine of black or brown color, sculpt the body of the bird, form a tail. Roll a ball of this color. This will be the head. Stick it to the body.
2. Now make wings of pumpkin seeds. Just stick them in plasticine in several rows.

3. Then also do the tail, but start from the top.

4. Take the sunflower seeds and insert them with the sharp side, filling the entire surface of the head and breast of the chicken.

5. From yellow and red plasticine, blind the scallop and beak. From white and black plasticine form eyes.

6. Take a small basket, place the dried weed and put the chicken in the nest. All is ready!

And kaike more work can be done. Watch and choose.
Application "Autumn tree".

Hedgehog. True, in the illustration it is made from sunflower seeds, but it is also possible from pumpkin seeds, just need small seeds. And first paint them black.

And here's another pretty snow-white chicken. The manufacturing technique is similar to the above described option.

Application "Spikelets". Work for preschoolers and primary school children.

So the sunflowers also look very impressive. The middle can be made from cereals.

I found another composition. Heroes can be made from some vegetables, for example from a pear, but the panel is just from seeds.

By the way, working with pumpkin seeds is very good for the development of motor skills, so take this into service.
New ideas for making pumpkin crafts for kindergarten and school
Wandering around the Internet in search of interesting and original works from this vegetable, I came across such a cool author's craft by Svetlana Ridzel from the Fair of Masters website. She amazed me so much that I saved it and share it with you. Maybe someone wants to do such an Ekibana.
Pumpkin Ekibana

You will need: pumpkin, acrylic paints, brush, piece of sponge, corrugated paper (fabric, felt, foamiran), wax, scissors, wire.
Work process:
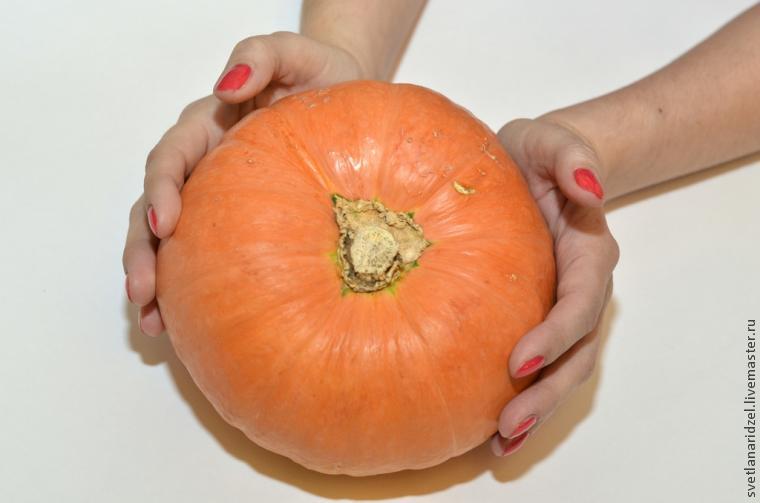
1. Wash the pumpkin and cut the tail.
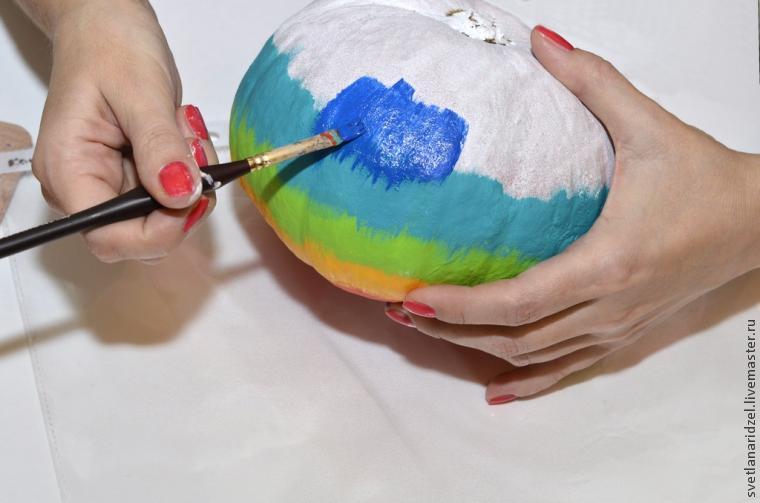
2. Paint the whole fruit with white paint using a sponge. Wait for it to dry.

3. Now, starting from top to bottom, paint the product according to the colors of the rainbow: red, orange, yellow, green, blue, blue, purple.


4. Paint the pumpkin with a regular brush, making only vertical strokes.
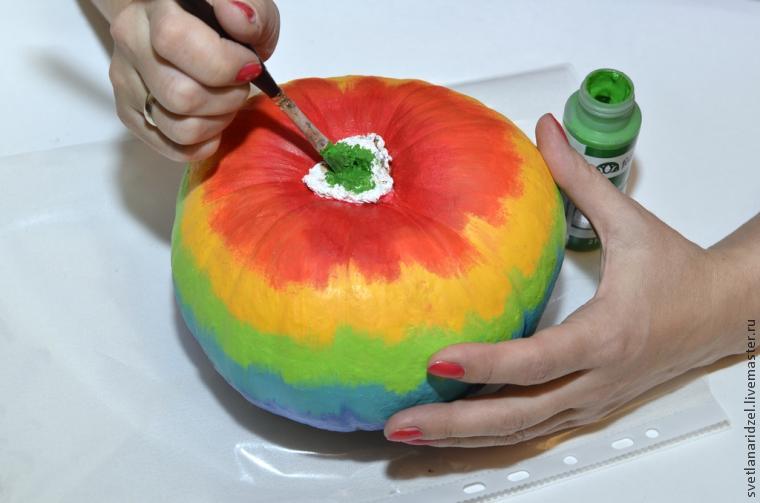
5. Paint the bottom black and the rest of the tail green.
5. Now dry the pumpkin well. Not less than a day! And when it is completely dry, cover it with wax.

6. From corrugated paper or fabric, or maybe felt or foamiran, make twigs, petals and flowers.

7. Use wire to attach them to the ponytail. Your "beauty" is ready.
I think you will agree with me that this is a real masterpiece! The author is just fine!
And a couple of new ideas for creativity. Especially for those who love tinkering.
- Kittens in a basket;

- Haunted house;

- Autumn candlestick;

- Vessel (pumpkin carving).

Well, of course, this is a difficult level, which is within the power of people who engage in such art.
Crafts from a decorative pumpkin for the holiday of autumn
And you choose what is simpler, well, and what the kids can handle. So look further and do not stop wondering from what you see.
What wise little owls from white fruits and seeds. Simple, beautiful and popular.

Another version of a flower vase, but with a decor. Check it out!

Big and funny spider. But you need metal knitting needles or wires.

Another spider in the role of a candlestick.

Pumpkin carving. Again, the level is difficult, but I really liked the work, suddenly someone is addicted and wants to make such a product.
Here is a simple job, like a vase, only berries with fruits are added.

And how do you like such an old crab. I smile directly, looking at him.

Here are some more interesting and charming little baskets. Cut the top and remove the flesh. Inside, put decorative grass, make a pen out of twigs and decorate everything with ribbons.

Mischievous bun. Kids will be thrilled.

Variations of fabulous carriages. Cool idea to lay a vegetable.


Houses for fairy-tale heroes. Imagine, take improvised and natural materials and create!


Well, a fabric letter looks very original.

Pumpkin souvenir workshop: fast and beautiful
Probably almost all the ideas of crafts I have already shown you. Well really there is plenty to choose from? It remains to tell you in detail how to make a flower vase. As you saw, it is popular and easy to manufacture.
Vase

You will need: pumpkin, dried or fresh flowers, felt-tip pen, knife, spoon, polystyrene.
Work process:
1. Take a smooth and beautiful pumpkin. She needs to stand steady on the table.

2. On the upper side of the fruit, draw a felt-tip pen on the outline along which you will cut the neck of the vase.

3. Then, with a knife, cut the “cap” along the contour.

4. Remove the grains and pulp with a spoon.


6. Prepare the dried branches of plants and stick them in the stand. Your Ekibana is ready.

In conclusion, a small selection of souvenirs from pumpkins for children. They will be happy to do such work themselves, as it will be necessary to paint and paint a lot. Look, the products are so light, and how beautiful they look.


Wow, now I don’t even know what to choose for work with my daughter, because there are so many interesting things. Well, if it’s not enough for you, then I suggest watching the next video plot. Then surely you say stop, I found).
Friends, how do you like such wonderful pumpkin work? I am sure that now you will definitely participate with the child in the competition of autumn crafts. Because there are a lot of ideas for their creation, and they are made very easily, quickly and not difficult. Just do not be lazy and everything will turn out. Bye, bye!
Creating pleasant moments for your children is one of my favorite hobbies, and it doesn’t matter whether it’s a task from\u003e a kindergarten or, perhaps, an occasion — a birthday or a visit, a family holiday, a simple purchase of a new color cardboard or felt - it doesn’t matter at all, the main thing is that you will make your own masterpiece together and with your own hands.
This year, when we were warned that they would be needed and preferably made from pumpkins ... I, as a decent mother, set about searching for interesting ideas. A huge help was the fact that the pumpkin season is in full swing, so first we bought small pumpkins.
I propose to get to know each of them better and figure out how to make such wonderful autumn crafts from pumpkins with your own hands. It will not be difficult, but a whole sea of \u200b\u200bpositive emotions from the creative process will appear, because it is pleasant even for adults.
DIY craft materials
We will need only two colors of paint, if one of the selected pumpkins is saturated orange, we will make fox from it. We will use felt, felt and colored cardboard to make everyone charming faces, ears, paws, wings and ponytails. Let's see what exactly comes in handy for us.

- Three small pumpkins of the correct form
- The paint is gray and turquoise.
- Colored cardboard gray and orange.
- Thick felt or felt - 5 colors:
gray, orange, milky white, brown, and black. - Black permanent marker for plastic.
- Sharp scissors.
- Hot glue.
- Stencils for creating crafts.
In order to simplify our task, below I will lay out ready-made stencils for our crafts, which means you just have to print them in the sizes you need, translate them onto the material and cut out ready-made templates, so to speak.
How to make an article "Pumpkin Raccoon"
To get started, we collect everything we need - gray paint for pumpkin, gray cardboard, black and white felt, black marker, stencil and glue.

We paint the pumpkin in gray and let it dry completely, this will be the body of our raccoon. We print out the stencil and translate the details to cardboard and felt, cut them out. From pieces of gray thick cardboard and black felt.

For the muzzle we need black and white felt plus a marker. We connect the parts using hot glue.
Making a Pumpkin Owl with your own hands
Now let's get to our little owl. It turns out to be almost polar with us, since we painted it in blue, even turquoise. The painted pumpkin needs to be completely dried.

Now let's take care of the details - we will translate and cut the wings, the breast according to the patterns (for an owl’s tummy you can use beige or light gray felt), eyes and a beak.

We attach the finished elements to the pumpkin, and with the help of a black marker we draw an expressive “look” and apply the ornament to the owl’s breast, imitating plumage.
Craft - Pumpkin Fox
We make a charming cunning fox) if your pumpkin is even orange, then you can not paint it, if not, paint it as you like before. Let the body dry and go to the paper and felt parts.

Using the stencil proposed below, we translate the tails of the tail into the base, pay attention to the “brush” of the fox tail, muzzle, tummy and ears.

Carefully cut out the parts, connect them together and attach using hot glue to the pumpkin. With a black marker we finish the nose and eyes.
Craft Stencils

And here are the details promised above for creating our magic pumpkin animals from the autumn forest. Stencils can be changed in size, so if your pumpkin is large, just print the file to the size you need before printing the template.
And yet, if you have such an opportunity, then buy artificial pumpkins in a decor or toy store, they will not only make your work as easy as possible, but they will also please you, your kids, the whole group in kindergarten or your school class throughout the year . There is nothing better than your good mood and the contented smile of your child 🙂