Pillows have been around since time immemorial. At excavations of ancient Egyptian burials, pillows were found on which the pharaohs slept without fear of damaging their complex hairstyle; they were wooden tablets with images of gods on stands. In Japan, geishas slept on similar structures to protect their expensive hair styling. History knows porcelain, metal, stone pillows, as well as those decorated with precious metals and stones. IN different time pillows were made of leather, fabrics, stuffed with feathers, down and dry hay or straw, decorated with multi-colored embroidery, lace and laces with tassels.
At all times, and even more so now, pillows serve not only for sleeping. They are used for decoration and creating a certain style in the interior, for comfortable sitting on hard chairs, tiny sachet pillows give a completely unique aroma to the atmosphere in the rooms, funny pillows in the form of funny cats, lambs and much more will make the atmosphere in the children's room bright and will be excellent toys for kids. And is it worth mentioning “heart” pillows as gifts for Valentine’s Day?!
Square and round, pillows in the form of cylinders and polygons, huge and very tiny, any of these products can be created with your own hands, crocheted, for example. At the same time, practical needlewomen often knit not the pillow itself, but a cover for it, which can be easily removed and washed without damaging the stuffing material.
One of the most simple patterns in crocheting is the “granny square”. At the same time, from such easy-to-execute motifs you can create very beautiful and surprisingly cozy decorative items. Another lovely thing about the granny square is that you can use a variety of leftover yarn. The result is an original, bright and cute pillow.
Granny square pillow.
Creating a pillow from such motifs is quite simple; the size of the square can be adjusted by decreasing or increasing the number of rows, and the use of multi-colored yarn will allow you to create a product that is ideal for a specific interior. Motifs can also be combined in different variations, which leaves even more room for creativity and imagination.
Connect a chain of 5 airs into a ring. loops
- First row. Knit 4 times, 3 tbsp. double crochet, alternating triples 1 air. loop. At the beginning of the row, replace the first st. with a double crochet for 3 air. lifting loops, complete row 3 connection. Art.
- Second row. At 1 air. knit a row loop (3 chain stitches, 2 double crochet stitches + 1 double crochet stitch + 3 double crochet stitches), *1 double crochet stitch. loop, in the next 1 air. knit a loop (3 double crochets + 1 double crochet + 3 double crochets) *, knit from * to * 2 more times. Finish 3 connections. Art.
- Third row. At 1 air. knit a loop (3 chain stitches, 2 double crochet stitches + 1 double crochet stitch + 3 double crochet stitches), *1 double crochet stitch. loop, in the next 1 air. knit a loop 3 tbsp. with double crochet, 1 air. loop, in the next 1 air. knit a loop (3 double crochets + 1 double crochet + 3 double crochets) *, knit from * to * 2 more times, 1 double crochet. loop, 3 tbsp. with a double crochet. loop of the row below, 1 air. loop, 3 connections Art.
- Continue knitting according to the pattern to the desired size.
Below are several photo examples of the layout of “granny squares”.


Elegant square pillow in vintage style.

This pillow is also knitted from motifs, but made from yarn of the same color will create a completely different atmosphere than a “granny square”.

Close a chain of 5 airs into a ring. loops
- First row. Tie 3 air into a ring. lifting loops, 15 tbsp. double crochet Finish 1 connection. column
- Second row. Knit 1 tbsp into each stitch of the row. double crochet + 1 air. a loop. In the first case, instead of 1 tbsp. with a crochet knit 3 air. lifting loops. Complete 1 connection. column.
- Third row. In Art. with the row below, knit 1 tbsp. with double crochet, in air. knit loops 2 tbsp. double crochet First Art. double crochet, replace with 3 chain stitches. lifting loops, complete 1 connection. column.
- Fourth row. 1 air lifting loop, *arch of 10 air. fasten the loops through 2 loops of the row below 1 st. single crochet, arch of 3 air. fasten the loops through 2 loops of the row below 1 st. single crochet, arch of 5 air. fasten loops through 2 loops 1 tbsp. single crochet, arch of 3 air. fasten loops through 2 loops 1 tbsp. without crochet *, knit from * to * 3 more times, finish 1 connection. column.
- Fifth row. In arches of 10 air. knit loops (5 double crochets + 3 double crochets + 5 double crochets), into arches of 3 double crochets. loops knit 1 tbsp. without crochet, in arches of 5 air. knit 7 stitches. double crochet Finish row 1 connection. column.
- Sixth row. 3 air lifting loops, *5 air. loops, in an arch of 3 air. knit loops (1 single crochet + 3 chain stitches + 1 single crochet), 5 chain stitches. loops, 1 tbsp. double crochet in st. single crochet row below, 3 air. loops, 1 tbsp. Single crochet in 4th of seven stitches. double crochet, 3 air. loops, 1 tbsp. double crochet in st. single crochet row below *, knit from * to * 2 more times, 5 air. loops, in an arch of 3 air. knit loops (1 single crochet + 3 chain stitches + 1 single crochet), 5 chain stitches. loops, 1 tbsp. double crochet in st. single crochet row below, 3 air. loops, 1 tbsp. Single crochet in 4th of seven stitches. double crochet, 3 air. loops, finish 1 connection. column.
- Seventh row. Knit st. double crochet loops of the bottom row. In the central loop of 4 corner arches of 3 air. knit stitches (1 double crochet stitch + 3 double crochet stitches + 1 double crochet stitch). Start row 3 air. lifting loops instead of 1 tbsp. with a double crochet, finish 1 connection. column.
- Eighth row. Knit st. Single crochet in each stitch.
Pillow with bumps in the shape of a cushion.

Made from contrasting multi-colored yarn, this pillow is sure to enliven the interior. Knitted from 3 parts, cylindrical and 2 circles. A zipper can be sewn in at the junction to facilitate the process of stuffing and washing.

Crochet using thick threads with crochet number 4 and larger. Before work, knit a small sample to calculate the loops.

- First row. 3 air lifting loops, 11 tbsp. double crochet Finish row 1 connection. column.
- Second row. Work 2 tbsp into each stitch of the row below. double crochet, replacing the first st. with a double crochet for 3 air. lifting loops, finish row 1 connection. column.
- Third row. Knit st. double crochet, knitting 2 tbsp in every second loop of the row. double crochet Start and end the row in the same way as the previous ones.
- Fourth row. Knit 2 tbsp. double crochet in every third stitch of the row below.
- Knit further according to the pattern. Knit the last eighth row without increasing stitches.
The cylindrical part is knitted in one rectangular fabric.

Dial a chain of air. loops
Knit 2 rows st. Single crochet in each stitch. Start rows 1 air. lifting loop. Then knit 1 row with “bumps” every 5 stitches, 3 rows of st. without a crochet and again 1 row with “bumps”, etc. to the required canvas size.
Knit the “bump” as follows. Knit 5 unfinished stitches. with a yarn over from one loop of the base (there are 6 loops on the hook), then knit all the loops into one.
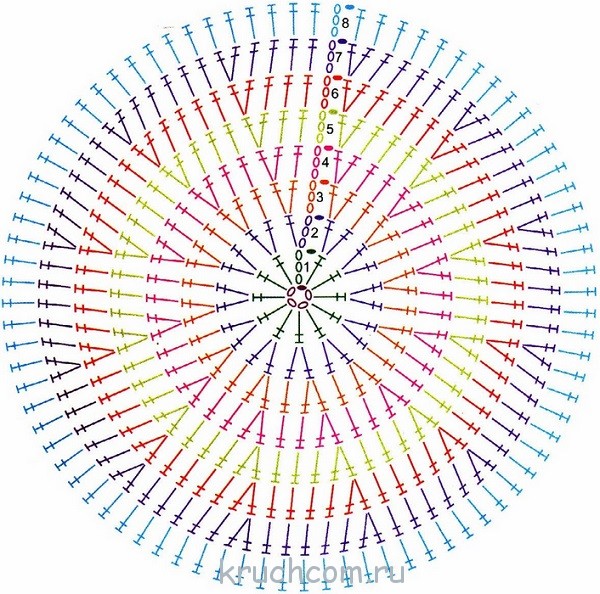
Round flower pillow.

It will be necessary to knit 2 identical parts from rows 1 to 22, connect them and knit from rows 23 to 25. Crochet No. 2. The diameter of the pillow is 49 cm.

Connect a chain of 14 air into a ring. loops
- First row. Knit 1 air into the ring. lifting loop (ignore), 24 tbsp. without a crochet. Finish 1 connecting post.
- Second row. Knit 8 arches from 4 air. loops, securing from 1 tbsp. Single crochet in every third stitch of the row below.
- Third row. Knit 4 tbsp into each arch. double crochet, work 3 chain stitches between the four stitches. loops, in the first case replace 1 tbsp. with a double crochet for 3 air. lifting loops. Finish row 2 connection. in columns. The knitting has shifted by 1 stitch.
- Fourth row. 3 air lifting loops, 2 tbsp. with a double crochet in 2 tbsp. double crochet row below, 3 tbsp. with a double crochet in 2 out of 3 airs. arch hinges, *3 air. loops over 2 loops of the row below, 3 tbsp. with a double crochet of 3 tbsp. double crochet row below, 3 tbsp. with a double crochet in 2 out of 3 air. arch loops *, knit from * to *, finish with 3 air. loops, 1 connecting post.
- Knit further according to the pattern.
Star pillow.

You will need yarn of two contrasting colors. Knit the first 3 rows with white yarn, then alternate colors every 2 rows. Tie with red yarn and attach tassels to the ends of the “rays”. It is necessary to connect 2 parts.

Connect a chain of 6 air into a ring. loops
- First row. 3 air lifting loops, 1 tbsp. double crochet, *2 air. loops, 3 tbsp. with a double crochet in a ring *, knit from * to * 4 more times, 2 air. loops, 1 tbsp. double crochet into a ring, 1 connecting stitch into the third lifting loop.
- Second row. 3 air lifting loops, *in an arch of 2 air. knit loops (2 double crochet stitches + 3 double crochet stitches + 2 double crochet stitches), 1 tbsp. double crochet in the middle of three stitches. with the bottom row crochet *, knit from * to * 3 more times, in an arch of 2 air. knit loops (2 double crochet stitches + 3 double crochet stitches + 2 double crochet stitches), 1 connecting stitch in the third lifting loop.
- Third row. 1 air lifting loop, *1 air. loop, in an arch of 3 air. knit loops (4 double crochet stitches + 2 double crochet stitches + 4 double crochet stitches), 1 double crochet stitch. loop, 1 tbsp. single crochet in 1 tbsp. with the row below *, knit from * to * 4 more times, replacing 1 tbsp in the last case. single crochet on 1 connecting column.
- Knit further according to the pattern.
Heart pillow.

A charming pillow will not only decorate your home, but also an excellent romantic gift. Knit up and down from the original chain of air. loops It is necessary to connect 2 parts.

Dial a chain of 48 air. loops Mark the center with a contrasting thread for easy calculations when knitting.
- First row. 1 air lifting loop, 22 st. without double crochet, knit in 2 central loops (1 single crochet + 2 chain stitches + 1 single crochet), 22 tbsp. without double crochet, tie 3 tbsp into the outer loop of the chain. without crochet, knit on the reverse side of the original chain 22 tbsp. Single crochet, skip 2 loops, 22 tbsp. without double crochet, knit 2 more loops into the first loop of the chain (from which the lifting loop is knitted). Finish with 2 connecting posts.
- Second row. 1 lifting loop, 23 st. without double crochet, knit in 2 central loops (1 single crochet + 2 chain stitches + 1 single crochet), 23 tbsp. without double crochet, knit 2 tbsp into the 3 outer loops. without crochet, 21 tbsp. Single crochet, skip 2 stitches, 21 sts. without double crochet, knit 2 tbsp into the 3 outer loops. without a crochet. Finish with 2 connecting posts.
- Knit according to this analogy according to the pattern.
Pillow sachet “Heart”.

This tiny sachet pillow will be an excellent fragrant detail for your interior decor. You can fill it with Provençal herbs, breathe in, close your eyes, and find yourself in the very heart of France.
For two parts, knit 6 circles according to pattern 1, connect them as shown in the picture and tie with a lace frill according to pattern 2. 
Tie a chain of 4 chains into a ring. loops
- First row. 3 air lifting loops, 19 st. with a double crochet, finish 1 connection. column.
- Second row. Knit alternating 1 tbsp. double crochet and 1 air. loop, st. double crochet between st. with double crochets on the bottom row. First Art. double crochet, replace with 3 chain stitches. lifting loops. Finish 1 air. loop, 1 connection column.
- Third row. In every 1 air. knit a loop of the row in 2 tbsp. without a crochet. First Art. single crochet replace with 1 air. lifting loop, finish 1 connection. column.
- Fourth row. Between 2 tbsp. Single crochet, knit 1 tbsp. double crochet + 2 air. loops, first st. double crochet, replace with 3 chain stitches. lifting loops, finish row 2 air. loops, 1 connection column.
At all times, things made with one's own hands not only brought joy to others, but were also elegant and stylish decoration. This category also includes various crochet stitches. Sofa, children's, large and small - this is very convenient. These can be warm and fluffy options, plain lace or made from the remnants of multi-colored yarn. And crocheted ones will delight their little owners for a long time, protecting their sleep. And in this article you will learn how to crochet a pillow quickly, beautifully and easily.
Crocheted sofa pillow made from leftover yarn
By knitting this version of the pillow, you will kill two birds with one stone. Bring bright notes into the interior of the room and get rid of large quantity multi-colored balls that are a pity to throw away, and it is not always possible to find a worthy use for them.
So, as has already become clear, for making it you will need the remains of multi-colored yarn and a hook. The design will depend only on your imagination and skills. These pillows are knitted from individual elements. They can be square, rectangular or hexagonal. The size may also vary. If you are an experienced needlewoman, you can come up with your own execution scheme. By alternating various shades, you will get bright and eye-catching parts of the future pillow. Don't forget that you can knit many small elements or several large ones. For example, the photo shows examples of both versions of a crocheted pillow. It is very easy to understand the diagrams, even by looking at a photograph. You need to start knitting from the middle with 5 air loops connected into a ring. And then we alternate three double crochets and 3 chain stitches. In the next row, in the corners of the element, you already need to knit six double crochets, separated by air loops. And on the sides of the square we alternate chain stitches and 3 double crochets in a checkerboard pattern. This is the simplest option. Please note that you can also crochet a pillow as a bright gift for any holiday.

Once the required number of parts are connected, you can proceed to assembly. All elements of the pillow can be connected to each other using a hook or thread and a needle. The back of the pillow can be made using the same technique as the front, or have a plain surface, crocheted with or without double crochets. In any case, a pillow knitted with your own hands will turn out unique and will surely appeal to your loved ones.
Round pillows
There is one more original way crochet a pillow. They can be used as sofa or floor options. It all depends on the size and filler used.

Knitting such pillows is quite easy, as they are made with simple double crochets. If you need a denser option, then knitting is done with single crochets. The color scheme of such pillows can be very diverse. The photo shows examples of these. You can use other colors or make them striped. Crocheting a pillow using this technique is very simple. This option is suitable for both experienced craftswomen and beginners.

Method for making a round pillow
Knitting such a pillow begins with 4 air loops connected into a ring. Then knitting continues in the round. The main thing is to make uniform increases in one loop) so that until the desired size is reached, the fabric turns out smooth and does not bend. Once you have knitted a circle of the required size, no increases are made. Knitting continues without additions, and with each round it will look more and more like a pillow. In this way, knitting continues until the height of the pillow you choose is achieved. Next, we knit a flat round surface again, only now we need to make decreases (skipping the loops in the bottom row). The photo shows how the knitting of such a pillow ends. For its internal filling, you can use foam rubber or other material, for example, more dense. This will make a great floor pillow that your kids will love. And by tying several in different color scheme, You'll get stylish accessories for a children's room. Agree, crocheted pillows will add coziness and warmth to a child’s room.

Pillows with applique
These pillows can decorate your sofa in the living room or bed in the bedroom; in any case, they look elegant and beautiful.
Crocheting this pillow model is quite simple. You can use existing pillows as a basis or sew new ones. Before you start working, carefully select the colors, as the aesthetic appearance of the pillow will depend on them. The photo shows an example of a yellow pillow decorated with a flower. And the seemingly inappropriate blue leaves add their share of originality. So the color scheme plays an important role in the decor.
Knitting the base and making the decor
You need to crochet a pillow using double crochets. Decorative elements are also crocheted. Also in this model embroidery is used, with the help of which the flower stems are made. You can choose a different decor. Which? Let your imagination give you the idea. To give a finished look to a sofa cushion, you need to tie it around the entire perimeter, for example, using the “shell” technique, using yarn that contrasts in color.
Crochet toy pillow. Models for the little ones
Any baby will be happy with such a pillow. After all, this is not just bedding, it is also a faithful friend that protects a child’s sleep. With such a pillow it is easier to fall asleep and wake up more fun. So don’t hesitate, just start knitting it.

For a toy pillow you will need colorful leftover yarn and a little imagination. In the first photo, the pillow represents a cat or cat. It won't be difficult to do this. It is based on double crochets and multi-colored stripes. The cat's body is a rectangle. It is not difficult to knit even for beginner needlewomen. Once the base of the pillow is ready, you can start decorating it.
We knit decorative elements of pillow-toys
The eyes are made in the form of two-color circles, and so is the nose. You can simply embroider the mustache and mouth. The knitted tail resembles appearance stocking. Knit from the end, starting with 4 air loops connected in a ring, and then in a circle. Once the desired length is reached, you can finish knitting and sew it in its rightful place. The paws of such a cat are no different from the tail in terms of the knitting method, they are just a little wider and shorter. The ears are also not difficult to make. Their knitting begins in exactly the same way as the tail, only then it will be necessary to make several increases to give them triangular shape. Color and coloring depend entirely on your imagination and the desire of the child. Let him also take part in creating a toy pillow and say which colors he likes best. Select suitable option together with the child, because our children love to spend more time with their mothers.

Another option for a baby pillow is even simpler. There are no large number of additional elements that complicate the work process. We simply knit a large rectangle with an extension downwards. We tie the upper, narrower part with any openwork pattern. Next we knit three-color circles - these will be the eyes of the owl. You also need to make a triangle that acts as a beak. That's all. A wonderful owl pillow is ready. Can you imagine how happy your baby will be? And children's smiles and genuine emotions are probably worth spending a little time knitting a toy pillow.
Knitted sofa pillows will add even more comfort to your home. And to knit such pillows, you just need a little patience and time. Master class on crocheting a “Flower” pillow from our regular author.
We will knit a pillow in the shape of a flower.
To knit a flower pillow we will need:
- Hook;
- Yarn (white, yellow);
- Sintepon.
We will start knitting with yellow color.
Let's first make five loops and close them into a ring.
Now we will knit fifteen single crochets inside.

The preparatory row for the petals is ready.
Let's change the thread to white. And now we will knit only the front part of the loops. For the back we will later make a new preparatory row for new petals.
We knit a single crochet behind the front walls and a double crochet into a new loop.
In the third loop we will knit five double crochets. In the fourth loop, one double crochet and in the fifth, a single crochet.

We repeat. That is, again we knit a single crochet into a loop, a double crochet into the next, and five double crochets into another. And so on.

Let's move on to the preparatory row.
Now we knit the remaining back parts of the loops with yellow threads. And we will knit the entire row with single crochets. In all second loops we perform two stitches.


Did you like the product and want to order the same from the author? Write to us.
More interesting:
See also:
DIY triptych of textile flowers
Today Shaginova Larisa will share with us the technology for creating panels with flowers from fabric: “After...
"Breath of Autumn"
We meet another wonderful work by Albina Nikolaevna Artemyeva - a wonderful autumn panel made of...
Decorative pillow "Flowers"
A master class on how to sew a beautiful sofa cushion for your home with your own hands is presented by Alen Smotrova...
Home comfort consists of thousands of little things, most of which you can easily create with your own hands. Knitted pillows are that home accessory that no true needlewoman will deny herself the pleasure of knitting.
Firstly, knitting a pillow is considered one of the most simple ways master the basics of crocheting, so any novice craftswoman taking her first steps in the art of crocheting can do it.
Secondly, a knitted pillow will decorate any interior - both artsy classic and modern minimalist style. This means that such a pillow will find a place in the living room, children’s bedroom and even in a formal office.
And, thirdly, a knitted pillow does not at all mean the only way to use it as a product for sitting comfort. With its help you can decorate upholstered furniture and even create a certain style in the interior. The imagination of a needlewoman, coupled with knowledge of various crocheting techniques, will help create pillows of various sizes (from tiny to massive) with all sorts of patterns and reliefs - from simple “bumps” and zigzags to intricate floral openwork and even Irish lace. 
If you wish, you can knit a variety of pillows, both in shape and purpose. From under the hook come traditional rectangular pillows for decorating sofas, flat pillows for comfortable sitting on hard chairs, aromatic pillow sachets, pillows for wedding rings and even pillows in the shape of funny cartoon characters.
Square, round, oval, triangular, cylindrical, star-shaped or heart-shaped - any pillow can be crocheted! At the same time, it is most convenient to knit not the pillow itself (especially if it is openwork), but a cover (pillowcase) for it, which can always be removed and washed without damaging the stuffing material.
Knitting pillows is also a great way to use up leftover yarn from previous knitting projects. As a rule, from several colors of yarn (25-100 grams each) you can create a pillow of amazing beauty without spending a penny on its production!
Today’s article is devoted to crocheting original pillows - a classic openwork one, in the shape of a cylinder with colored splashes, as well as an oversized flower floor pillow, made in bright colors.
Round openwork pillow with an airy border-band

A pillow made in openwork motifs will look beautiful in the living room on the sofa, and can also serve as a soft backing for the seat of a chair. To create it, you need to knit an openwork pillowcase according to the pattern and description given below, and also sew the round pillow itself from improvised materials (unnecessary fabric and padding polyester or holofiber filling).
To knit a pillowcase for a pillow with a diameter of 35 cm, you need about 100 grams. any yarn (you can take leftovers) and hook No. 2.
Knitting pattern:

Knitting a pillowcase consists of two parts: the upper one, made with an openwork motif, and the lower one, knitted with single crochets.
Abbreviations used
- VP – air loop;
- Runway - air. lifting loop;
- SSN, art. s/n – double crochet;
- RLS, art. b/n – single crochet;
- PR – prev. row;
- n. - loop;
- c. - chain;
- A. – arch;
- SS – connection column.
Knitting sequence
Top part:
We dial c. on 6 VP, close the SS in a circle.
Row No. 1: 4 VP (3 VP lift + 1 VP), then repeats in the amount of 12 pcs. “1 dc in the ring + 1 ch”, we get 12 a., we end the row with a ss.
Row No. 2: 4 VP (3 VP lift + 1 VP), 1 Dc in the first runway + 1 VP, then 12 repeats: “2 Dc in the PR column, one dc between them. loop + 1 VP above VP PR.” SS.
Row No. 3: 3 runways, 1 dc from air. PR loops, 1 dc in next. column PR, 1 VP, then 12 rapports: “1 DC in column PR, 1 DC in a. from the air point PR, 1 CCH in the next. column PR, 1 VP.” SS.
Row No. 4: 3 runways, 2 dc in the next row. column PR, 1 dc in the next row. CCH PR, 2 VP, then 12 rapports: “1 CCH in the next.” column PR, 2 dc in the next row. column PR, 1 dc in the next row. column PR, 2 VP.” SS.
Row No. 5: 3 runways, 1 dc in the next row. column PR, 2 dc in the next row. column PR, 1 dc in the next row. column PR, 3 VP, 12 rapports: “1 dc in the next. column PR, 1 dc in the next row. column, 2 dc in the next row. column PR, 1 dc in the next row. column PR, 3 VP.” SS.
Rows No. 6-16: we work according to the scheme, closing each of them with a SS.
Bottom part:
We dial c. on 6 VP, close the SS into a ring.
Row No. 1: 1 runway, 11 sc in the resulting ring. SS.
Rows No. 2-25: 1 runway, knit in single stitches, systematically adding 6 sc in each row. SS.
Assembling the pillowcase:
We connect the two finished parts of the product from the inside out using a sc, leaving a hole (later you can sew on a button or insert a snake). Turn the pillowcase inside out. We tie it around the perimeter with an openwork border according to the binding pattern (5 rows). The pillowcase for the round pillow is ready!
Original cylindrical bolster pillow

At first glance, it may seem that knitting a cylindrical pillow requires a Herculean effort, however, this is not so. You can crochet such a bright beauty in two or three evenings watching TV, try it, you won’t regret it! 
Cylinder fabric knitting pattern:

Knitting pattern for the side of the pillow:
The roller is knitted with contrasting multi-colored yarn, we used a thick coal-black thread as a basis, and bright threads for decoration: blue, purple, light green, yellow, pink, orange and red. If the pillow is knitted from thick yarn, there is no need to worry about the inner pillowcase and filling; a thick knitted fabric will replace such a pillowcase; all that remains is to fill the cylinder with synthetic padding and securely sew the edges, or sew in a zipper to facilitate the process of stuffing and subsequent washing.
For a cylinder pillow, you need to knit two side circles and one rectangular fabric.
Knitting circle
We dial c. from 4 air. loop.
Each new row - change the color of the thread according to the diagram.
Row No. 1: 3 runways, 11 dc. SS.
Row No. 2: 3 runways, then - in each paragraph of PR - 2 Dcs. SS.
Row No. 3: 3 runways, knit with rapports: “1 dc in next. p. PR, 2 dc in the next. n. PR.” SS.
Row No. 4: 3 runways, knit with rapports: “1 dc in next. p. PR, 1 Dc in the next. p. PR, 2 dc in the next. n. PR". SS.
Rows No. 5-7: knit according to the pattern.
Row No. 8: knit in s/n stitches without increases. SS.
Cylindrical part
Using a thread of the main color we collect c. from the desired amount of air. loops, focusing on the length of the future pillow.
The fabric is knitted in non-woven columns, with multi-colored “bumps” evenly knitted. The “bump” is knitted like this: 5 unfinished DCs are knitted from one warp stitch, there are 6 loops on the hook, which are knitted into one with a working thread.
The first two rows are worked with sc in each stitch of the warp. We start each row from the runway.
Third row - knit with the addition of one “bump” between every 5th sc (choose colors as desired or according to the pattern indicated above).
The next three rows are sc.
The seventh row is with knitting “bumps”. We repeat knitting rows until we obtain the desired width of the fabric.
Roller assembly:
We connect the rectangular fabric into a cylinder (from the inside we knit the two edges with non-woven stitches or joining stitches). Turn it inside out and attach the sides. We leave a hole on one side of the cylinder for filling with filler. We insert a zipper into it or sew it up.
Multi-colored flower floor pillow

Pillows are not only for sofas; a massive flower pillow that acts as a mini-chair is proof of this. Such a magnificent pillow can be used for decorative purposes, but it is also good as a seat - no one will mind lying on a bright, soft knitted flower!
The diameter of the pillow is as much as 85 centimeters, so it will require a lot of yarn to make it - almost 1 kg of yarn in the main color and 500 grams of threads in contrasting colors. We take hooks number 5 and 9. Don’t forget about the filler, you need at least a kilogram of it.
Despite the enormity of the work, it is performed in columns b/n and s/n. Each new row starts at 1 runway and ends with a connector. column.
Two sides are knitted: back and front.
Knitting the back
Using a thread of the main color (ours is blue), we cast on a c. from VP, we connect it with a SS into a ring, into which we perform 6 tbsp. b/n. We close the first and all subsequent rows with SS.
Row No. 2: 3 runways, 1 st. s/n in the same paragraph, 2 tbsp. s/n in RLS PR (we get 12 tbsp.).
Row No. 3: 3 runways, 1 st. s/n in the same paragraph, 2 tbsp. s/n in SSN PR (we get 24 st.).
Row No. 4: knit with yellow yarn, 3 runways, 2 tbsp. s/n in the same paragraph, 7 rapports: “3 tbsp. s/n in column s/n PR, next. We skip the PR column and move on to the next one. p. – 3 tbsp. s/n", 3 tbsp. s/n in next column PR, 1 tbsp. we skip s/n, in total we get 48 columns in a row.
Row No. 5: 1 VP, 8 rapports: “1 tbsp. b/n, 1 tbsp. s/n, 3 tbsp. s/n in one paragraph, 1 tbsp. s/n, 1 tbsp. b/n, 1 SS.”
Row No. 6: continue with orange thread: 1 VP, 8 repeats: “1 tbsp. b/n, 1 tbsp. s/n, 2 tbsp. s/n in one paragraph, 3 tbsp. s/n in one paragraph, 2 tbsp. s/n in one paragraph, 1 tbsp. s/n, 1 tbsp. b/n, 1 SS.”
Row No. 7: 1 VP, 8 repeats (skipping one p., 3 tbsp. b/n, 2 tbsp. s/n, 2 tbsp. s/n in one p., 3 tbsp. s/n in one p. , 2 st. s/n in one paragraph, 1 st.
Row No. 8: attach a raspberry thread, 1 VP, 8 repeats: “4 tbsp. b/n, 1 tbsp. s/n, 2 tbsp. s/n in next 3 p., 1 tbsp. s/n, 3 tbsp. b/n, skipping one p, 1 SS.”
Row No. 9: 1 VP, 8 rapports: “skip one p., 4 tbsp. b/n, 1 tbsp. s/n, 2 tbsp. s/n in next 3 p., 1 tbsp. s/n, 4 tbsp. b/n, skipping one p, 1 SS.”
Row No. 10: continue with blue thread: 1 VP, 8 repeats: “skip one p., 5 tbsp. b/n, 1 tbsp. s/n, 2 tbsp. s/n in next 3 p., 1 tbsp. s/n, 5 tbsp. b/n, skipping one point, 1 SS.”
Row No. 11: 1 VP, 8 rapports: “skip one p., 5 tbsp. b/n, 1 tbsp. s/n, 2 tbsp. s/n in 1 p., 3 tbsp. s/n in 1 p., 2 tbsp. s/n in 1 p., 1 tbsp. s/n, 5 tbsp. b/n, skipping one point, 1 SS.”
Row No. 12: 1 VP, 8 rapports: “skipping two stitches, 5 tbsp. b/n, 2 tbsp. s/n, 3 tbsp. s/n in 1 p., 2 tbsp. s/n, 5 tbsp. b/n, omission of two points, 1 SS.”
Row No. 13: attach yellow thread: 1 VP, 8 repeats: “skipping one stitch, 4 tbsp. b/n, 1 half st., 1 tbsp. s/n, 2 tbsp. s/n in each of the 3 next. p., 1 tbsp. s/n, 1 half st., 4 tbsp. b/n, skipping one point, 1 SS.”
Row No. 14: 1 VP, 8 rapports: “skip one p., 5 tbsp. b/n, 1 half st., 1 tbsp. s/n, 2 tbsp. s/n in each of the 2 next. p., 1 tbsp. s/n, 1 half st., 4 tbsp. b/n, omission of two points, 1 SS.”
Row No. 15: 1 VP, 8 rapports: “skip one p., 4 tbsp. b/n, 1 half st., 1 tbsp. s/n, 2 tbsp. s/n in each of the 3 next. p., 1 tbsp. s/n, 1 half st., 4 tbsp. b/n, skipping one point, 1 SS.”
Row No. 16: continue with yarn raspberry color: 1 VP, 8 rapports: “skipping one point, 3 tbsp. b/n, 1 half st., 2 tbsp. s/n in one paragraph, 2 tbsp. s/n, 3 tbsp. s/n in one paragraph, 2 tbsp. s/n, 2 tbsp. s/n in one p., 1 half st., 4 tbsp. b/n, skipping one point, 1 SS.”
Row No. 17: 1 VP, 8 rapports: “6 tbsp. b/n, 1 half st., 2 tbsp. s/n in one paragraph, 4 tbsp. s/n, 2 tbsp. s/n in one p., 1 half st., 6 tbsp. b/n, 1 SS.”
Row No. 18: 1 VP, 8 rapports: “skipping one p., 5 tbsp. b/n, 2 half-st., 1 tbsp. s/n, 3 tbsp. s/n in one paragraph, 2 tbsp. s/n, 3 tbsp. s/n in one paragraph, 1 tbsp. s/n, 2 half-st., 5 tbsp. b/n, skipping one point, 1 SS.”
Row No. 19: knit with orange yarn: 1 VP, 8 repeats: “skip one p., 7 tbsp. b/n, 2 half-st., 1 tbsp. s/n, 2 tbsp. s/n in next two p., 1 tbsp. s/n, 2 half tbsp. next 2 p., 1 tbsp. s/n, 2 half st., 7 tbsp. b/n, skipping one point, 1 SS.”
Row No. 20: 1 VP, 8 rapports: “7 tbsp. b/n, 3 half-st., 1 tbsp. s/n, 3 tbsp. s/n in one paragraph, 1 tbsp. s/n, 3 half st., 7 tbsp. b/n, skipping one point, 1 SS.”
Row No. 21: 1 VP, 8 rapports: “7 tbsp. non-cash, 1 half-st., inside another combination 3 times: “2 tbsp. s/n in one paragraph, 2 tbsp. s/n", 2 tbsp. s/n in one p., 1 half st., 6 tbsp. b/n, 1 SS.”
Row No. 22: knit with the main color: 1 VP, 8 repeats: “skipping two stitches, 7 tbsp. b/n, 1 tbsp. s/n, 4 times next. knitted combination (2 tbsp. s/n in the next 2 p., 1 tbsp. s/n), 6 tbsp. b/n, skipping one point, 1 SS.”
Row No. 23: 1 VP, 8 rapports: “skipping two stitches, 8 tbsp. b/n, 4 semi-st., 1 tbsp. s/n, 2 tbsp. s/n in next 3 p., 1 tbsp. s/n, 4 half st., 9 tbsp. b/n, omission of two points, 1 SS.”
Row No. 24: 1 VP, 8 rapports: “skip one p., 9 tbsp. b/n, 1 half tbsp., 2 tbsp. s/n in next 2 p., 3 tbsp. s/n, 2 tbsp. s/n in one paragraph, 3 tbsp. s/n, 2 tbsp. s/n in next 2 p., 1 half st., 8 tbsp. b/n, omission of two points, 1 SS.”
Row No. 25: 1 VP, 8 rapports: “skip one p., 5 tbsp. b/n, 24 tbsp. s/n, 4 tbsp. b/n, skipping one point, 1 SS.”
The back of the flower pillow is ready.
Knitting the front part.
We perform rows No. 1-25 according to the steps of knitting the back part, at the end of the 25th row, in order to create an edge, we knit another 15 rows with non-woven stitches, taking into account the alternation of yarn colors. Ready.
Knitting decorative pillow elements
Flower:
We knit with yellow yarn.
We twist the “magic loop” and knit 6 tbsp into it. b/n and 1 SS.
Row No. 2: 1 VP, 2 tbsp. b/n in each st. PR, SS.
Row No. 3: 3 runways, 6 rapports: “3 tbsp. s/n in next Art. b/n + 1 VP for skipping the 1st column of PR.” SS.
Row No. 4: 1 VP, 6 rapports: “1 tbsp. b/n, 2 half-st. in middle school s/n PR, 1 tbsp. b/n, 1 VP.” SS.
Row No. 5: 1 VP, 6 rapports: “1 tbsp. b/n, 1 tbsp. s/n in a column b/n PR, 2 tbsp. s/n, 1 tbsp. s/n, 1 tbsp. b/n in a column s/n PR, 1 VP.” SS. The flower is ready.
Circular elements
Using a thread of the main color, twist a magic loop and knit 12 tbsp in it. s/n, close the row 1SS. The part is ready. There should be 8 laps in total.
Assembling the pillow.
Sew the knitted flower in the center of the front side. Circular details - in the area of 15-16 rows, in the center of each flower petal.
We connect both parts of the pillow from the wrong side, sew or knit st. b/n (SS is also possible). We stuff the pillow with filler, sew up the gap left for stuffing or insert a zipper into it.
The floor cushion in the shape of a flower is ready to use!
Decorative pillows on the sofa are necessary for coziness, comfortable rest and interior decoration. Knit a pillow with your own hands You can customize it to your liking, using any colors that suit the style of your home.
This sofa cushion knitted from two round motifs, based on knitting a zigzag pattern in the round. The top of the pillow looks like a flower; petals spread out in folds from its center, creating a lush knitting that gives volume to the pillow. The shape of the knitted pillow is round with a jagged edge along the outer radius.
To knit a pillow with a diameter of 50 cm you will need about 300 grams. yarn of any colors and corresponding hook number.
Description of crochet pillow:
Start knitting a pillow from the center, I chose the brightest thread for the core of the flower. Dial 6 air.p. twist the connection art into a ring. From the ring, knit 12 double stitches, close this row into a circle with a connecting stitch in the first loop.
Next, knit the bases for the petals. * Cast on a chain of 17 chain stitches. and secure it to the starting ring by joining the next stitch. Repeat from * 11 more times, in total you should get 12 petals from chains of air loops.


Next comes tying the petals with half-columns. In the first row, make 2 chain stitches. rise, *knit 8 half stitches. from the loops of the chain, at its top from one loop, make 5 half-stitches, on the second side knit 8 half-stitches, between the petals 3 half-stitches. together*. Tie, repeating from * to * all the petals. Complete the row of joint st. into the 2nd lifting loop and make 1 more connection. in a row.


To make the knitting look embossed, with alternating protruding and recessed stripes, perform rows of half-columns, one on the front side, the next, turning the work on the wrong side. After turning the knitting inside out, the row is knitted in reverse side, but you need to complete each circular row with a connection st. into the 2nd lifting loop. When knitting half stitches in each row, insert the hook into the far half loops of the stitches of the previous row.

For knitting the second row of petal binding, after turning the work, to knit a row in the opposite direction, make 2 chain stitches, between the petals make 3 half-stitches together, on the side of the petal knit 9 half-stitches, from the top on one loop make 5 half-stitches, on the second side 9 half-stitches . and 3 half-st. together between the petals. Tie all the petals and complete the row of joints.

3rd row: Turn the work, tie the petals like this: 2 chain stitches, * 10 half stitches. on one side of the petal, 5 half-st. at the top of one loop, 10 half stitches. on the side of the petal, 5 half-st. together between the petals*. Repeat from * to *.


When knitting a pillow, you can introduce new colors at your discretion in any row.

As the diameter of the motif expands, the petals will straighten out. When the outer edge of the pillow motif lies flat on the surface without wrinkles and corresponds to the desired size, finish knitting.


You can knit a pillow with a larger diameter, to do this, continue to knit the zigzag pattern in a circle, making 5 half-columns at the tops of one loop, and 3 half-columns together between the petals, then in the row each repeat will expand by 2 loops.


