Every country celebrates Mother's Day with great joy, ours is no exception. It is celebrated annually, on the last Sunday of autumn. Among the huge number of holidays, this one is special. On such a day, attention is paid to the women who gave us life, the most dear people to everyone - our mothers. Best of all, your love and gratitude will help to express words, well, and a gift will perfectly complement them. You can do it yourself.
Mother's Day Cards
If you don't know what to give for Mother's Day, make a postcard with your own hands. A postcard is a great way to congratulate a loved one, and when it is also created with your own hand, it is doubly pleasant.
Postcard with chamomile
You will need:
- a sheet of white paper;
- colored cardboard;
- glue;
- decorative paper with a pattern or a piece of wallpaper;
- pencil;
- stationery knife;
- colored paper.
Now you need to follow these steps.
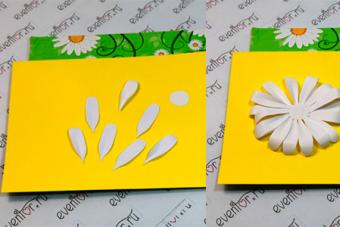
- Draw a daisy petal pattern. Then transfer it to paper and cut about 32 petals and two circles for the core out of white paper.
- Bend the petals slightly in the middle and use a pencil to twist their edges outward. Then glue half of them in a circle to one core, and the other half to the other. Thus, you should have two daisies.

- Glue the two flowers together, and then glue a circle cut out of yellow paper in the center of the top. Bend a sheet of yellow cardboard in half. Draw a flower on any paper that resembles a chamomile.
- Cut it out carefully so as not to damage the sheet. Now attach the template to the side of the cardboard that you marked the front, and transfer the drawing to the center of it. Now carefully cut out the flower.

- From patterned paper or wallpaper, cut a rectangle equal to the size of the postcard page, and then glue it inside (if you have a color printer, you can print the pattern below).

- Cut a few thin stripes out of green paper and curl them a little with scissors. Glue the strips in the upper right corner of the postcard, then attach a chamomile next to them. Draw and then cut out a ladybug and glue it to the flower.

Flower card
Postcards made using the quilling technique turn out to be incredibly beautiful. This technique seems complicated only at first glance, in fact, even a child can make a gift for a mother using it.
You will need:
- double-sided colored paper;
- wooden skewer or toothpick;
- scissors;
- glue.
Instructions for creating a postcard are presented below.
- Slice green paper lengthwise into strips 5 mm wide. Wind one of the strips onto a stick, remove it and let the paper unwind a little. Then glue the end of the strip to the base.
- Holding the circle on one side, squeeze it on the other, as a result you should get a shape that resembles a leaf. Make five of these leaves.
- Now let's start making big flowers. Cut several strips of colored paper, 35 mm wide (cut a sheet of paper lengthwise). Fold the strip 4 times and on one side cut it into thin strips, not reaching the edge about 5 mm.


- Cut strips out of orange or yellow paper that are 5 mm wide. Twist one of them tightly and fix its end with glue - this will be the core of the flower. Now glue the bottom end of the fringed strip to the core and twist it around.
- Glue the end of the fringed strip with glue and spread the petals outward with a toothpick. Make the required number of flowers. Small flowers are made in the same way as large ones. The only thing is that the stripes for them should have a smaller width, about 25 mm.
- The middle can be made in two colors, for this use thin stripes of different colors, for example, red and orange.
- Wind a small piece of orange strip, then glue a piece of red strip to it, make the required number of turns, then glue the orange strip again, wind it and fix it.


- To make a two-tone flower, first make a base for a small flower. Without bending its petals, glue a fringed strip of a different color and larger size around the base of the workpiece.
- Now you need to make several curls, for this, fold the green strip in half. From the bent end, twist it onto a stick, then let it straighten.
- Glue a piece of paper with the inscription to the base of the postcard (a sheet of colored cardboard is suitable as it), then assemble the composition and secure it with glue.
Wall newspaper
In addition to postcards for your beloved mothers, you can make a poster. A wall newspaper for mother's day can be made in completely different techniques. For example, drawing, applique, photo collage, you can use the same techniques as for making postcards. 

Whatever you decide to make a wall newspaper, be sure to write to the dearest person at least a few warm words and pleasant wishes.
Mother's Day Crafts
Children's crafts for Mother's Day will be a wonderful surprise for all mothers. Older children will be able to make them on their own, but kids with the participation of adult sisters, brothers, dads or even their educators.
Paper shoe
High-heeled shoes are a purely feminine thing, so for the main day of all mothers, a craft in the form of them, and even filled with sweets, will come in handy.
You will need:
- beads;
- colored paper;
- ribbons;
- glue;
- marmalade, pills or colored caramels;
- scissors.
Instructions for creating a shoe are presented below.
- Print or draw a shoe template and decorations.

- Bend the parts along the dotted lines and glue them.


- After the shoe is dry, decorate it with a flower, beads, or any other decor. After that, wrap the sweets in a piece of organza or any other transparent fabric and place them inside the craft.

Such crafts for Mother's Day with your own hands can be made from plain paper, but they will look much more interesting if they are made of paper with a pattern.
Flower basket
This is a simple, but at the same time very cute craft. She will surely please many mothers.
You will need:
- three wooden skewers;
- green corrugated paper;
- a pair of paper plates;
- scissors;
- colored paper;
- paints;
- glue.
Your actions:
- Cut one of the plates in half; for greater decorativeness, you can do this with curly scissors. Paint half and a whole plate with regular or mother-of-pearl gouache, you can also use acrylic paints. After the paint is dry, glue the plates with the middle inward.

- Paint the skewers with green paint, they will play the role of stalks. Next, cut the colored paper into equal strips and make loops out of them, gluing the ends.

- Cut out three circles from colored paper or cardboard and glue four petal loops to each of them.
- Glue the skewers to the back of the flower heads, then cut out three more circles and stick them on the ends of the skewers, thereby hiding the gluing point. Cut out the leaves from corrugated paper (you can take plain paper) and glue them to the stems.

- Insert the resulting flowers into the basket and decorate as you wish.

Mother's Day Gifts
Every child dreams of giving his mom the best gift in the world. For a mother, however, nothing, even the most valuable thing, can compare with what made her child her own hands. A do-it-yourself mother's day gift can be anything - vases, paintings, applications, photo frames, boxes, organizers, decor items, ornaments. Let's take a look at some interesting ideas.
Jar vase
Even a child can cope with the manufacture of such a vase. To make it, you only need a suitable jar, paint, double-sided and regular tape, a photo of a mother or child.
- Cut out a piece of cardboard to a size equal to the photo; it is better to make its edges wavy. Using double-sided tape, glue the piece to the center of the jar.
- Then cover the jar with several coats of paint. When the paint is dry, remove the cardboard fragment - a window will come out.

- Opposite the window from the inside of the can, glue the selected photo with tape.

- If your can has a raised lettering, you can add additional decor. To do this, simply scrape the paint off the bumps with a clerical knife.

Photo frame for mom
A good gift for Mother's Day is a photo frame. You can put your mother's favorite photo in it, this will make the gift even more beautiful and valuable. To make a photo frame, you can use different materials - buttons, shells, cereals, pencils, beads, artificial flowers, coffee beans and even pasta. 
- To create a frame, you can use any ready-made base or make it yourself from cardboard. To do this, you need cardboard from the box, scissors, a pencil, a ruler and glue.
- First you need to decide what size photo you will make a frame for. After that, add 8 cm to each side. For example, if the photo is 13 by 18, our frame will be 21 by 26. Now draw, then cut out two rectangles equal to the size of the frame.
- In one of the rectangles, draw a rectangle to fit the photo, and then cut it out a millimeter closer from the marked lines to the middle.

What beautiful, good and pleasant gifts for Mother's Day you can make with your own hands in kindergarten and elementary school, our simple master classes will tell. All lessons are given a detailed description of the process and step by step photos are attached. Choose the option that you like best and create touching, gentle and soulful holiday masterpieces for your loved ones.
What gifts to make for Mother's Day with your own hands
If you do not know what gifts for Mother's Day you can make at home with your own hands, we will throw you some fresh ideas and tell you how pleasant, joyful and inexpensive to please your loved one on the eve of the holiday.
- Postcard - an always relevant, effective and beautiful gift. It can be made from colored paper, cardboard, fabric and other scrap materials. There are no restrictions in design and everyone can make a completely unique, original and inimitable work with their own hands. Then it will remain to write pleasant holiday greetings, good wishes on it and hand it along with a bouquet of flowers to the hero of the occasion.
- Picture - a very common presentation. Moreover, it is not too important how well the author can draw. In any case, mom will be extremely pleased to receive her portrait or an image of a genre scene from family life. To add solidity, the artwork should be placed in a suitable frame. This will give the parent the opportunity to hang the painting in a prominent place in the apartment so that all guests and friends can admire and admire the talents of her child.
- Paper bouquet of flowers - an extremely original and attractive gift that invariably delights both young mothers and quite respectable parents of mature age. This souvenir is made from ordinary table napkins, and then placed in a basket, vase or decorative pot. The beauty is that the bouquet never withers and pleases the eye with its attractive appearance for a very long time.
- Photo frame - not only beautiful, but also a useful item. In order to make it yourself, you will need a wooden or plastic base, all kinds of decorative trifles of different sizes (buttons, beads and half-beads, shells, fragments of fabric, pieces of wood, etc.) and high-quality glue. Everything else entirely depends on the imagination and artistic taste of the manufacturer. But the fact that the work will turn out to be exclusive is one hundred percent guarantee.
DIY Mother's Day gift in kindergarten - middle and senior group

A simple and affordable master class for children from the middle and senior groups of the kindergarten will tell you how to create a delicate, touching and attractive gift for Mother's Day - a voluminous flower bed made of paper. The finished work will turn out to be bright, spectacular, beautiful and will surely cheer up your family and friends on the eve of a wonderful holiday. It is also very fortunate that the kids will completely calmly cope with making the gift themselves, and the teacher will only need to connect when cutting flowers from paper.
Required materials for a baby gift on the occasion of Mother's Day
- white thick paper
- green double-sided paper
- set of colored paper
- pVA glue
- flat wide brush
- scissors
- set of markers
- a4 white cardboard sheet
Step-by-step instructions for making a beautiful gift in kindergarten with your own hands for Mother's Day

DIY gift for Mother's Day in elementary school - master class with photo

In elementary school, together with the children, you can make a useful and beautiful, but at the same time very simple gift for Mother's Day. Such a cute flower pot will find a place in any home and, looking at it, a parent will always smile warmly and think with tenderness about her attentive and caring child.
Essential Materials for a Gift for Mother's Day in Elementary School
- tall tin can
- medium nail
- a hammer
- glue for decoupage
- wide flat brush
- colored tissue paper
- herbal mixture for indoor flowers
- seedling
Step-by-step instructions on how to make a useful gift for Mother's Day with your own hands at school

DIY Mother's Day gift from napkins

A good and very beautiful gift for Mother's Day in elementary school and kindergarten can be created with your own hands from the most ordinary table napkins. How to do it correctly and what materials will be required for work, will tell you a detailed master class with step by step photos.
Necessary materials for a bouquet of napkins for Mother's Day
- colored and white napkins
- balloon
- pVA glue
- super glue
- basket
- stapler
- thread
Step-by-step instructions for making a gift from napkins for Mother's Day

The Mother's Day holiday is gaining more and more popularity in our country. It has been celebrated relatively recently since 1998. And as a rule, in kindergarten or school, exhibitions and contests of children's crafts are organized. The competition is of course for children, but we, adults, have to help a little. So what can you think of for Mother's Day?
The first thing that comes to mind is an applique postcard with a floral theme. But instead of flowers, you can make a print with a child's palm.


The quilling tode applique looks decent. Don't be afraid to experiment with strips of paper - it is not as scary and difficult as it might seem at first glance.


And you can still make just such a shoe and fill it with flowers or sweets.


And you can also give a bunch of sweets. Here is a very simple and affordable video master class
Do-it-yourself voluminous card for Mother's Day. For crafts, we take a box of chocolates.

Girls can weave a bracelet for mom as a gift.

Present a candle with an original handmade candle pattern. How to make


Craft Scarlet flower using quilling technique.

Postcard Happy Mother's Day with the hands of a child in kindergarten. Glue a colored sheet of paper of light tone on a dense base. In the center we glue a white sheet for the congratulatory text. We decorate the opposite corners of the postcard with paper cut flowers, see the photo

Crafts at school, elementary grades, a do-it-yourself card for Mother's Day. Cut out the vytynanka of the basket according to the template and stick it on a sheet of paper. Glue flowers on the basket.

Drawing Heart with flowers by pattern

Mom is the best and closest person for every person. It is very important to be able to take care of her from childhood and make her pleasant on Mother's Day.
You can make a variety of crafts, applications, do-it-yourself drawings with your child from paper / cardboard, plasticine, salt dough.
Flowers for mom can be made out of paper with a child. For work, you need yellow napkins or corrugated paper, green paper for stems and leaves (in this example, office paper), scissors, glue.
Getting started, preparing materials

We fold a sheet of green paper into two parts
Having folded the sheet in half, we retreat about 3 cm from the bottom and draw a horizontal strip with a pencil, in the upper part we draw parallel lines in the interval 1 - 1.5 cm.

Where the lines were drawn, we make cuts to a straight line, not reaching 3 cm to the edge.

Unbend the sheet with cuts

Then we turn out the sheet with the other side and fold it not exactly edge to edge, but retreating by 1 cm.

After that we coat with glue, glue

When the glue sets, we begin to roll it up

It turns out such a blank for the stem. It can be placed on the table and will not fall.


Glue flowers to twigs in a row, we leave some branches without buds

Decorate the finished bouquet with sequins or tie it with a ribbon, you can make a flower arrangement in a pot (you need a sour cream jar).

We carry out a variety of paper crafts for mom, look at a selection with flowers
A postcard for mom can be made as an applique

Crafts from buttons
Greeting card with butterflies


Crafts from cotton pads you can make a card with flowers
Mother's Day Crafts
===================================
CREATURE BY THE DAY MOTHER from napkins.
Necessary materials for making napkins for Mother's Day : - a sheet of cardboard red
- stationery glue pencil
- paper napkins (pink and white)
- narrow satin ribbon or braid
- scissors
- double sided tape
- simple pencil
- pattern in the form of a child's palm
- yellow colored paper
- a sheet of white landscape paper
DIY step-by-step instructions for making do-it-yourself napkins for Mother's Day:
1. On a sheet of red cardboard, draw a large heart by hand, and then carefully cut it out with scissors.
2. Turn the heart over to you with the white side, attach a child's palm template to it and circle it with a simple pencil.
3. Take several white and pink napkins and cut them into four equal strips. Then cut each strip with scissors into 3x3 centimeters squares.
4. Roll balls-lumps out of napkin squares, trying not to press the paper too hard. The final round should be slightly fluffy and not stiff. It is not necessary to wet the napkins with water during the manufacturing process.
5. Gently grease the drawn palm along the contour with glue and lay out with snow-white lumps. Then fill the entire inner space with them. Lay out the balls tightly to each other.
6. When the palm is filled with balls, set aside the workpiece for a while, so that everything sticks well. Then cut off a piece of satin ribbon or braid of a suitable length and use double-sided tape to glue the top to the heart. This is a suspension loop.
7. Grease the empty surface of the heart from the outside with glue and lay out with pink lumps from napkins. Move from the edges to the middle and lay out the lumps as close to each other as possible so that there is no gap between them. Lay out the balls adjacent to the white palm especially carefully so as not to disturb the shape of the hand and fingers.
8. Take a white sheet from a regular drawing album, draw a flower with petals on it with a pencil, cut it out with scissors, and glue a bright yellow eye in place of the middle. Twist the edges of the petals slightly and glue the daisy to the heart.
9. Glue a holiday poem written by hand or printed on a postcard on the back of the product.
Postcard "To the best mom!"


Crafts for Mother's Day from talons
It's so great that the tradition of celebrating one of the brightest and kindest holidays in the world - Mother's Day - has finally become popular with us. But what is even more pleasing is the fact that the popularization of Mother's Day is actively involved in kindergartens and schools. And this is very correct - it is necessary to cultivate the manifestation of love and care in relation to mother from childhood. In addition, Mother's Day is also a great occasion to develop the creative abilities of children of all ages. It is gifts and various crafts for Mother's Day with their own hands that contribute to the improvement of fine motor skills, the development of creativity, attentiveness and perseverance in children. Add to all of the above a souvenir that mom will receive for her holiday, and you will get an incredibly useful creative activity in all respects. Next, you will find a selection of simple but effective master classes with photos on the topic of crafts for Mother's Day. Most of them use available materials such as colored paper and napkins. The technique is also simple, so these master classes are perfect for both kindergarten and grade 1, as well as for middle and high school students.
Crafts for Mother's Day with their own hands from napkins to kindergarten, photo
Flowers are the most traditional gift for Mother's Day. But in Russia, this holiday is celebrated at the end of November, when fresh flowers at a price become not the most affordable, especially for children. In this case, do-it-yourself flowers-crafts from napkins come to the rescue, which even the smallest kindergarten pupils can prepare for Mother's Day. From the most common napkins, you can build almost any flowers, including collecting a whole bouquet. Do-it-yourself mother's Day craft from napkins for kindergarten, a master class with a photo of which you will find below, will show you how to make a very cute flower for mom in just 10 minutes.

Necessary materials for crafts for Mother's Day from napkins to kindergarten
- colored napkins (thick)
- plastic disposable spoon
- plastic disposable cup
- paint and brush
- cotton pads
- scissors
DIY instructions for making napkins for Mother's Day
- Take a napkin and fold it several times. Then we apply a spoon and cut out the petals for the future flower from the napkin, the size of which should be slightly larger than the head of the spoon.

- Apply the resulting petals to the base of the spoon and carefully place them on the glue. The number of petals depends on your imagination. In this master class, you can make both an ordinary chamomile and a whole peony. Let the craft dry a little.

- From a cotton pad or ordinary cotton we form a small ball, which we attach with glue in the middle of the flower. Cotton wool can be replaced with a small thread pom-pom or a large button, a strass, a pearl.

- A plastic cup will serve as a stand for our flower, so if you have an ordinary white glass, it is better to tint it with colored paints. Let the paints dry and make a small hole in the bottom to secure the flower. Done!

DIY Mother's Day crafts for grade 1, step-by-step master class
Our next original bouquet of colored crepe paper will be perfect as a DIY gift for Mother's Day for 1st grade students. It is very simple in execution, but it will be a wonderful decor for any interior. Such a DIY mother's Day craft for grade 1 can be made both monochromatic and multi-colored.

Necessary materials for DIY crafts for Mother's Day for grade 1
- crepe paper of different colors
- colored cardboard
- scissors
- wooden skewers
- buttons
Instructions for making crafts for Mother's Day with their own hands, grade 1
- Cut a circle with a diameter of 5 cm from thick cardboard - it will become the basis for our flower. Cut a strip of 7-8 cm wide and 15-20 cm long from crepe paper.Pour glue onto the center of the cardboard base and carefully fix the tape, forming small rollers, as in the photo.

- We continue to form a flower out of paper, securing the paper folds with glue.

- We decorate the middle of the flower with a contrasting color button, which we also attach to glue.

- Cut out small petals from green cardboard. We fix the resulting bud on a skewer.

- We glue blanks of leaves to a skewer and form a bouquet of several flowers. An original DIY flower-craft for Mother's Day is ready! Photo 0
DIY crafts for Mother's Day from colored paper to school, master class
Colored paper is one of the most affordable and fairly versatile materials for all kinds of crafts. For this reason, colored paper is used more often than other materials in school for making colorful DIY crafts, including on Mother's Day. From our next master class, you will learn how to make an original craft from colored paper with your own hands for Mother's Day at school in the form of a beautiful flower - a hyacinth.

DIY materials for flower-crafts from colored paper for Mother's Day
- colored paper
- dense green leaf
- scissors
- pencil and ruler
- spoke

DIY instructions for Mother's Day to school from colored paper
- We take a sheet of paper of the same color as we plan to shade the flower. We measure a strip 20 cm long and 5 cm wide and cut out.

- Using a ruler, measure 1.5 cm on the cut strip and draw a line along the entire length with a pencil. Gently scissors make cuts about 0.5 cm wide, not reaching the marked line.

- We take a knitting needle and wind each strip on it in turn, as shown in the photo below.


- Cut a strip from thick green paper, equal in length to the previous workpiece and about 6-7 cm wide.

- Gently grease the green strip with glue on one side, making sure that it is distributed evenly. We take the workpiece by the upper right corner and begin to twist it into a dense long tube.

- We give the base for the stem to dry out a little and combine it with the preparation of the bud. To do this, glue the indentation on the first workpiece with glue and carefully wrap it around the stem.

- We put the hyacinth aside and deal with the leaves. To do this, cut out small rectangles from green paper and fold them with an accordion. Then cut the corners with scissors, forming a sharp sheet.

- We open the blank of the leaf and coat its wide part with glue. We connect with the stem.

- We repeat all the points again if desired. Let the finished flowers dry a little and form a festive bouquet for mom from them.

DIY simple crafts for Mother's Day, a master class with a photo
For Mother's Day, you can make with your own hands not only crafts from colored paper or napkins, but also simple functional presents, one of which you will find in the master class with the photo below. With the help of adults, a kindergarten student or a 1st grade student can also perform such an original craft. And middle school students can do it on their own. For this simple and original DIY Mother's Day craft, you will need a large white candle and a family photo. As a result, in a few minutes you will receive a beautiful photo candlestick, which your mother will definitely like.

Necessary materials for a simple DIY Mother's Day craft
- thermal transfer paper
- regular A4 sheet
- a printer
- white candle
- parchment paper
- scissors and tape
Instructions for simple DIY crafts for Mother's Day
- Cut out a sheet from the thermal transfer paper, the size of which should match the desired photo. Using scotch tape, we connect it with ordinary printer paper.

- We send the resulting blank to the printer and print a photo for a candle, cut it out.

- We attach the photo to the candle, fix it on top with parchment paper.

- We warm up the photo along the entire length and width with hot air, trying not to crawl it over the surface of the candle.

- The hot air will start to melt the wax and gradually cover the photo with an even layer. It will be noticeable externally. At the end, carefully remove the parchment. Done!

We advise you to read
 "The psychological climate of the family as an important component in raising a child. Unfavorable psychological climate in the family prevents the fulfillment of
 Ksenia Borodina does not hide on Instagram that she is pregnant!
 What to wear with a brown coat: calm classics and bright accessories
 Autumn tale. I apologize to S. Kozlov Hedgehog and Teddy bear were sitting on the porch, ...: darkmeister - LiveJournal Forest tale about why leaves turn yellow