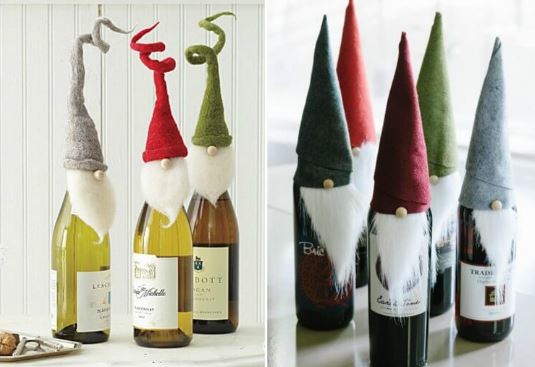
Friends, knitting creative work to the competition - HURRAY! New Year's clothes for the bottle from Nadezhda Maksimova. Further from the author's words:
“This is so festive New Year's clothes for the bottle - I made the fur coats of Father Frost and the Snow Maiden the other day.
It was the first time I knitted such a product.
A friend saw the photo on the Internet and was inspired to buy one for herself. And since she doesn’t know how to knit herself, she asked her to knit me.
And so the experiment began. And how the New Year's clothes for the bottle were knitted, I described as best I could. I tried to be more detailed and understandable.
Materials
- Pekhorka yarn “Children’s whim” (white and red colors for Santa Claus and white and blue for Snow Maiden),
- hook number 2.
New Year's clothes for a bottle - how to knit
1st row - we knit with white yarn: from 53 air loops, we close it in a ring, i.e. We knit a connecting stitch into the first loop of the chain.
Option #1
Option No. 2 
4th row - knit with half-columns
5th row - with hinged loop
6th row - half columns
7th row - with hinged loop
8th row - half columns
Next, change the color to red (Santa Claus) or blue (Snow Maiden) and knit from rows 9 to 28 with regular stitches.
Row 29 - decrease 3 loops in a row and also three more rows i.e. Rows 30,31,32. In row 33 there should be 41 loops left
Change to white and knit the 33rd row with half-columns
Row 34 - with hinged loop
Row 35 - decrease 3 stitches in half-columns in this row
Row 36 - with hinged loop
Row 37 - half-columns, decrease 2 more loops
Row 38 - with hinged loop
Row 39 - half columns
Row 40 - knit with another thread (red or blue).
I knitted the white strip for the fur coats separately on 7 loops using the same principle as the fur for the collar and hem.  The body is ready!
cap
We collect 23 air loops from white yarn onto the hat and close them into a ring.
1st row - half columns
2nd row - with hinged loop
3rd row - half columns
4th row - with hinged loop
Next, change the color (to blue or red) and knit another 5.6 row
Rows 7, 8 decrease loops every other i.e. close the cap...
During the knitting process, we try on the cap on the bottle because the knitting is different for everyone. If desired, the finished fur coat can be decorated with sequins or beads.  For the Snow Maiden, separately weave braids from white yarn and sew them to the hat,
  and for Santa Claus you can tie a beard...
Well, of course, he wasn’t the only one with this set of New Year’s clothes for bottles; there was another one who wanted to buy such fur coats.
And another set of New Year's coats for bottles was created!!!


And since the New Year is coming soon, I think this set of New Year's clothes for champagne will not be the last this year!
I hope you like my description too!!!
I wish you creative success!
Nadezhda Maksimova"
P.S. In addition to thanking Nadezhda for participating in the competition, I want to say thank you for reminding me of such a wonderful crochet technique as elongated loops (Nadezhda in her description calls them hinged). Unfortunately, this technique has not yet been discussed on the blog (minus for me))) there is something to work on... But there is an article “”, look, perhaps your New Year's clothes for the bottle will be knitted by you (not everyone likes to crochet)) )

And don't forget to leave your comment. Your opinion is important to me!
If you liked the article, then share this information with your friends by clicking the social network buttons! Just a huge request! - do not copy the entire material, please use social buttons! Do not be shy! I will help as much as I can :) An idea has arisen - Share! If you find any errors, write to us and we will fix them! I have a desire to help the blog in some way - I will be only too glad! Hosting costs money, and materials are not cheap these days... So, if possible, then help financially)))
Content
It seems to us that we have not yet written everything about crafts for the New Year, although there are a lot of interesting articles and ideas on this topic on our portal. But one topic was only partially covered - a cover for a bottle of champagne for the New Year. It’s easy and quick to make, and as a present or as a table decoration it turns out original and fun. Stock up on felt, fabric, old jeans, beads, buttons and all the related materials and let's create!
At the very end of the article interesting master class using the decoupage technique, but be sure to read and look at all the ideas that we have collected.

Decorate a bottle of champagne
A bottle cover for the New Year can be made from simple ribbons, thin ribbons, beads or beads and pearls strung on a fishing line. Whatever you have enough imagination for, design it. The basic idea looks like this:

You can take a wider ribbon, then it will be easier and faster to decorate the bottle. You can also stick various beads and any other decor onto the ribbon itself to make the product look more elegant. Multiple tapes can be used different colors to create something like smart suit for the bottle, look at the photo:

And here is a girlish version for you. Thus, it is quite possible to decorate a bottle of champagne for a wedding or Valentine’s Day:

Twine for bottle decoration
You can create country style decor using twine. This is quite a painstaking job and you will need glue, but in the end it turns out very stylish clothes for bottles for the New Year. From the same twine you can twist improvised flowers and decorate the bottle with them. In addition, you can glue acorns, spruce branches, slivers of cones and other natural materials.

By the way, empty bottles can also be decorated and used as a vase or decorative element for interior decoration. You can put dried flowers, tree branches, and decorative feathers in such vases.


Paper for decorating bottles of alcoholic beverages
Don't underestimate paper. It could be ordinary colored paper, quiet, corrugated paper, thicker color double-sided. You can make a DIY champagne case for the New Year using one of these types of paper:

All you need is a small amount corrugated paper, Christmas tree beads, gift ribbons, New Year's decor and glue.
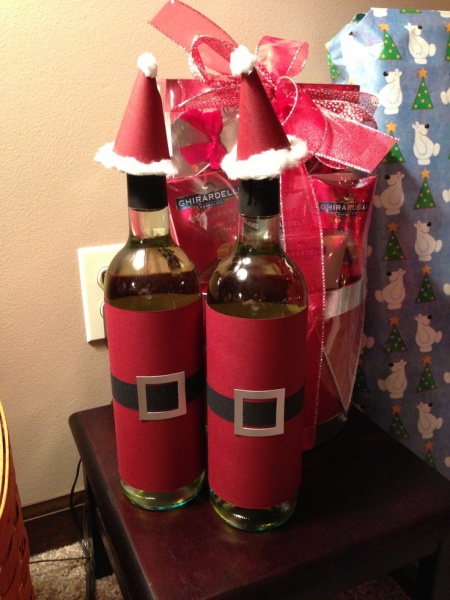
And for the next option you only need red, black and gold paper and now your bottle of champagne is dressed in a Santa Claus costume.
Also make the hats from thick cardboard and add cotton wool or a special filler for toys.
The exact same option can be made from felt or any suitable fabric:

Well, since we have smoothly moved on to fabric, we suggest looking at a few more interesting options, which can be used as a bottle cover for the New Year:


It is most convenient to present a bottle of champagne or wine in a bag as a gift.
Well, to create a beautiful and more complex case you will need a pattern for a bottle of champagne for the New Year. We offer several options.
Don't forget that a quality product will require seam allowances and good material.


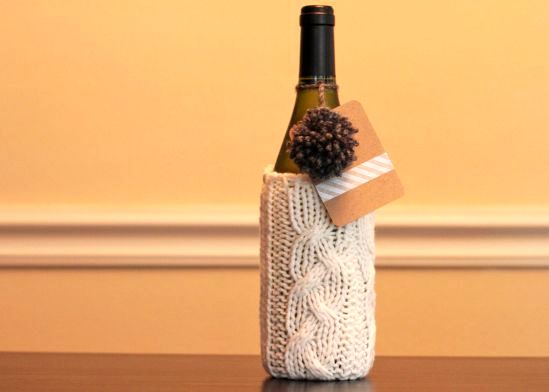
Knitted covers
This is for amateurs and craftsmen! Well, or for those who are not afraid of work, like to try something new and, in general, are a jack of all trades. In the end, everything can be learned. Although there is one trick - the cover can be made from the sleeve of an old sweater or jacket. You just need to carefully cut out the required size and hem it well so that the cover does not come undone while you are bringing the gift to a visit.

You can knit a short cover, without a bottom or with one - that’s how it turns out:

Do not forget that next year- this is the year yellow dog, So knitted clothes for a bottle for the New Year can be made in bright yellow colors. On top, by the way, you can sew or hang a souvenir in the shape of a dog made of felt. In our articles we talked about how to sew such souvenirs, but let’s give another example:

You can take a very simple route - knit a thin scarf and a hat specifically for your idea. It looks very elegant and festive! Corresponds to the spirit of the New Year and winter:

A knitted bag will require a little more time and thread, but you can beautifully present some good alcohol in it.
Feel free to use other materials to complement your knitted design. This can be felt, thick suiting fabric, thick colored cardboard, jeans and other materials.

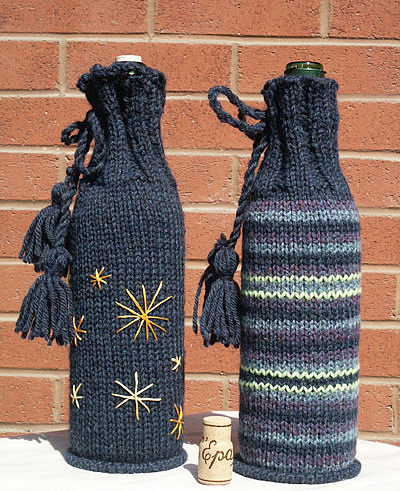
You can always be creative, especially if you're good with crochet or knitting, and knit, let's say, a story cover. Something like that:

Glitter and glitter bottles
New Year is all about radiance, brilliance, fireworks, colorful lights. An excellent option for decorating a bottle of champagne. Use glitter, loose glitter different sizes and colors, as well as glue. Apply it to the entire surface of the glass and while the glue is still wet, carefully apply the glitter so that it is distributed as evenly as possible. You can use the ombre technique to make the bottle have beautiful color transitions:
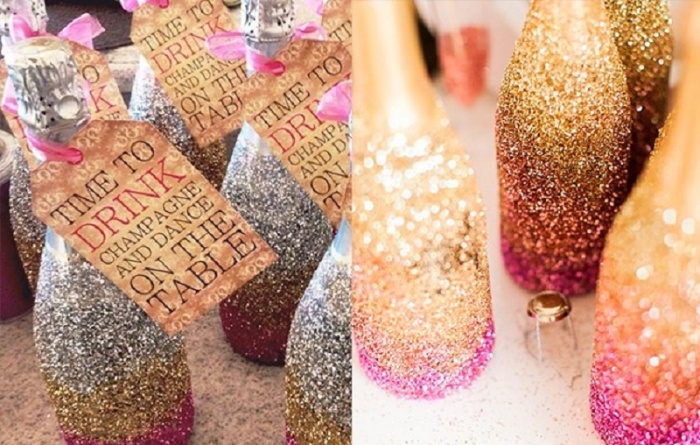
Large sparkles also look beautiful, they can even be mixed with confetti:

Decorative details for decoration
Clothes for a bottle of champagne for the New Year can consist of individual beautiful New Year's details. We suggest you first look at the ideas and then try to make them:

Use regular corks and glue to create a decor that will fit perfectly on the New Year's table.
And a hat with a beard will help you dress up the bottle as Santa Claus:
The hat can be made from felt, felted from wool, or choose any other material. Use cotton wool or special decorative material as a beard.
Ribbon, bow and Christmas decorations and now your New Year's clothes for the bottle are ready.
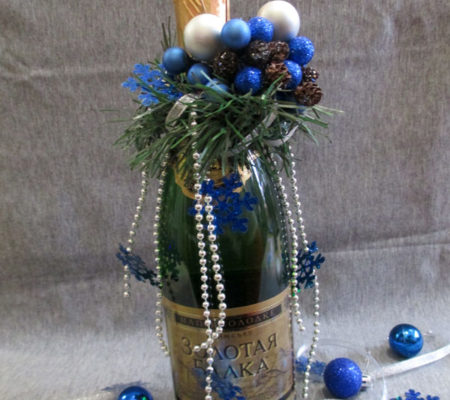
Remember what New Year's compositions we have already suggested you make using fir branches, beads, cones and other decor. It can be used to decorate alcohol:
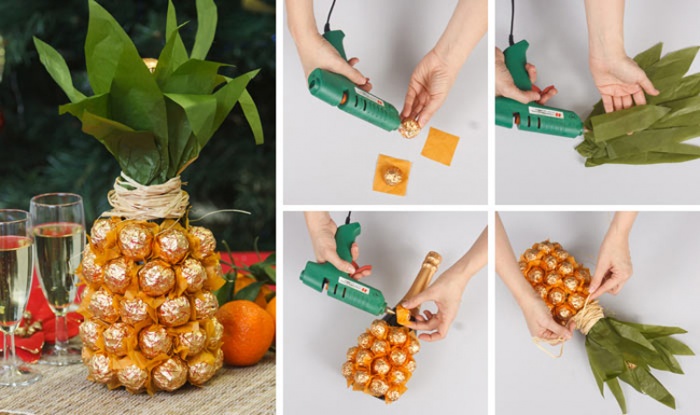
Decorative pineapple made from candies
Let's call this a conditional case, because in our understanding it is already a whole New Year's compositions. What do you need:
- actually, the champagne itself;
- glue;
- candies;
- corrugated paper.
Many needlewomen pre-wrap the bottle with paper, but in principle, this is not so necessary:
Some more very unusual ideas

Sequins, twine, stones and the boundless imagination of the needlewoman are used here. And the next option is very gentle and is more suitable for a wedding. But if you choose darker lace inserts, it will also work for the New Year:

How do you like the decoration with pasta? The photo shows empty bottles, but what's stopping you from decorating a bottle of champagne with pasta?

The pasta can be glued in a chaotic order and both the bottle and the decor can be painted over with spray paint, or you can paint the decor separately and only then glue it on.
Latest patterns
Do you want to learn how to knit and weave?
“Of course, yes,” you answer me.
I even know how you would like to learn knitting and weaving: quickly, efficiently, with pleasure.
Just sit down one day and knit at least a simple scarf in 2 hours.
But it seems impossible to you, since the Internet is filled with articles about how wonderful you can learn to knit and how great it is to be able to knit in general.
What to do?
Learn to knit and weave on my website. It's convenient, fast and high quality.
I create my knitting and weaving courses specifically for beginners. I show all the subtleties and features of each work. I record all models on a video camera. All you have to do is watch and repeat after me.
Quick results!
By learning from my videos, you will immediately do something simple and at the same time beautiful thing, in 2 hours. And you will like these types of needlework so much that later you will no longer be able to refuse.
There are no restrictions for handicrafts!
Some of my students write to me: “I live on your site, I have already knitted a bunch of things for my family.”
You will have the feeling that I am next to you, just showing you how to start, what to do next, how to finish.
The courses are available to users of any age and gender, there are no restrictions even on knowledge of the Russian language. People from all over the world watch, learn and buy videos.
Where will they offer this to you?
You can study at any time, watch free lessons as many times as you like. Where? In what knitting courses will you repeat the same movement 100 times? There are no restrictions on my site!!!
Choose what suits you!
Of course, you can continue to look at incomprehensible diagrams and descriptions and look for answers on forums, wasting time and money, but not getting any results. You can also sign up for knitting or weaving courses. In Moscow, for example, such courses cost from 5,000 rubles per month. And believe me, in a month you will knit 3-5 simple things. You simply won't have time to connect anymore.
Let's learn - FREE!
There are many free courses on the site.
If you want to get VIP courses, then you just need to participate in popularizing the site.
The most important thing is that you will learn to knit and weave: ONCE AND FOR ALL!!!
Good afternoon
In this master class, I will tell you how you can decorate champagne for the New Year. It will be removable clothes for champagne, stylized as Father Frost and the Snow Maiden.
Previously, in order to decorate champagne with ribbons, I made clothes for champagne that were not removable. But I always felt sorry that such beauty was intended only for one evening. I wondered how I could decorate the champagne so that it could be used every year. You also need to choose a decoration that you will never get tired of.
And the simplest answer is Santa Claus.
It really is! Why not make a removable Santa Claus decoration for your champagne bottle?
To decorate champagne, we will need:
- champagne;
- felt red and white;
- pencil and ruler, lighter, scissors;
- red bias tape 10 m;
- red ribbon wide 2.5 cm – 2 m;
- lace, sequins, half beads;
- Kinder egg for Santa's hat;
- glue Moment (gel) I only use it. You can take any other one that you are used to.

To begin with, we make a base cylinder for champagne. We take felt 20x30cm, this piece of felt is just right for champagne. We try the rectangle on the bottle and glue it, but so that the cylinder can easily be put on and removed from the bottle. I glued it together satin ribbon end-to-end

Now we make the shoulders: cut the felt vertically to the point where the bottle becomes straight. These strips were cut off on both sides (shown by the black line in the photo) to make the case shaped like a bottle.


This is the preparation I got

The most important thing is to do this beautiful shape blanks for decoration so that it is even and easy to put on and take off. At first I made it from paper, but there are bumps on the workpiece and they are very clearly visible. Then it is very difficult to hide. I decided to try it with felt and I was right. Of course it's a little more work, but it's worth it. The base turned out smooth. Another advantage of felt is that it stretches; if you pull the binding a little during the process of braiding the bottle, then together with the felt you can slightly adjust the size.
Let's start creating the design. We begin to braid our workpiece with bias tape. Try not to pull the binding too much so that the uniform can be easily removed.


After you have glued several strips, you can cut out the neck, then we will process it.

I apply glue to the middle of the bias tape so that it sticks to the felt and not to the tape. And so it is unlikely that the glue will “crawl” out.

Do everything carefully, take your time, make sure that your binding is glued just above the middle of the previous strip. If you want the strips to be wider, then you need to glue them in the middle.

We glue the binding to the place where the bottle becomes straight

Why do I like using bias tape? Because it fits well and doesn’t stick out, but it’s much more difficult to work with tapes.
I glue it using Moment Gel glue, applying it over the entire strip. Many people use Titan glue or its analogues. You decide for yourself which glue is more convenient for you to work with or which glue you are used to.


We will process the collar with the same bias tape.


And now the most interesting and enjoyable part - creating the image of Santa Claus.
We cut strips of white felt 2.5 cm wide. There should be three of them: for the neck, for the bottom and for the front (where the buttons will be).

We cut strips of lace equal in length to the pieces of felt; for the front you need two strips of lace, because the frill will be on both sides. In general, there should be 4 stripes

I first glued the lace to the felt. And then I glued the felt onto the bottle.
First of all, we glue the bottom, then the vertical strip, and then the collar.

This is how Santa Claus' clothes look from the back.

We make a hat from a kinder egg. We cover the larger half with tape and decorate it with a strip of white felt and a half bead. You can also make a hat from felt. It is easy to make. We take a piece of red felt 12x5 cm, sides 5 cm. We sew it vertically, overlapping or gluing it together. We collect the upper cut with a thread and sew on a pompom made of yarn, you can do without it. We decorate the bottom cut with white felt.
Now we make buttons: glue sequins in the shape of snowflakes, and half beads on them. The buttons are ready.
New Year's decoration for Santa Claus champagne is ready.

It’s good if Santa Claus has a Snow Maiden. Just decorate the second bottle of champagne in blue. Let these favorite characters decorate your New Year's table!
And in the end I got these Santa Claus and Snow Maiden.

How to decorate champagne for the New Year
By the way! The Snow Maiden has a hat made of a kinder egg, and Santa Claus has a hat made of felt.
P.S. If you are looking for how to decorate champagne for a wedding, master class
And also, you can beautifully decorate not only champagne with ribbons, but also a bottle of wine. For example, you can do something like this.

DIY gift for a friend
Agree, such a bottle of wine would be an excellent gift for a friend or good acquaintance.
What would New Year be without Father Frost and Snow Maiden? This is undoubtedly the most important attribute of the holiday! And how sorry it is for us to part with our favorite characters after the holiday! But it is in our power to make sure thatFather Frost and the Snow Maiden did not melt either in the spring or in the summer, but delighted us all year round.

I propose to knit elegant New Year's costumes for Grandfather and Granddaughter, which can be put on any bottles of drinks, or you can simply stuff them with padding polyester, and then you will get a doll. In addition, these outfits can be used an unlimited number of times as they are easy to put on and take off.
In this master class I “dress up” bottles of champagne. They can be placed under the Christmas tree, and then on the table. In addition, your friends will undoubtedly be delighted if you give them such a New Year's souvenir.
So, for knitting Santa Claus and Snow Maiden for a bottle of champagne we need:
- 2 bottles of champagne (or lemonade);
- red yarn (preferably with golden lurex) for Santa Claus;
- yarn of blue color(also preferably with lurex, but silver) for the Snow Maiden;
- white “Grass” yarn for creating fur;
- yarn for creating a braid from the Snow Maiden (what hair color you prefer, take this yarn);
- crochet hook No. 2-2.5;
- knitting needles No. 2-2.5 for knitting grass;
- decorative golden braid to decorate Grandfather’s fur coat;
- decorative braid, silver or with embroidery (like mine) for the Snow Maiden;
- decorations in the form of snowflakes, flowers or any other decorations of your choice for gluing on fur coats
Braid and purchased at your discretion. In principle, you can do it without them, but it won’t turn out so beautiful. Fur coats are knitted from bottom to top. We begin our work by knitting a fur coat for Santa Claus. From red yarn (and for the Snow Maiden from blue) we crochet a chain of air loops. The chain should be as long as the diameter of the bottom of your bottle.
Therefore, we apply the chain to the bottom edge of the bottle and see: as soon as it completely encircles the bottle, we close the chain into a ring. Please note that the resulting ring of air loops can be removed from the bottle if necessary, but at the same time, so that it is not too weak.
Next, we knit one lifting chain stitch and knit in a circle with single crochets for about 2-3 rows. You can knit the entire fur coat in single crochet stitches, but after the third row it will be much faster to switch to single crochet stitches. In this work, I did just that: starting from the third row, we knit in a circle with single crochets, not forgetting about 2 lifting chain loops at the beginning of each new row.
During the knitting process, we often try on our future fur coat on a bottle to make sure that it (the fur coat) fits the size of our champagne. We knit in this way until the bottle begins to narrow. Next, we begin to reduce the number of double crochets as follows: in one row we knit 2 stitches less than in the previous one (for example, we reduce 1 stitch at the beginning of the row, and 1 stitch in the middle of the row).
We knit the next row without decreasing. Next, again decrease by 2 columns. Make sure that the decreases are made evenly, i.e. Each time it is advisable to decrease in different places in the row. This way the decreases will be less noticeable.
And I remind you once again: do not forget to try your coat on the bottle more often, especially when decreasing! We alternate rows with and without decreases until you decide that you have reached the goal, i.e. the fur coat is ready. We tie and cut the thread.
Now we begin to knit a blank for the hat (for Grandfather - red yarn, and for the Snow Maiden - blue). We knit a chain of 3-4 chain stitches and close it into a ring with a connecting post.
1st row: 2 chain lifting loops and knit 6 single crochets into a ring. We close the row with the help of connecting art.
2nd row: 2 lifting air loops; and now we knit 2 single crochets into each loop. Those. we had 6 loops, and now there are 12
3rd row: you need to add 6 stitches again. To do this, we make increases every other time: we knit 1 stitch, in the second we make an increase, we knit the third without any increases, in the fourth we make an increase again. That. There should be 18 loops. We close them using a connecting piece.
4th row: also add 6 stitches evenly.
We try our bottom to the very top of the bottle neck. As soon as you see that the size is already sufficient, you can start knitting the sides of the hat.To do this, we continue to knit in the round with single crochets, but we simply stop making increases. Again: try it on the neck of the bottle and look. If you are satisfied with the depth of the hat, then tie it and cut the thread.Santa Claus hat almost ready.
We put a cap on the bottle. The result is something like this.
We make exactly the same preparation for creating the Snow Maiden. Now, using knitting needles in an elastic pattern (knit 1, purl 1), we knit fur from grass for a hat and fur coat. For the hat, we put 6-8 loops on the knitting needles and knit with an elastic band to the length needed to trim the bottom of the hat. We apply it to the cap and look. If the length is sufficient, then close the row. Exactly the same for finishing a fur coat. We knit with an elastic band, apply it to the bottom of the fur coat, and close the row.
For the collar fur, we cast on 10-12 loops on the knitting needles. And then also with an elastic band to the desired length. We close the row.
All details are ready. Now we sew fur and decorative braid to the hat and fur coat. For Santa Claus, we first sew on the fur, and only then the gold braid. For the Snow Maiden, it’s better to do it differently: first sew on the embroidered braid, and then the fur.
And don’t forget that the Snow Maiden must have a braid! To do this, we cut yarn of golden or other color (whatever you like) into strips of the required length and braid them into a braid. We sew the braid to the hat of our Snow Maiden.
We conclude our Christmas bottle decoration, gluing or sewing (I sewed) snowflake decorations onto both fur coats. These are so beautiful Father Frost and Snow Maiden on a bottle of champagne We did it! I think your family and friends will be pleased to receive such a souvenir for the holiday! Happy New Year!


