Good afternoon, dear needlewomen. Today we will look at the use of feet for sewing machines. If you love to sew, then this workshop is for you. I bought sewing machine feet from a Chinese online store.
The paws are very good, but how do you know how to use them. I started looking for information and realized that this topic is poorly covered. But if you use such devices, you can easily and simply perform various operations. So I decided to figure it out myself, and to help people who are also looking for this information. So, I'll start.
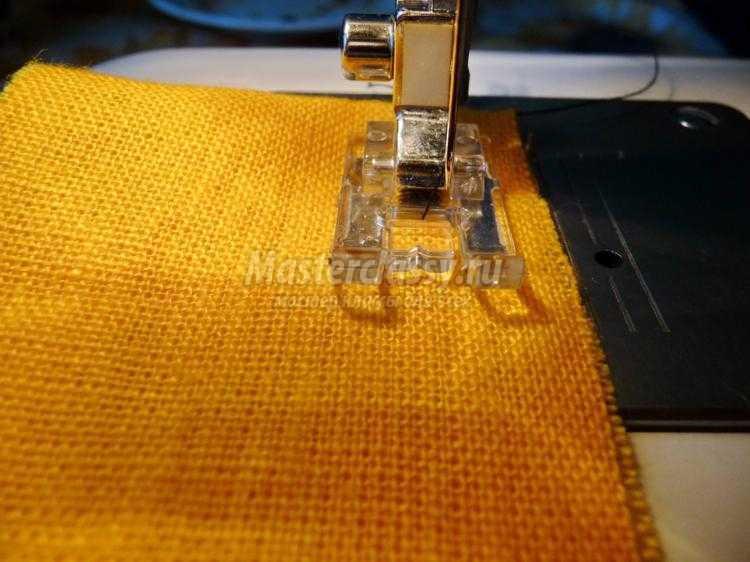
Foot narrow edge lining. The paws can be different by 2 mm, 4 mm, 6 mm. The foot makes it possible to process the edge very evenly and with high quality without basting. This foot is also called a snail. I'll tell you right away it's a decent foot. Cut the edge at the hem with an angle and tuck it into the snail. The fabric wraps itself very cool.
The seam is very neat. The width of the seam depends on the presser foot. Wrapping the fabric by 2 mm by hand is not at all an easy task, but here any fabric, even if it frays a lot, tucks up nicely. True, you need a new one, but you will be patient, and she will be your faithful assistant.
Using the feet for sewing machines - a master class

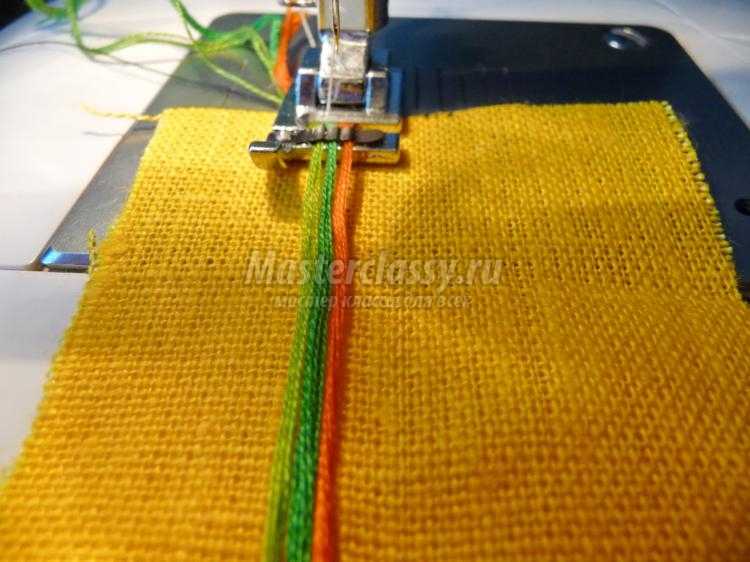
With this foot, you can sew on various narrow cords by tucking them into the snail from below. Instead of a thread on top, it is better to use a mono thread.


Assembly foot. A much needed paw. With this foot, it is easy and simple to make frills, ruffles. Pay attention to how the fabric should be laid. That fabric, which is collected, lies with the bottom layer, and the top one is tucked into the groove of the foot and will be sewn evenly along the top of the assembly. The assembly is uniform.


Foot for overcasting the edge. I liked this foot because the plate allows you to lead the edge of the fabric along the edge of the needle. We use an overcast seam, an imitation of an overlock.


Foot for sewing on elastic bands, ribbons, ribbons. I can say that the paw is just worthy. Using this foot, it is easy to sew on an elastic band, put it under the plate, and it lies flat and does not jump to the sides. And if you thread thick threads of different colors under the plate and sew, then you will get a beautiful decorative braid. We use mono thread instead of the upper thread. Use a zigzag stitch, or a zigzag stitch.


Foot for sewing on applications. The foot is transparent and the pattern is clearly visible through it, therefore it is used when it is important to sew accurately along the line. Used when sewing a zigzag stitch. The step distance is small, the line should be tight. For volume and beauty of the line, loosen the upper thread, and then the line will emphasize the beauty of your work.


Blind stitch foot. Everything is easy and simple to use, but I did not really like the quality of the lining, dots are visible on the front side. There is a screw on the foot, with its help we adjust the spade on the lining, but all the same, I still have traces and I think I won’t hem it like that.


Darning foot. This foot is designed for darning. Lower the teeth for free movement of the fabric. Conveniently.

Foot for sewing on buttons. Set up a zigzag stitch. Select a stitch height equal to the distance between the buttonholes. Simple and fast.


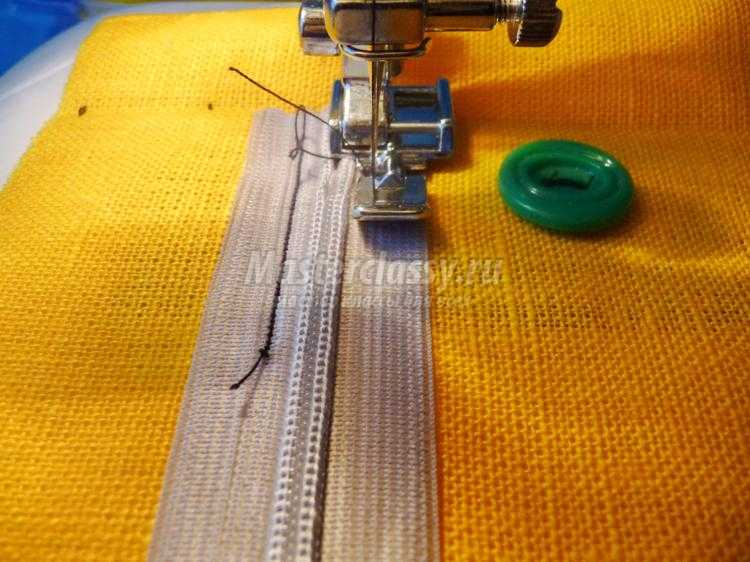
Foot for sewing on zippers. The foot has two holders left and right - this makes it possible to live the zipper on both the left and right, you don’t need to control anything, the foot rests against the zipper and the line lies very evenly, sewing zippers in such ways, the fabric will never fall into the zipper, the zipper opens easily . I've been using this foot for a long time and I love it.

Foot for sewing on a hidden zipper. A wonderful foot, it is like an iron, there is a notch on the bottom right to the width of the zipper itself. I also use this foot for sewing on cords, it lies in a recess and is easy to sew on.

Use of feet for sewing machines. Photo


Foot for lining fabric. How I regret not using this foot. The foot makes it possible to run the stitch evenly, the plate rests against the fabric and the stitch lies evenly, and there is a screw on the foot, and this makes it possible to shift the stitch, believe me, I sew like a pro and will not sew as perfectly as with this foot. If you flash a line, and then move the screw, you can lay a second line next to it. So great.


Solyanikova Tatyana Viktorovna
http://masterclassy.ru/shite/9162-use-lap...-klass-s-poshagovymi-foto.html
Sewing machine feet
June 14, 2013 - Irina AslanovaToday everyone knows what a sewing machine is. But not many people know about the sewing machine feet and how many types of them exist now. Nevertheless, the paws not only expand the capabilities of the machine, but also facilitate the implementation of many processes, and most importantly, make them of high quality. By paying due attention to this article, you will learn a lot of new things, and using the feet in practice, you will get great pleasure when sewing a variety of products.
If you bought a sewing machine, you will immediately see the adapter (mechanism for attaching legs) "AU-100" and the "ziz-zag" foot - "AU-107". In addition, as a rule, there is additionally a foot for zippers "AU-101" and for loops "AU-116".

(Allows you to quickly change the legs, which is very convenient, and speeds up the process)

(Standard foot for operations on
zigzag basis)

(Needed for lightning.
Can be located on either side of the needle)

(Great help when making buttonholes. Convenient when working on slats and collars)
Many machines also include Blindhem Foot AU-108, Quilting Foot AU-115 and Button Foot AU-105.

(Use for operations that need more careful execution. For example: blind stitches, etc.)

(Use for straight parallel stitches that run at the same distance).

(Use for buttons, fasteners, hooks)
The instructions for the machine always contain descriptions of the work on all of the above paws.
Today's home sewing equipment market can offer 40 or more types of presser feet for different functions. Paws are divided into semantic groups:
Run most workflows
Sewing decorative stitches
Performing work with fabrics of increased complexity.
Presser foot sets
Basic workflows:
There are many paws on the market that can sew in hidden zippers that exist in both metal and plastic.

(Stitching in a hidden zipper)
Due to the fact that there is a special groove at the base of the foot, sewing in a “hidden” zipper is done almost in the blink of an eye. To make good straight stitches on delicate fabrics, you need to use a straight stitch foot.

When processing edges, you need to take a hem for hem 2mm "AU-111".

For thicker fabrics, you can take a set of hemming feet with different widths (6 mm, 16 mm, 22 mm) "AU-121."
In the absence of a screwdriver, you definitely need an “overlock” foot “AU-109”.
This foot has a stopper that, when used, does not tighten the edge of the fabric. If the fabric needs additional processing of a part of the cut, then you can use the foot with a knife on the side for processing the edge "AU-125",

Decorative work:
Edging into products is a complex operation, but with a special foot, it is greatly simplified.
In a matter of minutes, you can sew bias binding with one stitch using the AU-117 piping foot or the foot that has the AU-114 ruler.


Very interesting is the device that lays the folds "AU-122". With it, you have the opportunity to sew a decorative part to the product in one operation.

If you want to give your product a more individual look, then use different types of decorative finishes. For this purpose, you can use, for example, the AU-130 beading foot,

foot for decorative cords AU-106 or braid AU-131,

Among those who perform decorative operations, be sure to mention the embossed tuck foot (when used together with a twin needle) AU-127, the appliqué foot AU-110 and the shirring foot AU-128
Greetings, dear lovers of sewing!
Despite the fact that the processing of the bottom of the products with a hem seam with a closed cut is a rather simple sewing procedure, it still requires considerable effort. Marking, ironing, temporary hand stitching, etc. etc.
Is it possible to do without all this? Yes, there is a way to get rid of this routine, use a special sewing machine foot - a foot for hemming the edges of products.
There are different names for this foot. Twist foot, Hem foot, Hem foot, Hem foot, Hem foot, Hem foot, Hem foot, Hem foot. That's all she is...
Of course, hemming feet from different manufacturers for different sewing machines differ from each other in shapes, sizes, and the material from which they are made. This difference can be minor or significant. In addition, the same manufacturer can produce hemming feet in several sizes at once. There are paws that make a hem with a width of 2 mm, 3 mm, 4 mm, 5 mm and 6 mm.
But all these paws have one thing in common. Each of them has a curler on the front, which folds the material in half in just one operation and produces a beautiful and durable hem in one go.
Such a seam is called differently: a narrow hem, an American seam, a Moscow seam, a narrow hem, etc.
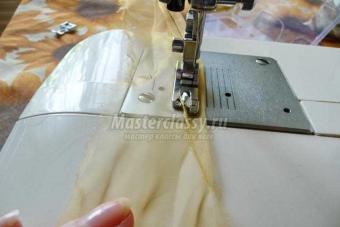
The curling device of the foot, the twisting mechanism for feeding the fabric, or as it is also called the “snail” (1 in the picture),
has (2 in the picture) guide. It holds the edge of the material up to the slit and thus prevents the fabric from slipping out of the curler.
Many sewing machines come standard with a hem foot. But always only in one size. So those who have only one size foot - a knife switch, and those who do not have one at all, are thinking about acquiring a foot. True, some dream of the first, and others of the next.
How to use the hem foot?
Many sewing enthusiasts search the World Wide Web for information on how to use the hem foot. And there really is a lot of information. Especially how to use the foot. Can I add something new? I'll try...
I don’t think it’s necessary to explain that the foot is installed on a sewing machine. This is clear to everyone. Another thing is that the paws for hemming, although very similar to each other in their main device, are still different from each other. This difference is especially visible in the way the foot is attached to the presser foot holder of the sewing machine.
Therefore, when choosing a foot for a hem, you need to carefully study the information about the foot, do not neglect the consultation with the seller. You may need an adapter - an adapter from one type of fastening of the legs to another, suitable. In general, everything will need to be taken into account ...
It is necessary to perform a narrow hem of the edge of the fabric with thin threads No. 120, No. 150. And with a thin needle No. 70, No. 80. The stitches are 2.5 - 3 mm long. (For very fine fabrics, it is recommended to starch the finished edge a little.)
So, the threads and the needle are in place, the foot too, the stitches of the line are set ...
Now, with regard to the work of the foot itself and its main purpose - execution. The whole difficulty of working with the hemming foot lies in the correct filling (institution) of the material into the curling device of the foot.
There are several ways to do this.
1st way.
This is the most shown method on the Internet.
Filling the material into the foot - the knife switch in this way begins with ... cutting off the corner of the fabric. How should it be done correctly?
The corner must be cut at an angle of 45⁰ to the cut being processed. And this means that a right-angled isosceles triangle is always cut off from the edge of the material.
The length of both sides of this triangle is equal to twice the width of the hem that the foot makes. For example, the foot makes a hem with a width of 2 mm, which means that a triangle with sides 4 mm long is cut off from the edge of the material. For 3 mm hem, respectively, 6 mm, for 4 mm - 8, for 5 - 10, etc.
We fold the material along the edge to be processed to a width equal to twice the width of the finished hem.
For example, for a 2 mm hem, we fold 4 mm, for 3 mm - 6, for 4 - 8, etc. That is, the fold line of the tucked material should coincide with the line passing through the top of the cut triangle, on the side perpendicular to the side of the fabric being processed.
We begin to lay the fabric in the hem foot.
So that the hem, made with the help of a special foot, is exactly obtained in this way:
1) it is always necessary to advance the material under the foot with the edge bent to the desired width (according to the size of the foot), and,
2) align the fold line on the material with the line on the right side of the foot (runs along the right side of the frame with the curler).
Failure to follow these two rules are the main causes of failure when performing a hem with a hem.
Now the third rule. The fact is that different sewing machines have a different distance between the working surface of the machine and the lower plane of the raised foot (clearance). It can be both 5 mm and 9, in different ways. And if the foot performs a hem with a width of 2 mm, 3 mm or 4, then the tucked edge of the material with a width of 6, 7, 8 mm, on sewing machines with a clearance of, for example, 9 mm, is simply not enough to enter it into the “snail” of the foot .
The material that entered the foot
fix it there by lowering the needle of the sewing machine.
and start scribbling.
If you keep holding it all the time, as you need the material (for the rules, see above in the article),
then the hem will still, in any case, work out.
But since my foot makes a hem with a width of 3 mm, inserting the material into the foot in the first way, I get such an unpresentable appearance of the edge of the fabric.
2nd way.
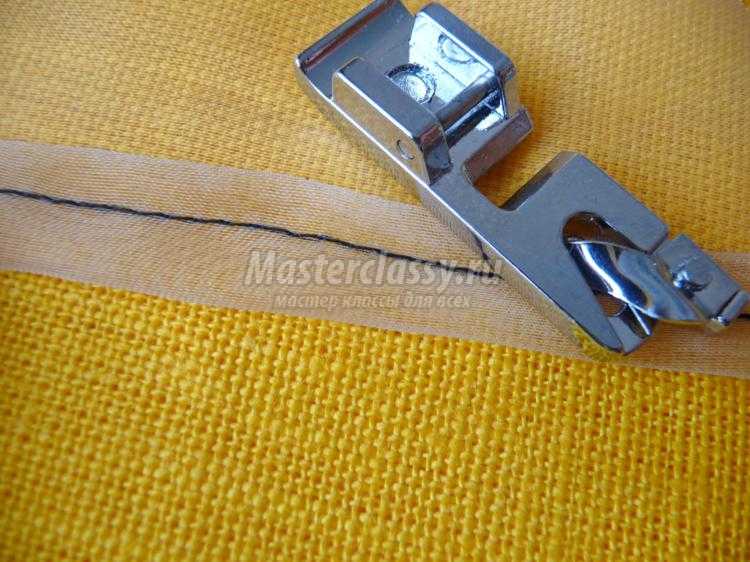
At the very edge of the processed cut, 3-4 stitches of machine stitching are laid with straight stitches. The length of the stitches of the line is 2.5 - 3 mm.
The line is laid at a distance from the processed edge equal to half the length of the hem that the foot performs. For example, for a foot that makes a hem of 2 mm, the distance will be 1 mm, for 3 mm - 1.5 mm, for 4 - 2, for 5 - 2.5, for 6 - 3 mm.
(The edge of the fabric should wrap well around the guide in the snail of the foot, which is why the stitching is sewn so close to the edge.)
If 2, 3 mm can still be somehow “observed”, then 1 or 1.5 mm is almost impossible. Firstly, the edge of the fabric may “crumble”. Secondly, you will need to take the threads of the line with your hands and pull, not much, but still. Can "pull out" the site ...
I took a fairly strong and dense material and still laid a line at a distance of 1.5 mm from the edge.
Without cutting the threads of the line, we take them all together
And we begin to wind the paws into the curling device.
Here, too, “crawls out” (for legs 2 mm, 3 mm, and maybe 4 mm) that there is simply not enough width of the material to enter it into the “snail”.
Lower the needle and foot of the sewing machine.
And we start laying the line.
If you hold the right amount of material in a folded form and evenly insert it into the foot (main rules 1 and 2, see above in the article),
then hem, again and again, turn out. But here again the end comes out ugly.
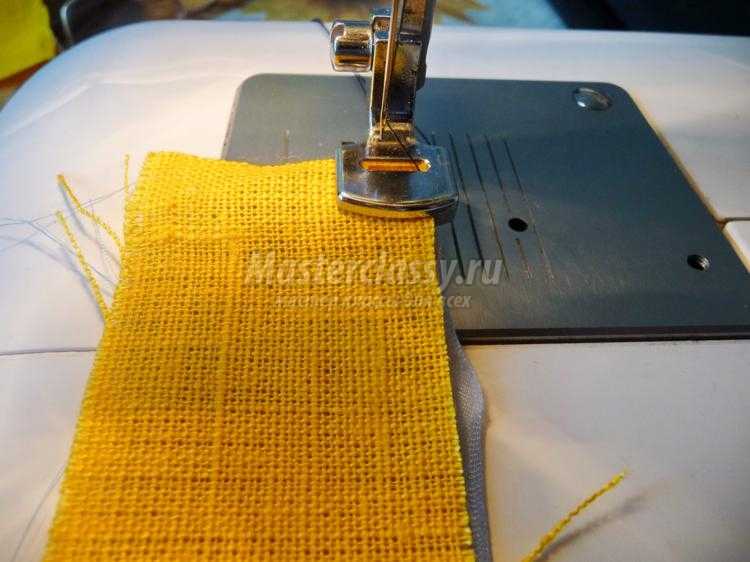
3rd way.
a cut of the edge of the fabric processed by the hem. Both allowances are the same and equal to the width of the finished hem that the foot makes. For example, the foot makes a hem with a width of 2 mm, we tuck it two times by 2 mm. Or the foot makes a hem with a width of 3 mm, we tuck it two times by 3 mm. Etc.
Place the folded edge of the fabric under the foot. The fold on the fabric, and here too, runs along the line of the “snail” frame on the foot (main rule 2, see above in the article).
Lowering the needle and foot of the sewing machine
And along the fold of the folded fabric we lay 3 - 4 stitches of the line with straight stitches. The length of the stitches of the line is 2.5 - 3 mm.
After that, raise the foot, but leave the needle in the down position. She will have to hold the material. We put the edge of the fabric freed from folds into the curling device of the foot.
And even the tip, in this case, is perfect.
What conclusion can be drawn from all this?
For paws performing a hem with a width of 2, 3 and maybe 4 (according to the model of the machine), only the 3rd method of threading the fabric into the foot is acceptable. But for legs that perform a hem with a width of 4 mm or more (according to the model of the machine), and exactly for legs with a 5 and 6 mm hem width, all 3 methods are suitable.
A hem with a width of 5 and 6 mm, if it “allows” to make the shape of the foot of the sewing machine, can also be done with a zigzag stitch of the selected width.
However, there are hem presser feet that are shaped so that they “do their job” with straight stitches only. In this case, manufacturers also offer special feet to perform the same hem, but with a zigzag stitch. The material is “embedded” in such paws in the same way as in those described above in the article.
Special feet for shell stitching or rolled hem.
Some manufacturers offer paws for their sewing machines, which perform another type of hem seam - rolled seam, rolled hem, shell seam. With the help of such paws, you can make a beautiful wavy edge along the edge of the product.
The seam hem presser feet are very similar to the regular hem presser foot. The fabric in them is refueled exactly according to the same principle as in ordinary paws. But a role-playing seam is always performed only with a zigzag line, and the seam at the same time turns out to be voluminous.
These hemming feet can be used to hem edges in widths of 6.5mm, 9.5mm, 16mm and 22mm.
Despite the fact that the legs for a wider hem look very different from the usual narrow ones, you can thread the fabric into the curler of such a foot using one of the three methods described above in the article.
Each of the special paws, the heroines of today's article, requires patience, attention and a certain skill that comes with experience.
Special paws for hemming are best handled:
narrow hem (2, 3, 4, 5 and 6 mm) edges, scarves, scarves,
and home decor products from light and medium fabrics;
wide hem (6.5, 9.5, 16 and 22 mm) - bed linen, bedspreads, thin blankets, curtains, curtains, etc.
But for ordinary clothes, such paws ... problems with seams, thickening, crawling out, etc. etc. ... in general, not very much.
Good luck to all! Sincerely, Milla Sidelnikova!
Sewing machine feet are the main components without which the sewing process is impossible. Standard feet for sewing machines - universal, lockstitch, for sewing in zippers, for buttonholes. In addition to these, there are many special feet, for example, a foot for sewing in a hidden zipper, for sewing on buttons, for sewing on satin stitches, for sewing on a cord, for making a blind seam, for darning, embroidery and many others.
: video master class
By the way, many do not even use them, although they are included with the machine. And all these paws lie in special compartments for storing accessories for years. But each of them is a little helper that can not only facilitate the sewing process, but also speed up and improve the performance of individual operations. For example, sewing leather and suede, knitwear and jeans, silk and chiffon using special feet will be a convenient and easy process.A description of how to use standard feet is in the instructions for the sewing machine. But, as a rule, it is rather scarce, and for additional accessories it is completely absent.
Types of feet for sewing machines
Gathering foot

With it, you can make a gathered stitch on a typewriter and save time. The density of the assembly is adjusted by the tension of the upper thread and the width of the stitch. With a wider stitch, the gathering is thicker. Thin fabric gathers more strongly, thick and dense - less.
To get the expected result when performing this operation, first try to gather on a piece of fabric from which you are going to sew the product. Cut a piece of a certain length and see how long the assembly will be. In this way, you can calculate the entire length of the frill.
Top feed or walking foot

allows you to grind several layers of fabric at the same time without shifting them. Works great with stitching. This foot is used for patchwork and quilting.

In some models, the top transport is already built into the sewing machine.
Teflon foot

Designed for sewing products made of genuine leather, leatherette and coated fabrics. Instead of the Teflon foot, you can use the roller foot, which uses torque to move the fabric forward. Which of these two paws to give preference to, will tell the selected fabric. The roller foot also works well with heavy materials, some types of raincoats and jackets.
Today, combined models are on sale - a Teflon foot with a roller.
All-purpose zipper foot

In addition to its main task, it can be used to finish the product with piping. If the edging is narrow, then you need to sew it on like a zipper. If wide - close to the edge.
Snail foot for sewing on bias tape

Eliminates the process of basting the inlay manually and significantly speeds up the process. To work with it, it is enough to cut a strip of fabric along the oblique of the desired width, tuck it into the foot and you can sew. It turns out neat and beautiful.
The Bias Binding Foot is suitable for both ready-made and unfolded. The finished inlay is inserted higher through the slot in the "snail". And deployed - into the main hole of the foot.
If there are several holes in the “snail” and they are of different sizes, then with the help of such a foot you can sew inlays of various widths. And these holes make it easier to move the bias tape forward.
: video master class
Foot for knitwear

useful for those who do not have an overlocker. It facilitates work with such sewing knots as tucks, bottoms and sleeves, neckline stitching on knitwear.
Bias binding foot

Suitable for sewing on any bias tape, any width - the screw on the foot allows you to set the desired width. The foot is easy to use as it is easy to attach to the machine and also easy to remove. And the result exceeds all expectations.
Pintuck foot

Provides an ideal process - the speed of the operation is increased, the quality is increased, labor costs are reduced, the tucks are obtained even and at the same distance from each other. Before starting work, mark the line of the first line. In order to make the tucks more textured, convex, place a special plastic tongue under the fabric (they come in different sizes). Very narrow pintucks, 1 mm wide, are made using a loop thread.
Edge sewing foot


It will help to lay a smooth finishing line along the edge of the product.