Using the now popular weaving from newspapers, you can make a chest, a vase and many other crafts. In this article you will learn how to make a house using newspaper tubes.
Master class - house made from newspaper tubes
Would need:
- newspaper tubes;
- cardboard, thick paper;
- paper clips;
- clothespins;
- PVA glue;
- paint and varnish.
- Cut out two identical hexagons from cardboard.
- We glue the tubes to one of them along the edge at a distance of 1.5-2 cm. We glue the second hexagon on top. We received a bottom with vertical bases for weaving.
- We make the sides of the house from cardboard or thick sheets of magazine along the length of the side of the hexagon. We fasten them together with glue or paper clips.
- We place the wall blank on the bottom. We lift the tubes vertically and secure them with clothespins at the top edge.
- We begin to braid the walls from below with a regular rope of two tubes. We do this 4 rows around the entire perimeter of the house.
- In the center of each side of the sides we leave 5 tubes free, and work with the rest. We make “chintz” weaving separately on each corner group of vertical tubes, and we have six of them (according to the number of corners), stopping at a height of 2-3 cm from the top.
- At the top we make 4 rows of weaving a rope of two tubes along the entire contour of the house, weaving in all the remaining free tubes.
- We remove the base box and hide the upper ends. We cut the tubes left in the center of the sides in the openings in the middle and also hide them.
- Cut from thick paper circle suitable for roof diameter. We cut from one side to the center and fasten it so that we get a wide cone.
- Take 4 tubes 4 times. We intertwine them as shown in the figure. This will be the base for the roof.
- We select the first tube from the base and use it to start weaving “chintz” in a circle, then continue with free tubes, repeating the shape of the roof. To work, we must have an odd number of base tubes.
- When we reach halfway, we retreat some distance and begin weaving again. After 6 rows, we attach additional tubes to the last two.
- Next, we continue to work until the roof extends beyond the walls. We secure everything, and trim the ends along the edge at the same distance.
- You can paint everything with paint or varnish.
- We connect the roof to the walls, and our summer house is ready.


 |
 |


 |
 |


 |
 |
 |

Using this weaving pattern from newspaper tubes, you can do tea house, and a variety of houses for dolls and animals.
A home made from newspaper tubes can be an excellent gift or decoration. own kitchen. To create it, simple and affordable materials are used, and the weaving process is not difficult even for those who are just starting to do needlework. A master class on making a house from newspaper tubes will clearly demonstrate how to make an original souvenir.
Materials and tools
To work you will need:
- tubes cut and glued from newspapers;
- acrylic varnish, paint or stain, brushes for applying them;
- cardboard;
- ruler;
- stationery knife;
- pencil;
- glue gun;
- pin;
- scissors.

Before you start, you should look at photos of finished houses made from newspaper tubes to get ideas for decorating your craft.


Making the base
Step-by-step instructions with a description for beginners will help you figure out how to make a house correctly:
Draw a rectangle (for example, 8*9 cm) on a sheet of cardboard using a ruler. Cut out the workpiece.

Using a glue gun, attach to the base of the tube. They need to be glued 2 together, according to a certain pattern: at 4 points at equal distances from each other on each side of the rectangle and in the corners.

One of each pair of tubes must be bent upward, the remaining ones must be used to weave the bottom. It is performed using the rope technique. The elements glued to the bottom are the frame.

Take 2 pieces from the stack of remaining tubes and begin to braid the frame. Both of them should go in the same direction, but mirror each other: one passes through the first post from the outside, the other from the inside. The tubes go around the next column in reverse, the first goes from the inside, the second from the outside. Do this for 3 rows.

If the length of the tube is not enough, extend it - coat the tip of the one that ends, and put a new one on it. Continue weaving. After finishing the third row, hide the ends inward and secure them.

They move on to weaving the walls of the house. To make it more convenient to work, it is advisable to place a container of a suitable diameter (mug, bottle) on the base. They begin to weave in the same way as the bottom, but they go not wide, but upward. Perform several rows. After this, you need to mark the location of the future hole with a pencil.

Using a utility knife, carefully cut a hole. The cut area is glued with a tube, having first slightly flattened it.

Taking a clothespin, connect the ends of 3 tubes. Weave regular braid. This braid is used to decorate the entrance to the house (using a glue gun, glue it around the perimeter of the entrance hole).


They continue weaving the walls of the house. When they reach the desired height, close the weaving of the sides, and hide the ends of the tubes in the frame. The wall on which the entrance hole is located and the wall opposite it must continue to be weaved, but gradually narrowing it.

First, several rows are made, increasing the tension of the tubes, then the racks are connected in pairs, and at the very end the remaining ones are woven into one. The result should be 2 triangles.

Creating a roof
After this they make the roof. Having understood how to make a house from newspaper tubes and studied the photo finished projects, you can choose the most suitable solution.

The simplest option is to make a rectangle using the same technique (“rope”), bend it in half and secure it with glue on the 2 triangular ends of the walls of the house.

Another way is to take a sheet of cardboard and cover it with any available material that imitates tiles, for example, wine cork cut into thin plates. You can cover a cardboard base with golden yellow-painted tubes to create a thatched roof.


Finishing of the finished product
When the house is completely ready, they move on to decorating it. You can cover the craft with stain, paint it in the desired color, decorate the roof with a ladder made from tubes, make flower pots - original ideas houses and instructions for making them will help with this.

If you wish, you can make a window in the house: cut a hole in the right place, cover the cut with a pigtail, glue two tubes perpendicular to each other, which will act as a frame.

Do beautiful house making from newspaper tubes is quite simple, the main thing is to understand the principle of weaving.

Photos of houses made from newspaper tubes


The question of what to do with a child at home is relevant even for experienced parents. Interesting idea about the use of improvised materials in entertaining games for children and DIY original crafts from magazines and newspapers will be very useful.
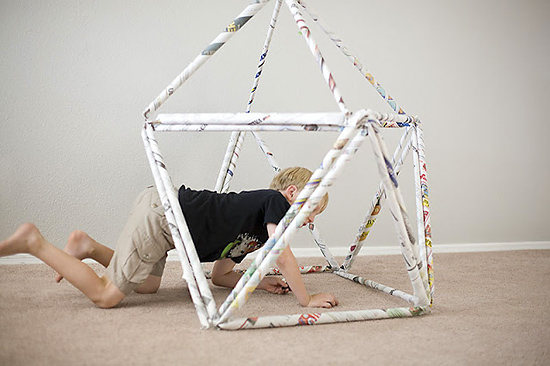
Children, both boys and girls, love to build all kinds of houses, shelters and play in them both on the street and in the house. It could be a military tent, an Indian hut, a palace for a princess, or even a tree house. Their imagination is unbridled.
Today I would like to tell you how to create children's games with your own hands and how to build a house from newspapers and magazines with your children.
DIY house made from newspaper tubes for children
This idea can be completely implemented by the child himself; this is very good for the development of his motor skills and spatial thinking. Parents can help with advice and show how and what to connect. Joint creativity brings its participants very close. Parents are often very interested in joining their children's games.
To implement our house we will need very few materials:
- newspapers or magazines (magazines have stronger paper);
- a roll of tape;
- stapler with staples.
So let's get started. To begin with, let's take several sheets of newspaper or magazine. You will only need to work with sheets of the same size to get identical parts. This will avoid problems during assembly.
Having folded several sheets together, you need to tightly roll them into a tube. Even a small child can easily cope with this task.
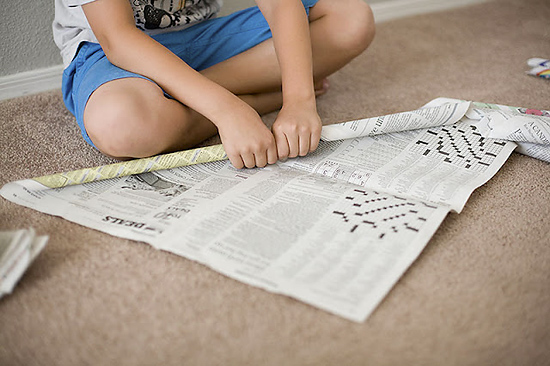
After the tube is rolled, the outer edge of the newspaper should be secured with tape.

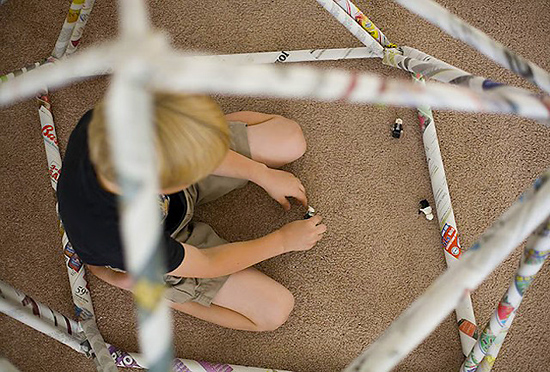
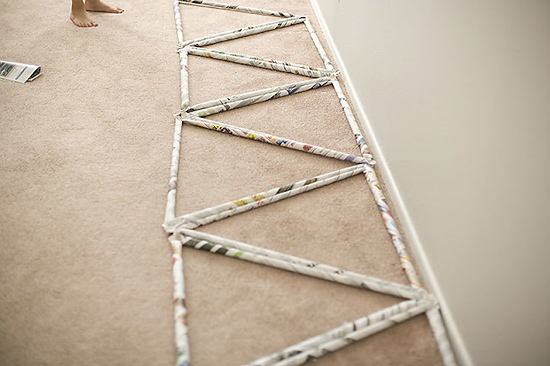
The number of such rolls may vary, depending on the type of construction of our tent. So, since we will build a house from triangles, the number of such tubes should be a multiple of three. Using a stapler, we connect the newspaper tubes into triangles.

When we have a sufficient number of triangles, for such a design we will need about thirty of them, we can start assembling.
For the house bigger size and other designs can be used large quantity tubes.
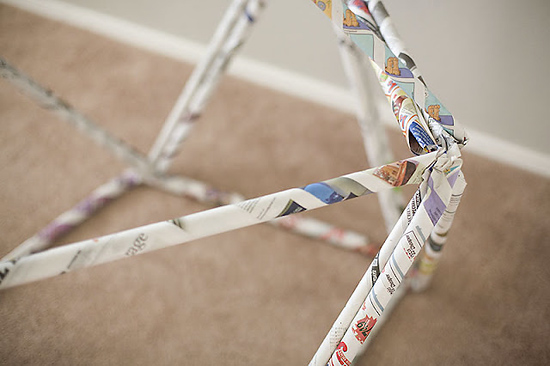
Connecting the triangles with each other using a stapler and tape, we gradually build our house.

Parents' help will be useful during assembly. Especially for connecting parts of walls and roofs together. Since children cannot always imagine the future appearance of the house and correctly connect the parts of the whole. For greater strength, the tubes can be wrapped and connected with tape.
The result will be a fairly strong frame in which the child can already play and transform it in accordance with his fantasies.
Nina Kuznetsova
To familiarize children with Russian life how and where they lived Russians people many years ago, I decided to make a layout Russian hut made of paper tubes. To make it you needed cardboard box, A3 and A4 paper, PVA glue, brown acrylic paints, acrylic varnish (semi-matte, brush, ruler, scissors, stationery knife, (board texture background printed on a color printer) for the floor.
I made a model of the stove from small boxes. I painted the stove with primer.
This is how the layout turned out" Russian hut"!


« Russian hut» used for conducting various classes in which children are educated morally, spiritually and acquire the initial basics of patriotism. Children’s spoken language also develops well, their vocabulary expands, children get positive emotions here and learn to imagine.
Use cases with preschoolers:
1. Organization of role-playing games games:
“Putting the baby to bed”, "Tea Party".
2. Educational games:
"Kinship and Occupation", "Village courtyard", "Crafts".
3. Educational conversations:
"Life Russian people" "Folklore"
Publications on the topic:
One of the main attributes of the New Year is the Christmas tree. And in every house on this holiday there is a Christmas tree decorated with different outfits. She.
Dear colleagues, I present to your attention a master class made from newspaper tubes, what beautiful things it would seem to come out of.
Dear colleagues, I present to your attention the Master Class “Making autumn trees from colored paper and cardboard tubes” For.
Making a wicker flower basket from newspaper tubes. Materials and tools: newspapers, gold paint, PVA glue; scissors, cardboard,...
Together, as a team, we make crafts. We won’t throw anything away, because we value everything! Stylish do-it-yourself vase. Master class We will need:.
New Year is always a sea of gifts. Adults, as usual, go to the shops, and children try to make something with their own hands. Crafts made.
Hello, friends and colleagues! You have already become acquainted with my events at the Russian Izba mini-museum, and now I want to introduce you to.


