Paper crafts are a very interesting and useful activity that promotes better understanding between parents and children, as well as the development of the child. Joint crafts are a way to get into each other’s ideas, thoughts, and feelings. For example, if you know how to make a paper wallet with your own hands, you can spend happy moments with your child, and he can use the craft to collect coins for a secret purchase or as a gift for his grandmother.
Craft materials
First of all, you need to select material for crafts. You can make an incredible number of crafts, the main thing is to have imagination and available tools:
- scissors or stationery knife;
- paper, cardboard A4 white, multi-colored;
- glue, tape, stapler;
- multi-colored thick threads with a needle;
- simple pencil, ruler;
- paints, markers, pencils;
- beads, bows, pasta, cereals, ribbons.
Drawing tools and accessories are chosen as desired.
Easy way
Making a paper wallet for money with your own hands is very easy by type. Take a sheet of A4 or A5 format, then follow these steps:
- Visually divide the sheet into 3 equal parts along the length of the paper.
- Fold the bottom part in the middle.
- Fold 2 edges to the end of the sheet, in the middle you will get 2 folded edges, and 1 on top in a non-folded rectangle.
- Use scissors to make cuts, as if separating the kinks from the unfolded part.
- We do not touch the folded edges, but cut a thin strip of 0.5-1 cm from the edge of the rectangle, which was folded inside the paper.
- We bend 2 strips of ears inward and into the middle - this is a compartment for paper money.
- The upper part of the sheet can now be closed from above, and the long rectangles obtained by cutting are a kind of lock for the wallet so that the money does not fall out.
This wallet option is suitable for playing with paper money.
Step-by-step execution in the photo:

Origami style
To make a simple paper wallet in origami style, you will need a colored sheet of A4 paper, if you need a small wallet, otherwise take A3 size:
- A sheet of paper must be folded in half, thereby dividing the long sides and drawing a ruler along the fold so that a strip remains. Next, you should expand the sheet.
- You need to visually divide the halves in half, bend the right and left corners to their middles so that they meet in the center.
- On the paper there were 2 triangles at the edges. Bend the top of the triangle towards its base, and do this on both sides.
- At the base of the triangle we make a bend in the center of the sheet, on both sides. The result is a rectangle with no triangles at the ends.
- Turn the rectangle over with the missing triangles facing the table.
- Fold the edges towards you to the middle of the rectangle. You should end up with a square with no rhombus in the middle.
Fold the square inward so that the corners of the rhombus meet. Now, if you look at the small resulting rectangle, there are compartments on the bend side: you need to pull out a triangle from one half - this will be the wallet lid.
Origami wallet patterns:


Wallet with two compartments
An original wallet in the shape of a triangle with two compartments can be created from 1 sheet of paper, without additional materials:
- Take a landscape sheet and bend a corner on one side to the opposite edge, making a triangle.
- Cut off the remaining part from the triangle.
- Fold the triangle in half and run your fingers or a ruler along the fold so that when the triangle unfolds to its original position, a strip remains.
- Unfold the sheet completely; there should be lines on it after the bends, from two triangles.
- Fold 4 identical corners to the center of the square.
- The resulting small square must be folded by bending the large corners to form a triangle.
- It needs to be folded in half, you get a small triangle.
- If you turn the triangle over with its base, you get 2 cells.
- From one triangle you need to pull out the middle and bend it between two triangles, fastening it into one.
- Pull out a corner from the second triangle - this will be the wallet lid.
You can glue a button, Velcro, or sew a button on the corner of the wallet lid so that it can close tightly.
This idea of creating a toy paper wallet is an interesting craft option for children aged 3 years and older. Playing shop or bank with your child can teach counting and some computational skills.
Making a purse
A wallet is a universal thing in which you can put not only paper money, but bank cards, discount cards and small change, as well as photographs of loved ones.
It’s not difficult to make a paper wallet; you will need one colored sheet of A4 or A3 paper:
- Fold A4 in half and mark the middle, bending it well and fixing it on the paper.
- Unbend the sheet and turn it over with the convex side of the bend.
- Fold one side of the sheet in half again, and do the same with the second part.
- Unfold one part, it turns out to be 2 parts of the sheet, separated by one bend. From the bottom of the sheet, fold the sheet in half to the nearest bend, repeat the action again, continuing to bend so that the third part of half the sheet is folded.
- Turn the resulting triangle over and fold the edges on both sides.
- Fold a small triangle on one of the curved edges - this will be a latch that holds the wallet and also acts as a clasp. This action is carried out equally on both sides.
- Turn the workpiece over to the reverse side and fold it in half, fixing the other half with the edges with a curved corner, the actions are duplicated on the second side of the workpiece.
- It turned out to be one compartment inside the workpiece and one on the outside; now it should be folded in half.
When the purse is ready, you can invite the child to fold the necessary things for shopping, paper money or ordinary pieces of paper (they can be replaced with leaves from trees and shrubs).
Step-by-step execution in the photo:


How to make a cash register
To create a cash register you will need 2 boxes (large and small), 2 matchboxes, scissors, glue, paper for pasting the cash register, a sponge for washing dishes, threads, 10 beads, square Velcro:
- Open a large box, put a small one in it and mark the width and length of the small box on one edge. This is necessary so that the bottom box leaves the cash register.
- Cut the marked hole in the large box.
- Glue the lid of a large box with double-sided tape or Velcro diagonally so that one side is higher. The bottom drawer of the cash register should slide out from the low side.
- Cover the bottom drawer of the cash register with soft paper in one color, and the entire cash register in another color so that they are contrasting.
- A piece of transparent film should be glued to the top part - this will be the cash register screen. To make it look more contrasting and more convenient, glue a ribbon around the perimeter of the transparent film. Draw a sum or action on a piece of paper and insert it under the film.
- Under the cash register screen, glue a rope with 10 beads, which must be strung on it in advance - this is an abacus.
- Below the score (beads) glue a dial from an old calculator or 12 squares on which to list the numbers from 0 to 9, the signs +/-, =.
- To the right of the numbers, glue 2 ice cream sticks with their edges - this will be a terminal for bank and discount cards.
- To the right of the bill, attach any flat object that should be glued to the cash register on both edges. The middle of the object must allow a sheet of paper to pass through - this is necessary for the machine to issue a receipt to the buyer.
- You need to cut out the letter T from a sponge - this will be a barcode reader for goods.
- On the right side of the cash register, make 2 holes: insert a key into one, and a rope into the other, which should be glued to the reader;
- On the bottom drawer, glue the handle with which it will be opened, as well as the open matchboxes inside for small change and bills.
The video shows how to make a cash register:
Cardboard wallet
A wallet made of ordinary paper is not durable; it is enough for 3-5 games with a child. If a parent wants a wallet for more games, then it is better to make it out of cardboard. Even Tetra Pak cardboard will do:
- Fold back the edges on the lid side and cut off the top of the sealed edge to create a hole in the box.
- Next, cut off part of the box and the bottom. Leave the front wide part with the lid and the side, cut off the rest - the second side, the wide second, the bottom.
- Draw 2 straight lines in the middle.
- Using a protractor or plate, draw 2 semicircles on the sides of the drawn lines.
- Mark the center at the base of the semicircle. From it you need to divide the semicircle into 9 equal parts, on both sides and draw a dotted line between the two halves.
- Cut off the excess parts from the cardboard, cut out a shape - 2 semicircles with a rectangle to the very end of the box. Bend the cardboard along the drawn lines.
- Raise the bottom rectangle up to the lid and mark a hole for it with a pen and cut it out. Glue the edges of the rectangle and the accordion, screw on the lid.
The wallet turns out to be very durable, you can put a lot of metal coins in it and it will not tear.
Paper coin wallet
To get a strong wallet, you need to take cardboard or thick paper, from which you can cut out the parts according to the diagram. Fasten the edges and sew with a needle using an overcast stitch. Threads need strong and contrasting paper. Any child will really like a wallet in the shape of a cat; instead of a spout, glue a button so that it closes tightly. Schemes can be cut out from colored or white paper, and invite the child to color and finish drawing the cat’s eyes and whiskers.
How to draw and cut out a wallet:

Magic wallet for children
Most children believe in miracles for a long time; everyone wants to receive a gift or do something magical. Therefore, you can please your child and make him a magic wallet. It can be opened from right to left and left to right. If you put money on any inner side under the ribbons, then after closing and opening the wallet in the opposite direction, the piece of paper ends up tucked under the ribbons located on the other side.
To create it you will need 4 rectangular pieces of cardboard slightly larger than the size of banknotes. 2 of them can be covered with fabric or colored gift paper. The pasted cardboard is the outer part of the wallet. You also need a ribbon or elastic band that will secure the bills in the wallet:
- Cut 4 ribbons, 18-20 cm each.
- 2 tapes need to be glued to the cardboard so that they intersect, and turn it over.
- On the inverted side we cross the ribbon.
- Turn the cardboard over and glue the edges of the crossed tape to the other inner part.
- Glue 2 other tapes to the second inner cardboard so that they are on the sides.
- Turn the cardboard over, hold the ribbons on the other side parallel to each other, and place the ends behind the second cardboard and turn them over. Glue the tape on the other side and trim off the excess.
- Glue the covers to the resulting wallet.
The video shows how to make a magic wallet:
How to make paper money like real money
Monopoly, playing in the store, in the bank and other activities involve the use of toy money in circulation. There are many different ways to replace real banknotes and make them from improvised means: draw, print from the Internet, make a photocopy of real ones, replace with lottery tickets, top-up cards. But often children imitate the behavior of adults, so there is a need to make money to play like real money. First of all, when creating such tools, special attention should be paid to paper. It needs to be made rougher and with some shade, as if the banknotes were already in circulation:
- The first and well-known method is to soak the paper in black, green tea or instant coffee.
- The second way is to soak it in milk. The paper will not change its shade much, but by drawing with milk you can make watermarks on the banknote, just like real banknotes.
- The third method is to dilute watercolor paints in warm water, turn the water pale yellow, soak the paper, dry it, and run it through the printer.
It is important for parents to emphasize that such bills can only be made and used for gaming purposes, otherwise such actions may be considered fraud.
A thing made with your own hands always inspires the most pleasant and warm feelings. And when it is made with love, then it seems there is nothing more to dream of... except to constantly have it with you.
On the other hand, you can ask the question: what thing that is constantly at hand gives a person the most pleasure. The answer is emerging more and more clearly, however, we need to firmly tie the ends of both assumptions with one more hint: this thing is a combination of business and pleasure.

There is still a little uncertainty, but the following statement will finally dispel all misunderstandings: this thing fits perfectly in your pocket and is simply irreplaceable for any fashionista.


Now there can be no doubt that this is a wallet. A beautiful, original wallet that meets all the whims of its owner, made with his own hands. But how can you do it without first reading the instructions?

How to make a wallet with your own hands
There are a huge number of options for this accessory, and even more such ideas “sit” in the heads of future authors. Therefore, the instructions will provide basic information about the material and decorations and will conduct a short master class on making your own wallet - one of the fairly simple and beautiful models.

Material
When thinking about what you can make a wallet out of with your own hands, the first thing, of course, you pay attention to is a leather wallet - and for good reason. This model is expensive, looks serious and lasts a very long time. Working with leather is not as difficult as it seems at first glance.

In addition to the already listed advantages - quality, strength and appearance - this material is perfect for making female and male models. The most important thing is to choose quality material. Thick or thin leather - it is important that it is tough, then the wallet will last for many years.

But even such a minor obstacle as finding material can be solved simply - just look into the most secluded places and find the oldest or most unnecessary leather products - and you can safely get to work.


Next comes ordinary fabric - but there are many options here too. The most common of them, as well as the easiest to work with, pliable and pleasant to the touch material is felt, or one of its varieties - felt. A felt wallet can be made in almost any shape without any special skills. It will be especially pleasant to hold in your hands in winter.

Felt is one of the varieties of felt - a thinner and softer fabric. It can be used to make the most original wallet ideas, and felt is ideal for beginner craftswomen.

In a separate group you can place fabric with a print - that is, a pattern already applied. Such a product certainly looks more beautiful, but its manufacture will require more patience and skill, as well as additional material for interior decoration.

After the option with ordinary fabric, you can consider denim. The principle of working with it is completely identical to the previous version - it is simple and does not require special tools or skills.

Denim fabric, unlike regular fabric, is denser and more wear-resistant, but in terms of elegance it is perhaps inferior to felt. You can use it to make a simple and good bag with a zipper or drawstring for small items.


Now there remain two of the most exciting, most beautiful and at the same time the most difficult options. The first one is a knitted wallet. Making such a wallet with your own hands is done using special sewing patterns.

The second one is made of beads. To do this, you need to be able to weave well. But with due patience, diligence and perseverance, knitted wallets, or, in particular, those woven from beads, turn out to be the most beautiful.

Decoration
There certainly can be no advisers on this issue. The only other thing that is appropriate is to list the various decoration options. These can be rhinestones, beads, embroidery, appliqués, beautiful buttons, ribbons, zippers and pockets and special, decorated material, and how to arrange it is up to the author to decide.

After all of the above, you can safely move on to the main part.


Master class: How to make a wallet with your own hands
Required material and tools:
- Rivets
- Hole puncher for rivets
- Scissors
- Paper
Sequencing:

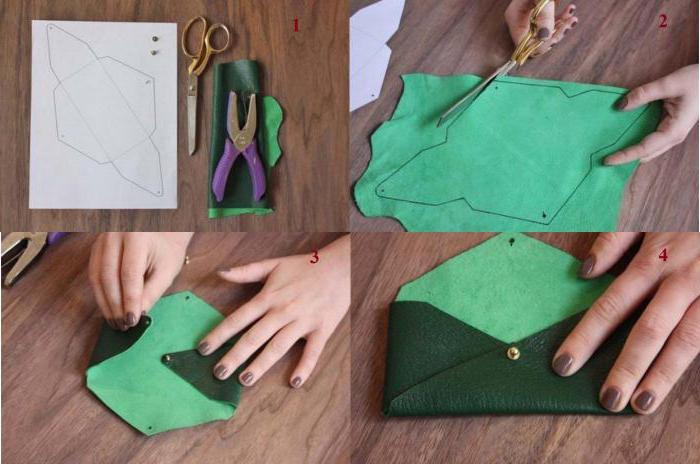
A template is made from a sheet of paper. It looks as simple as possible and is a cross with a thickened, vertical part. The height of the vertical and width of the horizontal lines of such a template should be equal so that when they are added, you get an even rectangle without protruding parts. Using the template, a similar blank for the future leather wallet is cut out.


The resulting product is a future wallet. All that remains is to fasten the four extreme corners with rivets so as to capture all the layers of leather, make a couple of rivets along the edges of the inner pockets - their more precise location will not be difficult to determine on the finished model - glue or stitch all the contours and, if desired, decorate the finished product to taste. The wallet is ready. You can start filling it out.


To decide which model is most suitable, you can look at photos of homemade wallets and choose from ready-made options. And no matter what riches this handmade wallet contains, it will always be full of those very warm feelings that the owner – and most importantly, its author – put into it.


Photos of DIY wallets


The art of origami is used to make various crafts. They can be practical or perform only decorative functions. Paper origami “Wallet” can be useful for a child in life. It is suitable for beginners, including preschoolers who are just getting acquainted with the magical world of origami. You can make an envelope for money out of paper in 5 minutes. It is useful for role-playing, board and other types of games.
Children over 5 years old need to play role-playing games to fully develop. An affordable and fun option is to set up a home store and shop there. To do this, you need to make a counter, a cash register, and product mockups. Setting up a home store is a lot of fun.
They do for him:
- counter and cash register made of boxes;
- product models made of plasticine or polymer clay;
- money;
- wallets;
- paper bags.
Many people forget to make wallets or money, which makes the game less realistic. A preschooler should be taught to count money, because this skill will be useful to him in 2-3 years. Make all the devices for the game together with your child, so that it will be more interesting for him to interact with them in the future. The counter can perform double functions - during the game you can put goods on it, and after completing the lesson, you can store all the little things inside it.
Now you can buy any toys, but joint creativity brings families together. Psychologists recommend spending time making crafts every weekend. These can be practical things, panels or other interior decorations. After 7 years of age, children begin to be fascinated by board games. Make a paper wallet for them, since the kit often contains cards that are easy to lose if stored scattered. If there are a lot of little things for games, then use the origami technique to create a separate storage unit for each type.

Girls should learn how to make wallets so they can make elegant clutches for their dolls. Such bags are useful for all types of dolls: paper, Barbie, Monster High, simple baby dolls of different sizes. To get a small clutch, use a candy wrapper as a base. This will allow you to make a handbag of an unusual color.
Scheme for making crafts
Once you have found a practical use for this craft, it is worth considering how to make an origami paper wallet. If you know how to fold simple airplanes, then the diagram of this craft will not seem complicated to you.
Before you start, prepare a rectangle of thick paper intended for printing, scrapbooking, and gift wrapping.
Beautiful wallets are made from textured sheets.
It will help you make an origami wallet from paper. The work diagram is:
- Mark a horizontal fold on the sheet, fold it in half, and unfold it. Repeat the same vertically. Place the sheet with the long side facing you.
- Fold all corners of the rectangle to the fold line.
- You are left with 2 sharp corners on each side of the sheet. Bend them towards the center line.
- Then bend the flaps on each side towards the central vertical line.
- Turn the workpiece over.
- Bend the top and bottom edges of the sheet to the horizontal center line.
- Fold the future wallet in half vertically.
- It will take on the shape of the real thing, all that remains is to pull out one of the corners so that it covers the compartments of the wallet.

If desired, the model can be easily modified - a clasp is made. It will require two thin vinyl records or regular Velcro. Glue one part of the fastener to the valve, and the second to the main part of the model.
For the first craft, give your child a simple sheet from a notebook. After he learns the lesson on folding wallets, change the material and dimensions of the craft. Origami is based on small candy wrappers or sheets cut to the size of money. If you want to make a craft that can easily accommodate Russian banknotes, then you need to make the width of the rectangle equal to twice the length of the banknote. The length of the sheet is equal to 6 times the width of the bill.
Purse: how is it different from an origami wallet?
Another type of wallet is a purse. It is made using a different technique. To make it you need to have:
- a sheet of cardboard or thick paper;
- scissors;
- scotch;
- glue.
The technique for making this craft cannot be called traditional origami, but it is close to it.

Make a wallet according to step-by-step instructions:
- Take a thick sheet of A4 format.
- Fold it in half lengthwise. Iron the fold line well: after you unfold the sheet, it should be clearly visible.
- Unfold the sheet, fold it vertically, and bend it in half. Iron the lines, straighten the workpiece.
- The sheet is lined with marked folds into 8 equal rectangles. Take scissors, use them to make a slit between the two shapes on the left, and between the next ones make a diamond-shaped slit.
- For rectangles 1 and 3, cut the edges and fold them up.
- Cover the vertical cut line with thin tape.
- Fold the right and left edges of the sheet towards the center line.
- Fold the workpiece in half.
- Use the protruding protrusions to secure the edges of the wallet. Secure them with glue so that the money does not spill out of the toy.
The resulting wallet is suitable for storing analogue bank cards, cardboard change and toy money. It is more difficult to make; it is best to do it with younger students. The same craft can be made easier by cutting out a wallet: prepare several rectangles from cardboard or thick paper, fold the large one in half, and glue small pockets to it (for cards). Make a flap with Velcro or thin magnets.

How to make money?
For a home “shop” you need to make money. You can get them in different ways:
- purchase ready-made dummies (sold in large packs, used for wedding celebrations);
- draw on a lined sheet of paper and cut;
- create a layout on a computer and print it out;
- scan banknotes and reproduce them.
You should not use real banknotes as a basis: if a child confuses them with real ones and goes to the store, problems will arise with law enforcement agencies. To make counting easier, borrow only existing coin denominations and banknote denominations.
It’s best to use your imagination and create your own banknotes, and come up with the name of the currency with your child. You can draw images of your favorite cartoon or fairy-tale characters on banknotes. Use characters from the same film series.
For kids, make themed “money” with the characters from “Paw Patrol” or “Masha and the Bear”. Older children can be encouraged to place characters from the Marvel universe or Pirates of the Caribbean on the new currency. The easiest way is to place images on banknotes using computer programs, and then print the finished banknotes on a color printer.
If you do not have the skills to work with graphic programs or you want to spend more time preparing for games, make banknotes for your wallet with your child with your own hands - cut the sheets into equal rectangles and color them. You will need paints, pencils or markers. Don't forget to put the denomination on each banknote.
Surely small bags for money were invented a long time ago, almost immediately after the invention of money itself. The purses of antiquity corresponded to the contents: for metal coins, a pouch was needed rather than a modern purse. It is clear that with the introduction of paper banknotes, treasury notes and plastic cards, the appearance of “handbags” for carrying and storing money has changed dramatically.
A classic wallet now is a bag slightly larger than a banknote with several pockets. Men's models are most often folded due to the desire for minimalism, but women's models are presented in all versions. There are many models on sale of varying quality, but often not the best. Therefore, the question arises: how to make a leather wallet with your own hands so that it is durable and emphasizes your individuality?
Leather for wallets
First we need a suitable piece of material. Sizes depend on the model and future sizes of the product. To make your own wallet for a man, it is better to choose cow leather, which has serious rigidity even after tanning and holds its shape well for many years. It is better to make internal pockets from cow or calf leather, but for the women's wallet model you can choose softer leather.
It is better to choose the thickness of the material yourself. It is important to choose vegetable tanned leather - this type of leather makes the material more elastic. A significant disadvantage of this type of dressing is the fear of moisture, under the influence of which the skin swells and, after drying, shrinks and becomes brittle. This is critical for shoes, but not so significant for a wallet. In contrast, vegetable tanned leather is more easily processed by embossing, pyrrhography and even carving. More expensive leather options are not suitable for beginners due to their price and processing requirements.
If necessary, you need to paint the material according to the instructions indicated on the dye packaging, and only after that start cutting out the workpiece. This will allow you to get the desired color on the surface of the entire product, much better than painting a cut out shape.
Wallet without threads
Leather as a material for accessories such as small handbags is traditional. There are some processing difficulties. The wallet requires durable, durable and fairly thick material, which not every sewing machine can sew. It is not always possible to create even stitches with your hands, so first we will consider the option of how to make a leather wallet for women without using threads. Let's look at the photo.
The picture shows it on just one metal fastener. This model is suitable for storing cards, bills and small papers, and by making a larger model, you can get a small cosmetic bag.
with card slots
If you feel strong enough and patient enough, you can try to sew a classic model of a men's folding wallet with one compartment for bills and 6 pockets for cards.

This model of 4 leather parts is called "Milan Collector". It is highly durable and popular among men. Having made such a wallet, you can use it almost all your life. The question of how to make a wallet that will serve you for a lifetime is solved by the simplicity of the design and the replaceability of parts.
Material and tools
To make such a wallet, you will need fairly rough, durable leather so that the wallet can maintain its shape for a long time. For internal parts, you can take the material a little thinner, but not too much, otherwise the seams will be uneven, which will lead to additional wear on these parts. To work you will need the following tools:
Scissors - choose a tool that is durable and convenient.
A sharp knife - a construction knife or a durable one with replaceable blades will do.
A metal ruler or just a straight plate for cutting with a knife.
Awl or special piercing tools.
Needles - select the thickness of the thread, but remember that the holes for the needle should be slightly smaller in diameter so that the needle moves tightly in the skin and does not dangle.
You should take nylon threads - they have sufficient strength and melt at the ends to prevent the seam from unraveling. Choose the color yourself, based on personal preferences, but it is worth remembering that a thread that is a slightly darker shade than the leather will highlight the color of the material.
Manufacturing nuances

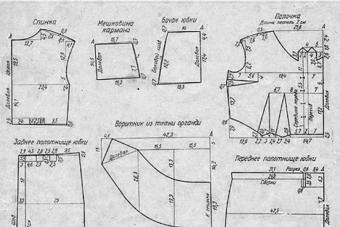
The most difficult thing in making this model is, perhaps, piercing the holes for the threads; here you need to be careful. You should align the parts to be sewn when piercing or measure the holes exactly using a ruler. The seam will be visible from the outside as an additional finishing element, so the distance between the holes must be maintained as accurately as possible. The end threads will need to be pulled out from the inside, tied and melted with a lighter. The pictures show templates with hole locations - you can simply print them on paper and transfer them to the material.

If you are wondering how to make a wallet for yourself or as a gift for a friend, approach the work with care and patience, and you will definitely succeed.
At all times, children were interested in creating interesting paper crafts. Older children can be taught a technique such as origami - they can fold interesting animals or some useful thing from a sheet of paper. From this article you will learn about several ways to make an origami-style paper wallet.
Method 1
For further work you will need only one sheet of colored paper.
Important! To make the craft look more original and neat, many people use textured paper rather than ordinary colored paper.
To make an interesting wallet, you need to follow this procedure:
- Take the prepared leaf, fold it in half and unfold it back.
- Fold the corners on both sides.
- Bend the “nose” of the resulting sharp corners.
- Fold the edges of the product in half again.
- Turn over the paper structure.
- Fold over the edges at the top and bottom.
- Fold the wallet in half - you will get two pockets, inside of which there will be triangles.
- Pull one triangle out - it will act as a wallet flap.
The craft is ready! As you noticed, such a wallet is made quite quickly, regardless of whether it is folded by an adult or a child.
Method 2
Now you can consider how to make a coin purse from a cardboard juice box or some dairy product. For this purpose, you need to stock up on just a few materials for work:
- Box made of thick cardboard.
Important! A prerequisite is that the box must have a screw-on lid.
- Sharp scissors.
- Pencil and ruler.
- Template to print.
In order to make such an accessory together with your child, you must follow the following procedure:
- The first step is to thoroughly wash and dry the cardboard box.
- On the parts of the box that are located at the top and bottom, carefully pry up and peel off the bent corners of the box using scissors.
- Straighten the folds on the bag.
- We cut off the strips along which the cardboard box was glued at the top and bottom.
- Now, to make your own paper wallet without glue, you must position the cardboard bag so that its lid is in the middle.
- Cut the box lengthwise along the side opposite the cork.
- We apply the prepared template to the inside of the bag and cut it.
- Now, without removing the template, we trace the fold lines, using a simple pencil - you need to press hard on it. It's better to use a ruler here.
- We bend the workpiece along vertical as well as horizontal lines.
- We bend the side parts of the workpiece.
Important! To make this easier, first bend the product along diagonal lines, and after that, fold the resulting corners in half.
- Let's open the lid of the former box and fold the almost finished wallet. Now you need to use a simple pencil to mark the resulting hole on the top and sides.
- We complete the missing parts of the circle and cut them out.
The children's coin purse is ready! You can decorate the craft in any way - with paints, paper flowers or even small beads.
Method 3
Let's try to make a small wallet for coins with your child using just paper and a ruler.
So, in order to make a paper wallet with your own hands, you must follow the following procedure:
- Cut out an even square from colored paper. If the sheet is not double-sided, turn it over with the light side up.
- Fold it in half towards the top.
- Measure exactly 5 cm on both sides using a ruler, bend and straighten the workpiece along these lines.
- Unfold on both sides so that two triangles are formed at the bottom, superimposed on each other. The triangle on the left should be on top.
- Turn the workpiece over.
- Fold both sides upward.
- Fold the corner at the top left.
- The same part must be completely bent downwards, and then the corner must be tucked in such a way that the structure cannot open.
- If you did everything as needed, then you will end up with a blank that looks like an envelope, but with a rectangular top.
- Turn over and repeat the fold of the corner of the product.
The paper coin wallet is ready!
Decorating the product
So, we figured out how to make a money wallet out of paper, but how to decorate it? Decorative elements add individuality and uniqueness to any product, regardless of what it is made of.
Decorative decorations for origami can be:
- Any coloring matter.
- Personalized Designs – You can add an interesting design to your wallet.
- Colored tape.
- Rhinestones.
- All kinds of stickers and decals.
- Glitter is especially important for little fashionistas.