Create beautiful and original products can be made from almost any material. The main thing for this is the desire to create beauty with your own hands.
Ordinary plastic spoons are perfect for home crafts. From standard and unremarkable items disposable tableware You can make bright, interesting, creative compositions.

This exciting activity will appeal to both adults and children.
What can be made from spoons
We invite everyone who wants to please themselves and their loved ones with the results of their creativity to the “Crafts from Spoons” master class.

You will see step by step the entire process of forming crafts from plastic spoons.

Tulips
In order to make a charming bouquet of tulips, we will need:
- spoons (5 pieces for each flower);
- colored corrugated paper;
- glue with a brush;
- scissors;
- green electrical tape.

Cut red paper squares. We wrap spoons in each square and seal it.

Then we collect the tulip. To do this, we fasten 2 spoons, add 3 more to them and fix the resulting flower with electrical tape. We cut out the leaves from green paper, attach them to the stem and tie them with ribbon.

We make a bouquet and put it in a beautiful vase.

Water lily
To create a plastic water lily you need to prepare:
- spoons of different sizes,
- glue gun;
- regular glue;
- paints;
- scissors;
- green plastic bottle.
After cutting off the handles of the spoons, attach the future petals with a glue gun. You should now have an inner layer of petals.

Make the outer layer of the flower in the same way. Cut a strip measuring 12x3 cm from the bottle and make a fringe along one of its edges. Roll the strip and secure it with glue.

Dye the fringe in yellow and let it dry.
Make leaves from the bottle as shown in the photo.

Attach the dried strip to the inside of the petals - this will be the center of the flower. The magnificent snow-white water lily is ready!

Garland of flowers
A bright flower garland will look very impressive, for the manufacture of which you will need:
- 18 multi-colored spoons;
- scissors;
- glue;
- thick thread;
- dye;
- pom-poms;
- thick cardboard.

Cut out 3 triangles of the same size from cardboard and color them.
Note!


Cut off the handles of the spoons. Mark the middle in the triangles and stick petals around it (6 pieces per flower). Place a pompom in the center of each flower.

Make 2 holes in each triangle and thread a thread through them, thus connecting the flowers into a garland.

Flower vase
Making a cute flower vase will require you to have:
- spoon;
- tin cans;
- scissors;
- glue;
- paints.
Paint the jar your favorite color. Cut off the handles from the spoons. Paint the rounded parts of the spoons in the desired colors.

Glue the spoons to the jar, placing them in even rows.

Note!

ladybugs
You can make a cute ladybug from spoons using:
- spoon;
- glue;
- large voluminous button;
- paints;
- scissors

After cutting off the handles of the spoons, paint the oval part of each of them. Glue the wings together. Attach a button head on top.

Candlestick
To create a sterile original candlestick All you need is the spoons and glue.

By gluing the spoons together as shown in the photo and attaching a candle to the top of the structure, you will get a stylish decorative element that will brighten up any holiday.

Decorative frame
You can use disposable spoons to create original frames decorating various interior items.

Note!

For this you will need:
- spoons in large quantities;
- scissors;
- glue;
- polystyrene foam or thick cardboard;
- a watch, a small round mirror, a photograph or another item that is valuable to you.

After measuring the diameter of the desired object, cut out a circle of the appropriate size in cardboard or foam plastic.

Place a watch, photo or mirror in the resulting frame and secure it. Cut off the handles of the spoons. Glue the rounded parts of the spoons to the frame in rows in a circle, from the edge to the center.

Color the finished product of your creativity the way you want.
Christmas tree
Among crafts made from disposable spoons, picturesque Christmas trees are very popular, for the manufacture of which you will need:
- paper cone;
- glue;
- scissors;
- dye.

As usual, cut the spoons into 2 parts;
Glue the oval part of the spoons to the cone in a checkerboard pattern.

We paint the resulting Christmas tree any color or leave it white and admire our creation.

Maracas (musical instrument)
Creating this unusual instrument will take you very little time, but is guaranteed to delight your children.

Prepare the following materials for this:
- 2 spoons;
- plastic egg;
- scotch;

Place a small amount of rice into the egg and close.
Press the sides of the egg with spoons.

Cover the resulting model with tape.

Pumpkin
To make big spoons bright pumpkin, you need to prepare:
- yellow or orange spoons in large quantities;
- foam ball.

Cut the handles off the spoons.
Attach the rounded part of the spoons to the ball in a checkerboard pattern from bottom to top.

The top of the resulting pumpkin can be decorated with a small branch.

The process of creating all the described compositions is reflected in the photo of crafts made from spoons. We talked about the most popular and beautiful products from this material and shared secrets on how to make crafts from spoons with your own hands.

We hope that our master class was useful to you and gave you aesthetic pleasure.

Photos of crafts made from spoons

They make everything from disposable tableware. The simplest plastic spoons make really interesting crafts. The flowers look very beautiful, ready product almost indistinguishable from porcelain.
There are, of course, a lot of master classes on the Internet on roses made from plastic spoons; I tried to explain everything clearly, once again adding my own twist. 🙂
For this master class, I made a red rose with leaves from disposable spoons. The process of making a rose is not complicated, but it requires a lot of attention, patience and accuracy.
To work you will need:
- 24-26 plastic spoons,
- candle,
- matches or lighter
- thin wire,
- electrical tape, green tape or corrugated paper,
- a can of red paint,
- green acrylic paint,
- brush,
- scissors,
- round nose pliers (optional),
- hot glue gun,
- knife, thick needle or thin scissors.
Light a candle and begin...
Step 1: Rose petals from disposable spoons.
Petals for the bud:
Keep the spoon at some distance from the flame and do not allow the plastic to turn black.
First, warm up one side edge of the spoon and twist it a little.


And then we do the same with the other edge.

Now we need to heat the tip and slightly bend it in the opposite direction.


We make the second petal for the bud in the same way, only we bend the edges of the spoon a little less. 
Petals of the second row...
We bend the edges even less. We heat the edge of the spoon and symmetrically from the center, bend the spoon from one and the other edge into reverse side, twisting a little.


This is how it should turn out...


We need 2-4 of these petals.
On all petals, except the first, we cut off the handles. Heat the joint and cut it off with scissors.


Large petals:
Warm the spoon a little inside to straighten it slightly.


Turn over and heat the tip of the spoon over the candle. When the tip begins to deform, quickly use scissors or pliers to twist the tip of the spoon on both sides symmetrically from the center in the opposite direction, giving the shape of a rose petal.

This is the kind of petal we should get...
Front side…

And the reverse...

We need 10-11 such petals.
Forming a rose flower.

We take a spoon with a handle, apply glue to the petal and firmly press the other petal to it. The result was a bud on a stem.

We carefully glue the petals of the second row around the bud. And then all the other petals. Apply hot glue to each petal. We go in a circle, adding one petal after another.
It turns out this white rose.
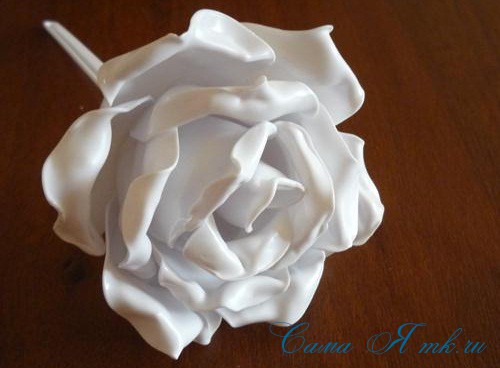

This is the “butt” of the flower...

It's not very pretty, but we'll fix it. 🙂
Step 2: Leaves and sepals for roses from plastic spoons.
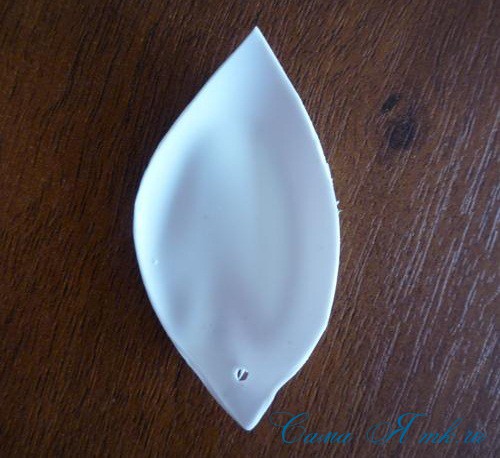
We warm up the spoon from the inside so that it begins to straighten a little and cut out the leaf with ordinary scissors.


Now heat the tip a little and make a hole for the wire with something sharp.
Like this…
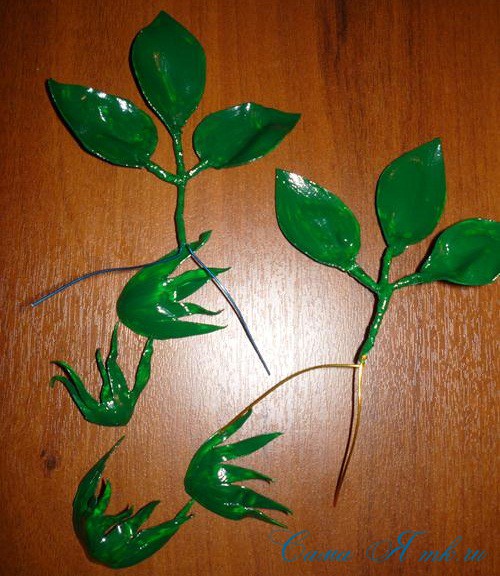
For the rose I made 6 of these leaves. We connect them 3 pieces per thin wire.

To make sepals for our rose, we also heat the spoon from the inside and cut it out with scissors.

We will hide the wire with electrical tape, tape or corrugated paper.

Step 3: Coloring.
It is more convenient to paint the flower with spray paint. If you only have acrylic paint, then first paint the petals, and then assemble the rose together.


We color the leaves and sepals acrylic paint Green colour.
Step 4: Assembling the flower.
When the paint is completely dry, fix the sepals with hot glue. We secure the leaves with the remaining tails of wire.
Yes... To make the stem long, we will attach the cut off handles using hot glue.


For strength and to make the stem even and neat, we wrap it with green electrical tape.
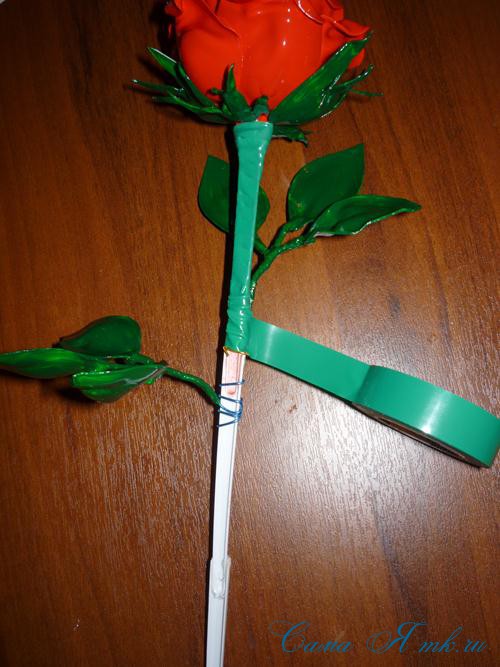

And paint it to match the leaves.
This is the rose we got!

And from all angles...


Flowers made from plastic spoons are of course slightly inferior in beauty to real ones, but they have an undoubted advantage: they will delight you for many, many years.
It is not necessary to make a flower on a stem. Imagine! Roses can be used as hair decorations by attaching them to a headband, hairpin, or the like. Topiaries with roses made from plastic spoons look interesting, and the color of the flowers can be any, it all depends on your desire and imagination!!!
I was glad to help!
Making a beautiful rose
from plastic spoons
Master Class.
The rose can be used as a pendant, brooch or gift packaging decoration
The rose consists of 17 spoons: two form the petals in the center, 5 around the central petals, 10 for the outer petals.
Light a candle. Use pliers to grab the spoon by the cut handle. Soften the inside of the spoon over the flame, and then the outside. Let the plastic cool slightly. Pull the end of the still warm, soft and flexible spoon and bend it back with your fingertips. Repeat this process for all petals.

Collecting a rose:
Start with outer circle, which consists of 10 petals. Take two petals and melt the ends of the handles, connect them together. Use pliers for this, as the melted plastic is incredibly hot. As a result, you will get five paired petals. Connect them together in the same way. Also connect the middle five and inner two petals in pairs.
The next stage is to form a rose. Glue five, then two, onto the prepared outer 10 petals. You can glue the petals using hot glue or connect them by heating.

When the rose is assembled, melt the middle of the underside of the rose and make it concave slightly inward. Use a piece of melted plastic to glue the pin.
It's very simple, but very beautiful decoration, which you can easily make yourself from scrap materials. Such a rose will not take much time, but it will look very elegant as a pendant on a long chain, or as a brooch to decorate any dress. In addition, no physical effort is required when preparing it. Just attentiveness and patience.
Necessary materials:
17 plastic spoons (you can use white or any other color);
Long thin pliers with a round nose (needle-nose pliers);
Thick paraffin candle;
Lighter or matches;
Regular pin;
Scissors;
Thin black marker or pencil;
Permanent glue.
Manufacturing process
1) Take 17 plastic spoons and cut off their handles, as shown in the figure, after marking the cut line with a marker or pencil. We will need 10 pieces for the outer petals, so they should have the longest handle ends, 5 pieces for the middle petals with a slightly shorter handle, and 2 pieces for the inner petals with the shortest handles.

2) Take a thick paraffin lamp and light it. Wait a little until the candle warms up a little and the paraffin begins to melt. Take needle-nose pliers and use it to hold the spoon with the longest cut handle. Remember not to keep it too close to the fire, otherwise the plastic will start to turn black, and we don't want that. Melt the base of the spoon a little until it begins to become limp and deformed. Let the spoon cool slightly, but not completely. While it is still warm and soft, you can make it into a petal shape. To do this, carefully pull the ends with your fingers, bending them. To make the petal cool faster, you can blow on it. Then repeat this step for the remaining 16 spoons.
Be aware that when you soften the spoons using heat, the plastic may give off a nasty and slightly pungent odor. Therefore, it will be better if you open the window first.

3) Now let's start forming the rose itself. First, take 10 spoons with the longest handles. Heat the handle of each of them on the fire one by one, and then attach them to each other, carefully smoothing them out until they stick together securely. This is best done using the nose of a pair of needle nose pliers as the plastic will be very, very hot during this period. Do the same for the set of five and two petals. Once everything is ready, you will have three parts of the rose. Be patient as this process may take a long time.

Glue all the pieces together with permanent glue. If there is none, then this can be achieved again by melting the plastic. You need to form a rose like this: glue a part of five petals to a part of ten, and a part of two petals to a part of five.
Now that your rose is almost completely done, carefully melt the bottom and flatten it. This can be done by gently pressing onto any flat surface. For example, to a saucer. Once you have done this, again melt the base of the rose slightly in the middle and press a pin into it - the part that does not open. To secure the pin, it will be enough to just squeeze the edges of the still soft plastic well, or drop molten plastic onto it. Afterwards, let the entire structure cool.
To make roses, use plastic spoons in any color or paint them after making. When you get started, don't forget to have everything ready necessary tools and materials: 17 plastic spoons, a pin, pliers, a candle, hot glue, scissors, gloves.
The size of the spoons will depend on the product: whether it is a brooch, pendant or packaging decoration. The rose consists of 17 spoons: two form the petals in the center, 5 around the central petals, 10 for the outer petals. Use spoon scissors to cut off the handles.
Light a candle. Use pliers to grab the spoon by the cut handle. Try not to hold the spoon too close to the flame, as this will darken the plastic. Soften the inside of the spoon over the flame, and then the outside. Let the plastic cool slightly. Pull the end of the still warm, soft and flexible spoon and bend it back with your fingertips. Repeat this process for all 17 petals.

Now let's move on to the process of assembling the petals. Start with the outer circle, which consists of 10 petals. B Take two petals and melt the ends of the handles, connect them together. Use pliers for this, as the melted plastic is incredibly hot. As a result, you will get five paired petals. Connect them together in the same way. Also connect the middle five and inner two petals in pairs.

The next stage is to form a rose. Glue five, then two, onto the prepared outer 10 petals. You can glue the petals using hot glue or connect them by heating.
When the rose is assembled, melt the middle of the underside of the rose and make it concave slightly inward. Use a piece of melted plastic to glue the pin.


