![]()
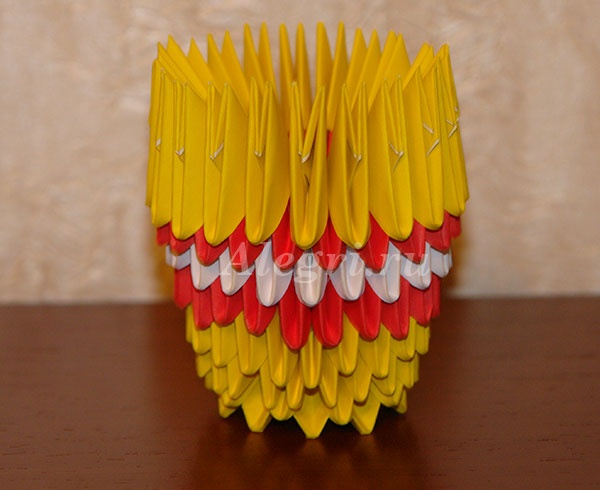
In general, here is the description found on the forum dedicated to modular origami at nanya.ru. Judging by the responses of those to whom I sent it (with my comments), everything is pretty clear. The image of the original chicken could not be inserted, so as an illustration - mine.
"CHICK:
0 row-12 (triangles 1.5 * 1.5)
1 row-12
2-7 rows-12 + 4
8 row - 16 (vice versa, like 0 row)
9-14 rows-16
15 row-8 (triangles 1 * 1)
Wing.
1 row-3
2 row-2
3 row-3
4 row-2
Bottom shell.
1-4 rows-14 (triangles 1.5 * 1.5)
5-10 rows-14 + 7.
Upper shell.
1-2 rows-8 (triangles 1.5 * 1.5)
3-10 rows-16.
Triangles are arbitrarily removed from the finished shells (at the discretion of the doer). "
What changes I made. The modules were made from 1/32 A4 sheet, therefore, in order to get a neat bottom after turning out, it took 16 modules at once, I did not add anything anywhere. The arrangement of the modules is standard. What the author calls next "0" - we put the modules on the short side, the rest - on the long side, the transition from the body to the head - again on the short side. I did the wings a little differently. There are 6 modules in total: 3-2-1. The first row - we put the modules on the long side, the 2nd and 3rd - on the short side. The modules of the 1st wing row are inserted between the modules of the last row of the torso. Hold without glue.
In the shells, all modules are placed on the back side and nothing turns out anywhere. As the shell grows, it takes on a glassy shape itself. It is very flexible, so you can change the shape a little as you wish. The biggest problems were with the lower shell. As a result, I made it on the basis of 20 modules, in the 3rd row I added another 10 modules, in total the shell turned out to be 8 rows. In the 7th and 8th rows I removed the modules under the wings. The shell is not too stable. Again, we bend and bend it a little with our hands, trying to find a variant of the most stable bottom. The craft is in my bookcase; before donating, I plan to shove a piece of plasticine into the center of the lower shell for stability. The chicken stands from the inside of the shell 3m from the top of the ring of modules, I pressed it a little there.
In general, the process is creative, it depends on the quality of the paper, and on the individual characteristics of the module attachments, and on imagination ...
How to make paper chicken and chicken with your own hands
Hen and chicken. Master Class
We will tell you how to make a chicken and a chicken from modules.
This craft can be made by children over 6 years old. This craft is simple and good for those who are just getting started with the art of origami.
Such a craft can be done for the Easter holiday to decorate the Easter table. You can make it in kindergarten and decorate the educational corner and the ecological corner with it.
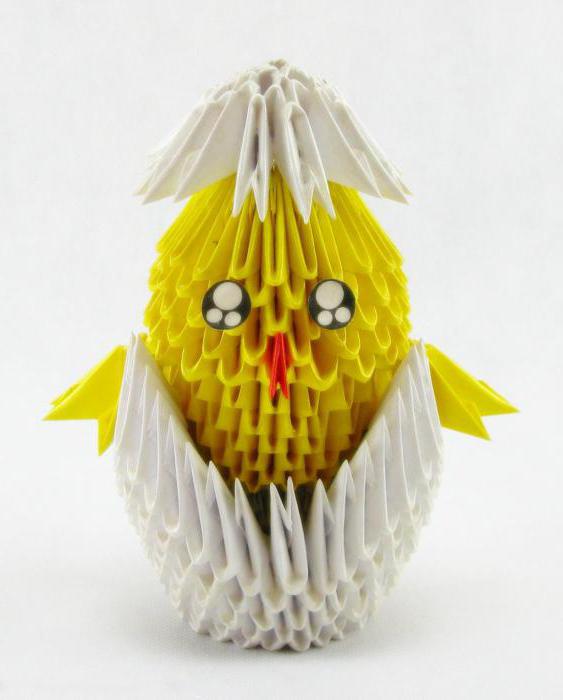
How to make such a cute chicken mom out of modules from this master class.
.jpg)
We will dwell in detail on the manufacture of chicken modules
DIY paper chicken. Manufacturing
We will use three paper colors to make the chicken: blue, white, yellow, and red. The size of one module in our case is 7.5 by 5 cm. (Modules can be made in other sizes and colors)
Collect red, white and yellow modules. You will find diagrams for assembling modules .
.jpg)
Step-by-step process of making a chicken from modules
1. Take 10 yellow modules for the first and second row and connect them in Method 2 ( see Securing Modules), closing in a circle.
.jpg)
.jpg)
3. In the fourth row, put on the 20 yellow modules.
.jpg)
4. In the fifth - 20 red modules.
.jpg)
5. In the sixth - 20 white modules.
.jpg)
6. Then put on the 20 red modules.
.jpg)
7. In the eighth row, put the 20 yellow modules back on.
8. In the next row, put on 10 yellow modules, skipping two corners of the modules of the previous row.

9. The tenth row should also have 10 yellow modules. But each of them is put on already on 4 corners of the modules of the two previous rows.

10. In the last row, put on 10 yellow modules (see photo).
.jpg)
11. Make a tuft of chicken out of yellow paper. To do this, cut the paper to the middle across into strips, use a pencil to twist the strips in different directions. Roll the uncut piece of paper into a tube and insert it from above into the chicken.
.jpg)
12. Glue the eyes to the chicken, one row below the eyes, insert the beak - a red small module.
The chicken is ready.
.jpg)
Well, here's our couple together
.jpg)
.jpg)

Hen - hen
Helps children:
Wants chickens
We were all right!
Yellow lumps
Happy kvochka.
Everyone follows mom
Worms are found!
Not so long ago, the origami technique gained popularity in many countries and truly turned into a world art, although the roots of this art go deep into ancient China, and this knowledge was available to few, only to representatives of the upper classes. In the middle of the twentieth century, technology began to spread throughout the world. Various varieties began to appear: simple origami, modular origami, pattern folding, wet origami. Little by little, origami even began to be introduced into kindergartens and schools, since scientists have proven that this art form contributes to the development of fine motor skills, concentration and perseverance in children. And if you want to instill these qualities in your child, then invite him to make a modular origami chicken in shell together.
But before we get started, let's define what modular origami is and how it differs from the classic method. Classic origami consists of using a single sheet of paper, which is folded into original figures without the help of scissors and glue. Modular origami consists of several separately folded parts, which are subsequently inserted into each other without the help of glue.
Triangular modules
So what do we need to create a cute chicken in shell? Let's take a look at a master class and a detailed assembly diagram.
Of the necessary materials, we only need paper of three colors: white, yellow and red. Our chicken consists of triangular modules.
You can fold triangular modules of various sizes, it all depends on the volume and height of your craft. All modules in one craft must be the same size. How to properly divide an A4 sheet is shown in the photo.


Having decided on the size and cutting out the necessary rectangles, we proceed to the assembly of triangular modules. Detailed instructions are shown in the photo.
Related article: Blue color in the interior (photo ideas) - what combinations can be

It is necessary to make 221 yellow modules, 304 white and 1 red module, which will act as the beak of our chicken.
Assembling the bird
The first row is assembled from triangular modules located with the short side outward, all subsequent rows of modules are located with the long side.

We begin to collect the chicken, for this we collect three rows of 16 modules of yellow color, not forgetting that the first row is located on the short side.

We turn our craft out so that the modules turn out to be the long side to us, and add 4 more rows of 16 modules to them.


In the eighth row, place another 16 modules with the short side. We add 16 modules to the ninth row, but we already have the long side.

And in the same way we collect four more rows. At this stage, we already have the body of our chicken, now we start assembling the wings.


To assemble one wing, we need 6 yellow modules. We arrange these modules according to the 3-2-1 scheme. The last module should be on the short side.


We do the second wing in the same way. We attach our wings to the chicken body on the sides.


Insert the red module in the center.

Now we start assembling our "house" for the chicken - to the shell. Let's start at the bottom. We collect the first four rows of 14 white modules.
This time I propose to do it nice origami chicken from modulesusing a simple instruction. It, as always, consists of paper triangles. See how they stack up.
A total of 214 parts are required. Choose the size of the leaves based on the ratio of 3: 2. I have rectangles 6x4 cm.
Do not use thin paper that tears easily. Thick as cardboard will not work either. The optimum density is 80-100 g / sq. m.
In addition to the yellow modules, make six red and one half the size.
Do not forget to glue the modules during assembly if you plan to give the chicken to the child. If he just decorates the interior or becomes part of some composition, then you can not glue all the details. It is enough to use glue only for the wings, legs and tail.
Modular origami chicken
Before collecting the adorable yellow chicken, prepare the necessary materials and parts.
You will need:
- 207 yellow modules;
- 6 red triangles measuring 6x4 cm;
- 1 small red module (half of the sheet);
- colored paper for the eyes;
- a yellow rectangle of arbitrary size for making a hairstyle;
- pVA glue.
Step-by-step instructions for assembling a chicken
Start with a standard base described in detail. To do this, take 16 yellow modules and connect them to 16 more parts by inserting the long ends into the pockets of the others. Close the circle. It turned out to be two rows. One will go inside and not be seen.


Continue assembling 16 yellow triangles for 5 more rows. The modules of the new row are inserted into the pockets of the previous ones.


For the head, fold 4 more rows of 16 in the usual way. The final row consists of 10 triangles. Their tops fit snugly together to make the head round.


Attach the two wings to the modular chicken, remembering to glue them. They are assembled simply - insert one triangle into another.


Make paws from the red parts, three modules for each. Insert them from the bottom of the base. Attach the tail from the yellow triangle at the back. The chick can now stand confidently.
The model is almost complete. It remains only to visually arrange it. Do not spare your time and effort.
Give the chicken a hairstyle, "conjure" over the eyes, evenly insert the beak from the small red module into one of the available gaps.

The technology for making chicken is very similar, so you can also quickly and easily assemble it in black and white. I wish you good luck in your endeavors! Origami can be a good hobby for you, which will give you a lot of joy and amazing discoveries!
Modular origami is aimed at middle and young children. It is an additional education, a creative hobby and a method for developing fine motor skills. These paper souvenirs will be a great gift for parents and friends. Origami can decorate a corner with crafts or a shelf with indoor flowers. This article will show you how to make chicken.
Amazing origami art
Modular origami is the national Japanese art of folding various animals or paper figures. The art of this hobby is a mystery to all adults. This technology attracts children of all ages like a magnet. They are happy and curious to create incredible paper objects. Various images of animals, buildings, cars can be hidden in the folded sheet. In children's fantasy, these images come to life. They have mixed feelings of joy, childhood, satisfaction from hand-made crafts. To get modular origami chickens, the assembly includes several simple steps. In the first stage, it is necessary to prepare in advance special paper for making crafts.
Preparation for work
All children love small, fluffy yellowish chickens. Such creatures cause tenderness, tenderness and a desire to protect them from the outside world. Particularly joyful emotions occur in children whom their parents call "my little chicken." The modular origami chicken is a symbol of childhood, bright sun and summer. To make this simple craft, you will need:
- Cardboard or thick colored paper.
- Scissors.
- Stationery glue.
- Stand or computer disk.
- Ruler.
In order to get a modular origami chicken without any complications, the master class should not last more than 1 hour. Children definitely need a break. Otherwise, this process of making crafts can negatively affect the vision of children. The work area should be level and well lit. The best way to master the art of origami is on your desktop. The surface is preliminarily covered with oilcloth so as not to stain it with glue.
Manufacturing modules
Modules are small triangles. They are folded from cardboard or colored paper. To make a modular origami "Chickens", you need yellow paper. The aspect ratio of the sheet should be 1.5x1. Most often, such rectangles are folded from landscape A4. It is divided into 4 equal parts vertically and 4 equal parts horizontally. There should be 16 rectangles on one sheet. All sides are drawn with straight lines. Each rectangle should be approximately 74x53 mm. If the horizontal side is divided into 8 parts, and not 4, then the size of the rectangles will be 37x53 mm. It is allowed to add half a square. To do this, you need to use blocks for records.

- The rectangle folds in half.
- Another line is drawn in the middle and bent in half again.
- The workpiece turns upside down towards itself.
- The edges are bent towards the middle.
- Then the module is turned over.
- The edges are lifted up.
- The corners are folded over large triangles.
- Then they unbend.
- The triangles are folded along the marked lines.
- The edges go up.
- The workpiece is folded in half.
- A correctly formed module should have two small pockets and two corners.
To connect the modules to each other, they are inserted long and short sides. Depending on the scheme, different volumetric figures are obtained. Next, we will talk about making a voluminous chicken.
Assembling the chicken torso
To get the Chicken in Shell modular origami, the diagram includes 315 bright yellow modules and 7 red modules. Their size should be equal to 1/64 of the A4 landscape sheet. The first, second and third rows are assembled at the same time. This will require 66 modules of 22 for each row. In the first row, the modules are installed on the short side, and on the second, they are put on with the long side down. In the third row, the modules are also put on with the longest side down.

Then they should be closed in an even ring. The resulting circle is turned inside out so that the long side of the modules is directed outward. The 4th row also uses 22 modules. They fit with the long side out. To get a modular origami chicken, the diagram repeats the next 5, 6 and 7 rows in the same way. The body of the figurine is rounded.
Assembling the neck and head of the chicken
In order to make a neck, 22 modules are also needed. In row 8, they are worn with the short side out. They must be placed vertically. To design the head, 22 modules are needed with the long side out. The next 5 rows are worn in the same way. A total of 14 rows should be done. The head is rounded. On the 15th row, the number of modules is halved. They are put on every second lower module. Then they should be closed closer to the center. You should get the perfect modular chicken origami.
Origami decoration with wings and tail
Instead of a beak, a red module is glued. It is located in the middle of the chick's head created. To create a scallop, 6 modules are assembled into a column. They need to be slightly bent with an arc. The scallop is then gently glued onto the chicken's head. To do this, it is used To create a tail and two wings, 2 modules are glued together.

Then three more are glued on their upper side so that the middle module is in the middle. Then the created wings must be inserted between the body. They are carefully glued with glue. A tail is glued to the back of the figure.
Origami decoration with eyes and eyelashes
To completely create a modular chicken origami, you need to make black eyes. To do this, you need thick cardboard or colored paper. Two small pieces with a diameter of no more than 4 mm are cut out of the material. The rectangle is also cut out. Then it must be cut in such a way that the cilia are obtained. Eyes and eyelashes are glued to the chicken.
Black circles can be dripped with office glue, white paint, or you can glue more circles of a different color on them. This will make your eyes more lively. You should get a modular origami "Chicken in an Shell". It is also allowed to use purchased eyes for decoration. They are usually sold at sewing or stationery stores.
Decorating crafts with grass
Cut straight rectangles from green cardboard. Their size should not exceed 3x5 cm. Then one edge of the rectangles is cut into several even parts. It follows the fate that the edge cannot be reached by more than 5 mm. Then the cut rectangles are twisted with scissors. A sharp side is drawn along the edge. Small paper curls are produced. Then they can be glued to a board, thick cardboard or computer disk.

A chicken is glued to the center of the support. You can stick butterflies, flowers, dew on such grass. To create a modular origami "Chickens", the craft can be made several times. Then you get a whole family of unpretentious yellow chickens. And to create mom and dad, you just need to take modules of a slightly larger size. Then the crafts will be larger.
Making crafts with shells
To make a modular origami "Chicken in Shell", you need white paper. It folds into special modules. Then the 36 modules are stacked short side up. On the second row, 36 long modules are superimposed on them. It is necessary to carefully bend the resulting craft in a semicircle. The modules are fixed with office glue. After they are identically folded on rows 3-10. To create the effect of a broken shell, on the last row, the modules are put on every other. To get the perfect modular origami "Chicken in Shell", the scheme for creating the second part of the craft is identical.

To create a hat, one part is put on the bottom of the craft, the other on the chicken's head. But it is worth noting that in this case there is no need to make a scallop, since it will close with a shell.