Always a pleasure. And how nice to receive them! But the same problem always arises with this matter: how beautifully to pack a gift so that it is not embarrassing to present to the hero of the occasion? Of course, you can entrust this to specially trained people, but for such a service you sometimes have to lay out an amount that almost reaches the value of the gift itself. So go broke for long! Therefore, it is better to learn how to make gift wrapping yourself. Today you will learn how to make bows, only one look of which will create a festive mood. It does not take much time, since only 2 options are offered to your attention.
Option 1
Take a decorative plastic tape 5 cm wide. You can use both plain and with a pattern. From a thinner ribbon, you will also get a very nice bow.
You will also need a book, a notebook or a piece of thick cardboard. They will serve as the basis. The width of the future bow depends on the size of the base.
Take the edge of the tape and fasten it from one edge of the book.

Make a revolution around the base and return to the starting position. In total, you need to make 7-9 turns of tape.

After cut the tape and remove the workpiece from the base.

In the center of the resulting turns, make cuts as shown in the photo.

Tie this place with a short piece of tape. So all the turns will be securely locked.

Now carefully separate one turn of the tape, bring it to the side and twist around the axis once.

Do the same with the rest.

As a result of such manipulations, a gorgeous bow is obtained.

It remains only to dissolve the ends of the tape into thin strips, with which you bandaged the center of the workpiece.

To make the resulting stripes become wavy, twist them with scissor blades.

Here is the finished bow!

Option 2
Again, use a red plastic tape 5 cm wide.

Cut it into pieces of different lengths. Total need:
- 8 pieces of 15 cm;
- 4 pieces of 10 cm;
- 1 should be 5 cm.

Using a heat gun, glue each workpiece as shown in the photo. And fix the shortest strip in the shape of a cylinder.
A gift bow may not be the main thing, but absolutely everything is important in a good gift. And if the bow is not very beautiful or untidy, then the impression of the gift will immediately deteriorate. So, you need to learn how to make the most beautiful and original gift bows with your own hands!
Important: making a gift bow yourself is very simple. But it’s a little harder to choose the style that suits the overall design of the gift. Try to take into account and weigh everything at once, and see in your imagination what a wrapped gift will look like. The fabric, paper or tapes should match the texture and shade of the packaging material, and everything should be organic. Demonstrate a sense of taste and realize your design talents, and the gift will be the most beautiful!
Creative
A simple bow is commonplace. Let's see what unusual shapes you can come up with and do it yourself, so that the gift bow decorates the gift and makes it look simply irresistible!


Gentle
These are options for girls and women. Delicate, sophisticated and beautiful bows made of the most luxurious materials can decorate any packaging!


Fancy stuff
You can make a gift bow with your own hands not only from a ribbon, but also from many other, more unusual materials. This will add a twist to the entire package, and the design will be very unusual!


As you can see, there is a huge variety of unusual and beautifully decorated bow gift. Just choose the method that you like more, and do a little miracle to the joy of the birthday!
You know, I recently realized with full clarity - my articles are very similar to notes from sclerosis! This is a kind of diary where I write down all sorts of things that seemed to me useful and interesting. If necessary, it is possible to quickly find everything!
In the light of the past holidays, the issue of making decorative bows at home was very relevant.
Of course, you can go to the store and buy what you want for every taste and color, but where is the creative flight?
I like to add such cute touches to gifts as: hand-made packaging, bows,. This makes the gift more emotional and warm, or something.
And also, I can not help but boast of my results in the implementation of these workshops.
Option one
This is a very magnificent bow. It can be made from both paper and packaging and fabric tapes. With a different layout of the loops, either a ball or a flower is obtained.


And here is a video on how to make such a bow.
Needle bow
This bow can also be made from any kind of materials.
You can fasten with a stapler, double-sided tape, glue.
It is easier to attach to the gift with double-sided tape or glue.

Here is a detailed video instruction.
Bow - Star
This bow - Star I saw on the site of Julia "Sea of \u200b\u200bideas"

It is made of paper strips or packing tape. Attach to the gift with a double-sided tape or stapler. And you can use it just as a Christmas tree decoration.
Video master You will find the class on the website of Julia.
The fourth kind of bows

I still could not find the video instruction for it, so I have to resort to the drawing. The picture is enlarged when pressed.

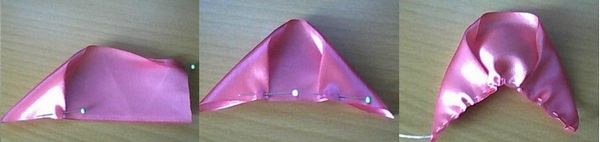
1. Cut two strips 60 cm long. The width of the first is 2 cm, the second is 5 mm.
2. Bend both strips in half.
3. We put a thin strip inside the thick one. We try to arrange a thin strip in the middle.
4. We fix two strips together with a stapler.
Further, through the indicated gap, we fasten the strips with the stapler so that the thin one remains free to move and can be pulled out.
5. Take the thin stripes with your right hand, and with your left hold the thick ones from the inside and pull. As a result, our blank begins to be folded into a bow. At the end of the tension we fix the bow by tying a knot on a thin ribbon.
Such a bow turns out to be beautiful from braid and packing tape.
Bow is an important element of gift wrapping. Voluminous and brilliant, of the correct form or randomly scattered, plain or multi-colored, like the tail of a peacock - it is he who gives the gift an original festive look. Experiments with color and shape, a combination of incompatible materials - ribbons and wire, organza and feathers gives an endless scope of imagination. To make a luxurious bow you need patience, dexterity and a trained eye. But the efforts spent are more than paid off by the smile and genuine delight of those whom you want to please with a gift. Let's try to make a terry bow out of a ribbon with our own hands - the most common version of holiday packaging.
Terry bow
Such a bow looks more voluminous if you take a hard ribbon for it. We turn it a few turns (the loop is equal to the diameter of the future bow). For an average workpiece, 8 turns is sufficient. The diameter of the bow should be slightly less than the area of \u200b\u200bthe cover of the gift box.

Classic bow
The classic bow is not subject to fashion and time and is appropriate in any design. The main thing is to do everything carefully so that the tape remains not wrinkled. Follow the steps in the photo. 
Strict bow
Fold the tape in half, fix the ends with glue to make a ring, level it with your fingers. For decoration, to close the junction, take a piece of tape (you can contrast in color). Arranging crosswise, we hide a seam under it and fix the ends with glue - the bow is ready. 
Tiered bow
For a tiered bow, you need to prepare three different ribbons (both in color and in width). Align the ends so that the widest tape is the longest, the middle one is a little shorter and the shortest one is narrow. Beautifully shape the ends of the workpieces. We put the ribbons one on top of the other and tie them in the center with a long narrow ribbon (the ends should be enough to fix the bow on the box). 
Two-color bow
This model is a variant of the previous one, so it’s not difficult to master it. We prepare two pieces of tape of the same length, but different in width and color. First we connect a wide ribbon into the ring and process the ends with glue. From above we impose a narrow one and do the same operation. We iron the resulting sandwich with your hand and fix it in the middle with a paper clip or glue. Finally we decorate the bow with a third long ribbon (as in the previous version), leave the ends of sufficient length to tie a bow on the gift. 
Bow "Dior"
This bow can be considered a variant of a strict, but complicated design. We prepare several strips of tape different in length. We turn each into a ring and fix the ends with glue. Now you need to align the loops in the center and fold them in height one on top of the other. While holding the “sandwich” of ribbons in the center, we fix the middle with a stapler or thermal gun. It remains a small piece of tape to mask the junction of the rings, securing the ends of the ribbon as in the photo. 
Bow flower
The basis of this man-made miracle flower is an ordinary ring that we wrap from a ribbon, holding it in the palm of your hand with your fingers. We repeat this operation at least 10 times, and if you want to make a large bow with your own hands, that's all 15. We determine the center of the bow and tie the middle with a narrow ribbon. We straighten successively wound rings, forming a flat bow. The ends of the dressing tape are fixed on the box. 
Bow chrysanthemum
It looks solid, but to make it easier than it seems. Prepare a stiff tape, scissors and wire. Reread the instructions to the terry bow - there is a lot in common. Until the tapes are fastened with wire. After this operation, the terry bow should be given the appearance of a chrysanthemum, for the manufacture of its curly petals on ribbons folded together we make even cuts. And we begin to gently straighten the petals, laying out in different directions. You need to start with the inner loops. 
St. George ribbon bow
This bow is a mark of distinction, special heroism, black and orange colors symbolize smoke and flame. By decree of Peter the Great, a ribbon was issued to the St. George Cross for special merits to the Fatherland received in battles. During the Great Patriotic War, a particularly distinguished military unit received the St. George ribbon and the title of guard. Today, many show patriotism, clinging to this tape where they come up - from pants and motorcycles to a dog collar.
 To design a St. George’s bow, it must be folded as in the photo, securing the connection point with a pin or an award order corresponding to its status. See the photo for new-fashioned ways to tie the St. George’s bow.
Roses from ribbon
Finally, we have already come to serious options for gift wrapping decor - a bow in the form of a rose. How to make a bow from a ribbon in the shape of a rose with your own hands, it is worth exploring step by step.
We start with the bud, bending one edge of a piece of tape and securing it with an English pin. We wrap the same edge again, fixing the joint with a strong thread.
 We bend the upper free edge of the ribbon and form a bud. Again we bind it tight with threads.
 There is a beginning. We turn to the petals. Bend the upper edge about half a centimeter and secure with a pin. Turn the ribbon corner and fix it with a pin. We perform a similar operation on the other hand, pinning the result with pins. We thread the bottom edge with a strong thread and slightly tighten.
 Before sewing, connect the bud and the petal with a pin for precise placement. Sew the edges of the petal wrapped around the bud along the bottom edge. According to the same scheme, we make the third petal and fix it with a pin on the flower.
 Sew the third and subsequent flowers in the same way. A rose looks more natural if you place petals from a dark ribbon in the middle and make the edges a little lighter. In the very center of the bud you can sew beads or beads, arrange a rose with green leaves and admire the handmade masterpiece.
A few days are left before the New Year. It's time to mobilize imagination, temporary and financial resources and go on a pre-holiday gift hunt. We know for ourselves: to set aside a free hour or two for this at the very height of the end of the year, oh, how simple it is. But have to. And so that even the present chosen in a hurry made the donee's heart beat faster, do not forget to beautifully arrange the surprise. At least tie a bow. In the case of "your best present is me," you can even do it yourself. After all, these three bows will look beautiful and appropriate on what (and on whom) whatever.
Have you seen how cleverly they tie all these bow-knots-ribbons of a girl who wrap gifts in wrapping paper in a store? No wonder: they get paid for it. We, armed with the advice of bloggers, will teach you how to do this for free. Simply select one of the three instructions and repeat it step by step.
Option 1: Classic Bow

Step 1: take the ribbon and, mentally dividing it in half, fold each end into a loop (not without reason in the West this bow is affectionately called "rabbit ears" because of the shape of the loops).

Step 2: put the right loop on the left crosswise.

Step 3: wrap the right loop over the left.

Step 4: Pull in the middle, making a knot.

Step 5: compare the lengths of both “ears”, and cut the ends diagonally


Option 2: Pompom

Step 1:fold the ribbon in a ring and wrap around the center in as many layers as there are “petals” in your pompom. Do not forget that for this type of bow it is better to use paper tapes rather than fabric ones.

Step 2: Now make your ribbon ring flat by squeezing it slightly with your hands. Make 4 diagonal cuts with scissors, as in the photo.

Step 3: connect the ends of the "flat ring" so that the cropped edges meet in the center. Secure with a thin tape of the same color.

Step 4: and now, working only from one edge, get the innermost “petal” and carefully move it in the opposite direction, then the next, third, fourth, etc.

Step 5: fix the resulting pompom at the base with a thin ribbon of a similar shade.

Option 3: Tiffany Bow

Step 1: First, measure the box of the future gift. You need the length of the cover from edge to edge and the height of both ribs (from the cover to the bottom). Add up three values. Now multiply this number by 5. This is the optimal length of the ribbon to make a beautiful bow.


Step 2: find the center of the tape. Center the ribbon in the center of the box. Hold it so that it doesn’t “leave”.