A wonderful souvenir gift, original and cute, most importantly, made by yourself with love! I wish you happiness and happy minutes (hours, days, years, centuries) with your loved one!
Teddy bear with a heart.
Materials:
Sausage ball and heart ball.
A step-by-step master class from the Creative Workshop “Blowers”.:
- 1. Take a bright red 5-inch balloon, inflate it and tie it.
Now we’ll make a teddy bear that will hold this ball in its paws.
Here is the complete scheme of the teddy bear twists. Do not be alarmed by their number, but just carefully read the subsequent instructions and see photos, sequentially performing all the actions.
- 2. Take a long ball (sausage), for example, soft purple or blue, inflate, leaving a 10-12-cm tip inflated.
- 3. Then twist seven bubbles in succession: 3 centimeters (nose), 3 centimeters (nape), 5 cm (cheek), 3 cm (ear), 4 cm (forehead), 3 cm (ear), 5 cm (cheek). The main rule is to twist in one direction all the time, holding the first and penultimate bubbles constantly with the fingers of your left hand (remember, you have as many as five of them! Hold the penultimate bubble with your thumb and forefinger, and use the rest to support the first bubble, the rest of the bubbles hang between them) , and hold the last of the twisted bubbles with the fingers of the right hand, while at the same time with the right hand twist this bubble three times. If this is not done, then the bubbles will spin up (this may not work right away, exercise!).
- 4. Twist the two 5-cm bubbles into a loop to make a loop of 5 bubbles (now these five bubbles will not unwind, hold only two bubbles - the nose and the back of the head),
- 5. we’ll put the bear’s nose in this loop (so that the back of the head does not stick, but remains behind!),
- 6. then we’ll twist the ears with a technique called the “ear” (with one hand we press our forehead and cheek against each other, and with the thumb and forefinger we press the ear bubble, we twist this bubble, preferably twice (so that it definitely doesn’t unwind). this is first with the right ear, then with the left.
So the muzzle is ready! If you succeeded, the rest is already quite simple.
- 7. We twist the neck 3 cm, and then make a large 20 cm bubble, folded in half and twisted into a loop by a lock, these will be the front legs of the bear. Then we make a 5-6-cm bubble body, and then two more 6-cm bubbles for the hind legs, we twist them into a “lock”. There will be a small bubble tail.
- 8. Now take a red 5-inch heart balloon. Put it in the front legs of the bear, as if the bear hugs him. We tie the knot on the heart ball (you can just wrap it) to the twist in front of the hind legs. Teddy bear with a heart in its paws is ready!
You can familiarize yourself with other lessons and workshops on modeling toys from balloons on the website of the Creative Workshop “Blowers”
Are you already familiar with twisting? This fun and exciting technique can not leave anyone indifferent. The variety of shapes and colors in it is conducive to real creativity and invention.If you have already mastered the simplest figures and with a confident hand master all kinds of pirate sabers, dogs and giraffes, it's time to move on to the figures more difficult. We offer another “air” master class - a figure of such a cute little bear.
Inflate the ball. 
We tie the tip of the ball. 
It's funny, but there is nothing accidental, and even the resulting bundle will not need to be hidden - it will become the nose of our bear. 
When inflating the balloon, do not forget to leave the tail for twisting. In our case, it should be at least ten centimeters. 
We begin the formation of the figure from the nodule. We make the first small bubble. 
The second should turn out even less. Here is such a round small ball: 
The third is more authentic, but not too long. 
The fourth bubble is equal to the second. 
Fifth - to the third. 
Sixth to the second and fourth. 
And the seventh to the third and fifth bubbles. We should get such an original design with its appearance resembling a beads or a caterpillar: 
Firmly hold our "caterpillar" so that it does not bloom. Now we connect the second twist with the last, simulating such a triangular window with two small and three oblong bubbles: 
Twist, while holding the first two bubbles firmly. 
Then we work inside this triangular window: we pull the small bubbles with the thumb and forefinger. 
And several times we twist around ourselves, forming such a small shell - an eye: 
The ears of the teddy bear are ready. 
Now gently push the first bubble into the triangular hole. 
Look how cute the bear is! 
We make a little bear’s neck - a small round bubble. 
Measure out a small loop - foot. 
And twist. 
The second same loop will become the second foot. 
Modeling the tummy. 
And similarly to the previous ones, we form the two remaining legs. 
The tip of the ball becomes a tiny tail. 
Get acquainted, a new figure of your collection is ready - a bright cheerful teddy bear! 
Good afternoon! Today, mk is another figurine ... for those who like to delight children))) by the way, gifts from balloons are loved by both children and adults!)) We will make a bear or one more dog ... as fantasy allows)))
For work, we need:
- 6 balls 12 inch blue ... or 5 balls and one linkolun (more on that later)
- 3 balls 5 inch white
- one five-inch ball black for a nose
- 4 blue 5 inch balls
- 2 shdm 260 (shdm-balls for modeling ... in common people sausage balls))) for pens
- one small ball for a weight of any color
- permanent markers
beads ... (in my case, vitamins roars .... in my opinion this is ideal ... even if a child bites a figurine ... what happened in my practice ... a Vitamin bead ... will not harm him)
- trimming shdm
- a pair of hands and a great mood .. this is as usual)))
We’ll start) we’ll inflate a cluster of 4 12 inch blue balls (a cluster is 4 of the same diameter of the inflated ball connected together) in order to make the balls the same there are several ways ... but since for this figure we need a few calibrated balls .. .We will consider the pump pitching by inflating each ball ... so we inflate each of the balls by 20 pump strokes ..


Now we make the torso .... there are such balls ... linkoluns are called ... these are balls with two tails like in my photo ... but if there is no such ball ... it's okay ... we’ll make a button on a simple ball .. to which we will then fasten the head ... for this we inflate the ball to the desired size ... and without tying it, put a mark on the top with a marker .... blow it off ... put a bead inside it ... roll the bead to ours mark and tie a piece of shdm-ki for a couple of turns ... and tie a knot .... we fasten the body to our base ...

The next step ... we inflate a cluster of small balls, we attach it to our torso ... make sure that all the balls in the cluster are the same ... otherwise the figure will be crooked and sloppy ...


We inflate the ball for two or three pump strokes ... we tie it ... then with both hands we press the walls of the ball to the friend ... with one hand pushing the bundle inward ... and with the other hand we try to grab it from the other side .... as soon as we they grabbed him ... scroll him three times around him and tie him around ..

fix it with a shdm trim ... so we’ll do two ears ... it’s hard for one person to do this at first ... ask for help ... at least to tie a knot while you hold it ... so do two ears ... for the muzzle we need the ties on both sides ... one to tie the muzzle to the head ... the other ... to tie the nose to the muzzle ... the technique is the same ... but when we inflate and tie the ball ... we will tie shdm scraps to the tie ... so that pushing the knot inside the ball ... the tie remains outside ... unfortunately forgot to take a photo .... if something will not be clear write ... I will explain ...

Here are the blanks we got ... to one of them ... which has two ties ... we attach the nose ...

We collect all the blanks ... inflate the blue blank with three buttons ... and tie the ears and muzzle into place ...

tie our head in place) there is very little left))

And let's test your imagination. What do you think can be done with balloons? Right. Inflate! Let it go to heaven! Or quietly sneak up on someone and burst so that BABAH! 🙂 Wow, how much joy! Everything? But they didn’t guess! You can also make real toys out of balls! Whom to come up with? Maybe a little hare, or a little house ... And let's make a chubby little bear Puzyashu!
We need a do-it-yourself children's toy kit from AirFrend.
The kit includes: balls, pump, stickers, instructions.


Let's see how toys are made? GO!
(And then again, be sure to watch the video in which the children themselves collect the teddy bear. It is posted onod article)
1. First you need to make a load for the figure (weighting agent)
We take one small ball, and with the help of the pump we inflate it first. Then blow off the air. Now we take a ball, and we pull its neck on the water tap. Pour some water into the ball. After this procedure, the diameter of the ball should become about 3 cm.
2. We make blanks for the standWe take 4 larger balls and, again, use the pump to inflate them. Each inflated ball should be about 15 cm long. We tie a tail at the end of the ball. We connect the balls in pairs. As a result, you and I should get two pairs of interconnected balls. We connect one of these two pairs of balls with a load (this is, if we forgot, the first ball of water). Now all the workpieces are laid aside.

3. Go to the manufacture of the body
We take and inflate a balloon with a pump without a pattern. The length of this inflated ball should be about 30 cm. We tie a tail at the end of the ball. The workpiece is again set aside.
4. make 2 front legs
From the ball for modeling we take a long workpiece, and inflate the “sausage” using a pump. The length of the inflated ball should be about 30 cm. We tie the tail at the end of the ball. Fold the ball in half and tie the ponytails. As a result, we should get an oval from the ball. We make the second paw in a similar way

5. Make a pair of ears
We take a short blank from the modeling ball and inflate the “sausage” with the pump. The length of this inflated ball should be about 12 cm. Then we do it, in exactly the same way as the front paws. Fold the ball, tie the tails
6. Head
We take a large ball, the one with the picture, and inflate it with a pump. This inflated ball should have a length of about 28 cm. Then we do it, everything is in the same order as when the body was made.

7. Connect the ears and the head
We take the ears and the head, we attach the ears to the head with the help of ties.
8 .We connect the body, legs and head
Take the head and torso. We connect them together using ties.
Take the front paws. We tie with the help of tie paws to the body.

9. Make a stand for the resulting figure
We take the resulting bear figure, and with the help of the tails we bind the torso (tail at the bottom) and one pair of small balls connected together, together with the load. Then we take the second pair of interconnected small balls, and gently weave them with the first pair. The one that was just tied to the body.

10. make a bow
Now we take a ball of red color and inflate it, but we inflate not completely. We should have a tail about 10 cm long. Now we tie a ball so that air does not come out of it. We measure from the place where the tail is tied, about 7 cm, and then fold it in half in a ball so that the result is a loop. We twist this very loop at the base. In the same way we make the second loop. At the end of the bow we make a small ball. We twist one loop with a ball at the base. We try on the resulting bow on a bear’s neck. We measure the length we need, and then twist the ball. We remove the excess end of the ball. To do this, carefully cut the end of the ball with scissors and let the air out. Tie a tail at the end. Now wrap the neck of the teddy bear with a bow, and tie the tail of the ball to the bow.

11. Make the little bear's face
We take stickers with eyebrow and nose blanks. Glue stickers on the head. To the place where they should be. 🙂
The Puzyash Bear from the Deep Forest is ready! Voila! 🙂
And do not forget to treat your teddy bear Puzyasha with honey, otherwise he is often attacked by a sweet-eyed one.

And what other toys can you make yourself? For example, you can make different ones. Or - a wonderful lesson! What do you like to do with a baby?
What do you associate with balloons? Celebration? Childhood? Fun? Perhaps almost everyone will answer that question that way. That's all, because it was precisely when we were little that balloons could be found at birthdays, at the circus or during other celebrations in the city, where funny animators turned into real wizards, creating various figures from the balls. Such small or large figures of various animals and colors look very unusual and therefore attract interest in them not only children but also adults.
You can create crafts from balls yourself at home and for this you do not need to have any special skills. It will be enough to buy just a few balls and you can begin to work wonders. As a rule, crafts from balloons are not very complicated, but the result is stunning, so even a child can do such an unusual kind of art called twisting. With crafts that come out of the balls, you can decorate the house for the holiday or give a made figurine to friends.
In addition, on crafts from balls, you can make good money. Since such crafts are very popular. They usually decorate the holidays, creating a fabulous atmosphere, and the process of creating such figures is even a separate form of entertainment for children's parties. In addition, crafts made of flower-shaped balls are in great demand during such holidays as March 8 and Valentine's Day, because such an unusual bouquet will be a very original gift. So you can earn good money on crafts from balls.
If you decide to seriously engage in the creation of crafts from balls, then get a small pump, thanks to which you can quickly inflate balls and create figures, while consuming less energy.
What do you need to create crafts from balls?
Before you start twisting, you need to prepare a little. To do this, you must first clearly determine what kind of craft you want to create. After you make your choice go to the store and buy a little more balls than you need for the selected craft. This is necessary in order to avoid the situation of a repeated trip to the store if the ball suddenly bursts during operation.
When you have all the necessary materials, you can get to work, but do not forget to free up the extra few hours so that you don’t rush anywhere in the process of creating the crafts, but simply enjoy your creativity without wasting any nerves. In addition, it is important to tune in the right way, namely, not to think that nothing will work out, because the work of creating a craft from balls is very painstaking and requires a clear confidence in your abilities.
Balloon dog
Perhaps this craft is the most familiar to everyone since childhood. Most often the animators make the dog out of balls as a small gift for their viewers, and all because the time for its creation needs very little, but at the same time the craft looks magical, beautiful and original anyway.
So, to create this craft you will need:
- Just one oblong ball of any color you like.
- The desire to make a craft
- Patience
Such a craft is done very simply and quickly. To begin, inflate the balloon for crafts, but not completely! Leave a little emptiness in the amount of about 5-10 centimeters.
Twist three small sausages on the other side from the free side. Now we move on to creating the head, for this, take two sausages, namely the first and second and twist them together, the head is ready!
We proceed to further create the dog, which will be performed on the same principle. So in order to make the neck and front legs, you also need to twist 3 sausages and intertwine the second and third with each other, only now you will need to twist the legs down.
The body is made even simpler for this you need to twist only one large sausage. Craft is almost ready left to make the hind legs and tail. To do this, twist three more sausages, but now you need to twist the first and second ones together, this will make the legs, and the tail will be the third sausage.
That's all the craft dog made of balls is ready!
Ball daisy
Balloon flowers are a beautiful and original gift for various holidays. It is quite simple to make such a gift with your own hands, and besides, there are quite a lot of options for how to make a flower from balloons, but it is the chamomile option from balloons that is the most beautiful and common among all.
For such a craft you will need:
- White round balls 5 pieces
- Yellow round ball
- Two long green balls
- Patience
So in order to make a daisy out of balls, you first need to inflate all the round balls, both white and yellow. White balls should be larger than white. To get started, take two white balls and fasten them with a strong knot. Now tie another 3 balls together and combine these structures. Petals are ready, go to the stalk.
To do this, you need to inflate a green ball, but not completely leaving a bit of free space. At the end, make two small sausages and tie them together, wrap them in different directions.
Now you need to fasten these two parts using the core. To do this, take the remaining inflated yellow ball and stretch it in the center of the petals, wrap the circles on the stem with the tail from the ball and tie this design in a knot.
The flower of the balls is ready!
In order to make the flower easier to fasten, you need to make all the petals of the same size. To do this, cut out the opening of the required size in the cardboard and, inflating the balls, measure by inserting half of it into the template, and inflate the ball until it is perfect, fits into your circle on the template. So, do with each petal, then all the balls will be the same size.

Heart of beads
Perhaps this particular craft of beads is very multifunctional, because the heart of beads is used both as a simple gift and as a decoration for a festive design. Halls for weddings are often decorated with such a heart, because it is the heart that seems to speak of the love of the young. Such a figure decorates the premises and in honor of the birth of a child or just for a birthday. In addition, such a heart can be a very original declaration of love. Therefore, everyone should be able to do such an artwork from balls, besides, this lesson is not particularly difficult.
For crafts you will need:
- For the heart you will need as many as 150 round balls, this is certainly a lot, but it's worth it
- 2.5 meters wire
- pliers
- Few hours of free time
- Patience
So, first you need to make a heart out of wire. To do this, connect the wire into a circle using pliers and carefully make the perfect heart shape. This process is very important, therefore, it is recommended to pay special attention to it.
After you have made a heart out of wire, take care of the balls. They all need to be inflated, of course, this process is quite long and painful, so use a small pump to inflate the balls, so you will finish much faster.
When you inflate all the balls, they will need to be tied in four pieces together. To do this, first knit two balls into a knot, and then combine two such structures together.
After that, all the resulting designs of four balls will need to be put on a cooked heart made of wire. Putting the balls on is pretty simple, you just need to wrap them around the wire.
When you put all the balls on the wire, you will get a beautiful heart of balls, which you can give or use as a decoration.
In order for the design of the balls to be more beautiful, it is recommended to put them on the wire in a checkerboard pattern, so that between the two balls of the previous row one ball of this gets up. Thus, you will hide the wire under the balls and your heart will look much better.

Bright decoration of balls for the new year
For this composition you will need:
- 20 green balls, round
- Thread
- And, of course, the desire to create a holiday
So, we take 5 balls and inflate them to the maximum. After you have inflated 5 balls, we tie them at the ends to each other. After inflating as much as 5 balls only not as much as the first 5, and also we bind them together. And so on, until you have a very small composition that looks like flower petals. After which the very first thing that we have done will be the foundation, the next one a little less and we connect. And do it further. If you do everything right, then you will get a beautiful tree. You can put a real star on top of your spruce. And this composition can be wrapped in rain. 
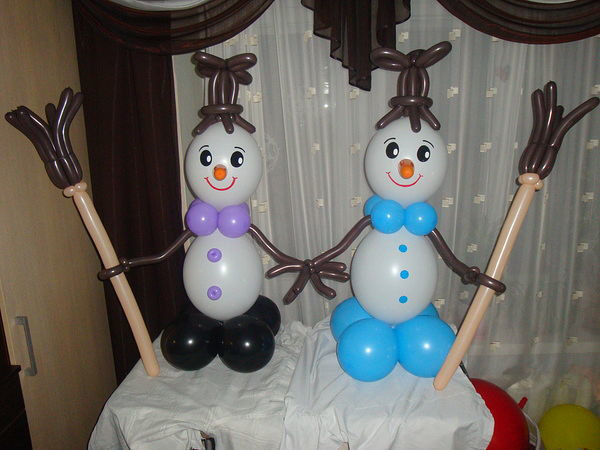
Now we will make a fabulous character of the assistant to Santa Claus, a snowman
For this we need:
- Round balls of white color 10 pieces
- Round ball of red color 1 piece
- Balls for decoration 1 blue, 1 orange and 1 white
- Scissors
- Double sided tape
- Self-adhesive film red, black, blue and white
- Marker
Let's start, take two white balls and inflate, one should be larger than the other. After being fooled, we tie the balls. Now the balls need to be tied together. Now you should prepare the collar for the snowman. To do this, take 4 white balls and inflate them, and tie. After linking them you need two. Now you need to twist the obtained balls of 2 to get out like a flower. Now two large balls, which we made at the very beginning, are twisted with the resulting collar. And you will get a torso and a head with a collar. Now create the same as the stand collar. On the resulting stand we stick tape and put our snowman.
We take balls for decoration and make hands to our snowman. For this we need balls in the form of sausages. Inflate the balls and divide the ball in half and twist. Now in place of the connection of the torso and head we wind our hands. For mittens, twist 2-3 times at the beginning of the ball, on the other hand, do the same.
We make a hat for our snowman, take a ball to decorate the blue color and inflate it. Then we bind it so that a circle comes out. We take our ball of red color and inflate it in the same way. Now we need to connect using tape and you should get a hat. We attach the hat to the head of your snowman with the help of adhesive tape.
Now we make eyes and a mouth out of a self-adhesive film to our snowman. And glue to our snowman. We take the remaining ball of orange color and do not inflate it strongly. This will be our nose, which we fasten with adhesive tape. Our snowman is ready.
Now we have a snowman and a Christmas tree are inalienable attributes of the new year and which cause a smile, and the joy of everyone who sees them.
Teddy bear
Craft in the form of a teddy bear will surely appeal to both children and adults. This original toy can become an interesting decoration for creating a festive atmosphere, or a bear can be just a very unusual gift. Buying a teddy bear from balls will be far from cheap, and why spend money if you can make it yourself and, at the same time, is pretty much worse.
For crafts you will need:
- 5 large round balls of any color
- Linkolun
- 3 small balls distinctive in color from large balls.
- 4 small balls of the same color as the big ones.
- 2 oblong balls
- Beads
- Waste ball
So, for starters, take all the balls to inflate, it won’t take you a lot of time. Now take four balls and tie them together, these will be the hind legs of the bear and also the base for the figure. In order for the craft to stand, it will be necessary to make a weight for this foundation, it is very simple to complete this task. To do this, take a small unnecessary ball and pour a little water into it, tie a small weight well and tie it to the point of adhesion of 4 balls.
After this, you need to make a body, it is performed quite simply, for its manufacture you will need one linkolun that needs to be attached to the base. The torso is ready.
Now you need to take 4 small balls of the same color as the large ones and tie them together. Now attach the resulting structure on top to the linkolun and proceed to the manufacture of the head. This is the hardest part in creating a teddy bear from balls. In order to make a head, take a large ball and inflate it, mark the places for the ears and muzzle and blow off the head. In the places that you marked, drive the beads and wrap them with pieces of ragged balls. After that, you can gently inflate the ball. Now make the ears and nose. Ears and nose need to be done using a technique called the bull's-eye; you can learn more about this technique on the Internet. Now connect the parts to the head and draw the eyes.
Attach your head to the rest of the structure and make pens. To do this, inflate two oblong balls and make twists at their ends that connect at the ends. Now we attach the handles to the body and, if desired, decorate the bear with small details. That's all, the craft of the bear from the balls is ready.

Bunny of balls
Such craft from balloons as a bunny will surely appeal to all children. The craftwork looks very unusual and original. It can be, like a wonderful gift, or an interesting decoration for a festive design. Such a figure of balls is made very simply and to create it you do not need to have special talent, it will be enough only your desire and patience and everything will work out.
To create a bunny from balloons, we need:
- Pump
- Scissors
- Black marker
- Balls blue ШМД 2 pieces
- White ball ШМД 1 piece
- Scrap pink ball SMD
So, we take a ball of blue color and inflate it, tie it and make a ring. For the follow-up action, you need to find the middle of the ball, and with the other hand take it where we tied. Now we make a figure similar to the figure eight, and put it aside for now. We take the second balloon and inflate it, so that the tail would remain about 6-9 centimeters. Now we make a bubble of about 5 centimeters on it.
We take our eight and place the connection to the bubble with a place and twist them together. Now on the resulting leg we make the second bubble, the same as the first. We twist the resulting bubbles several times, but this must be done so that the bubbles do not spin. Set aside what happened and take the white ball and inflate it.
You should leave the tail about 10-13 centimeters, now on this balls we make 3 identical bubbles. The resulting bubbles need to be twisted together, the next action that needs to be done is another bubble of about 20 centimeters, and bend it in half, and twist the ends. We make one more exactly the same bubble and repeat the same procedure. We lower the remaining piece of the ball and make a knot.
Now we take the blue balls, and the long end we put on the resulting muzzle from a white ball. On a blue ball, on which we put a white ball, we make a bubble about 15 centimeters in size. We make the same bubble as we did just now and twist it together. We make two more bubbles a little smaller than the two previous bubbles. We push apart the first two bubbles and between them we push the two bubbles that we just made. Take a pink ball and inflate it not much. Tie with a long tail to the blue ball. Now cut off the remains of the pink ball. We take a marker and draw eyes for our rabbit.
If everything is done correctly, it turns out a beautiful rabbit, which will be a wonderful decoration for any holiday. 

Summing up, I want to note that the figures from the balloons that are given in this article are only a small part of what can be made from balls, since all such crafts are simply impossible to list. The number of options for figures of balloons every year becomes more and more, people have new ideas that they successfully implement.
But, despite the fact that there are a huge number of options for such crafts, all of them have one certain feature, which is that it’s very easy to make all such figures and even children can do this activity. Crafts made by hand from balloons are an interesting and unusual hobby, both for children and adults. In addition, on such a hobby you can earn good money. So balloon figures are an interesting and fascinating and also useful activity, which you can also earn money on.