12/22/2014 | CreativingSister | 24,419
Probably, many of us have already noticed that Christmas trees in the form of cones are in fashion for several New Years in a row. Starting from souvenirs and ending with a festive tree on the main square of the capital.
Cone-shaped trees can be a good New Year's and Christmas addition to the main decor or as an independent decoration. They can host your guests as they enter your home, be part of your Christmas table decoration, and even make your coffee table or fireplace look more beautiful. From different trees, you can create a great composition.
In this issue we will try to make a New Year's beauty ourselves based on various cones (truncated, paper, mesh, from different materials). We tried to accommodate as many ideas and master classes as possible, interesting and completely independent. All homemade products are exceptionally festively beautiful.
Read more issues on the topic -,,,,.
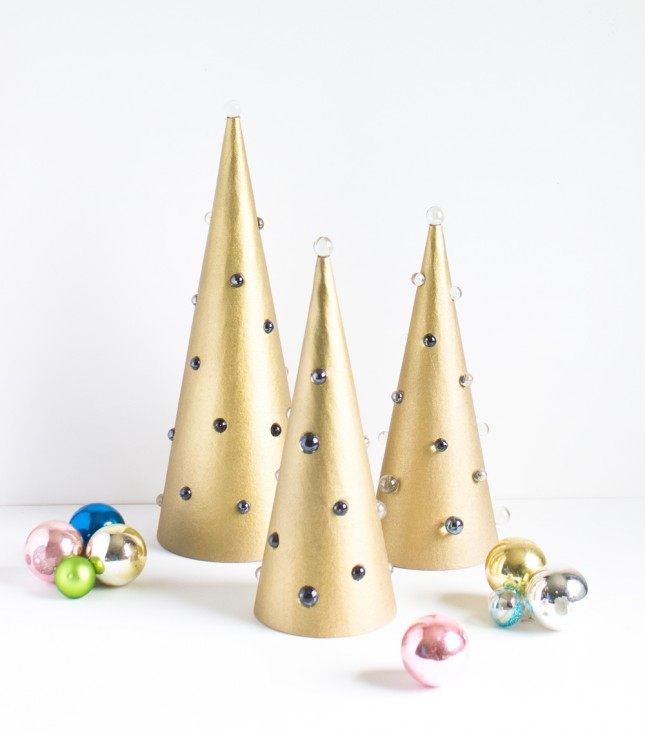
1. Christmas tree made of paper cone.
Manufacturing - we take a paper cone, if not found, then you can glue it out of cardboard. Then we outline and drill holes of different sizes in a chaotic manner. You need to drill with a solid base inside. Then we remove the roughness with a fine sandpaper. You can stop at this, but it is better to paint the Christmas tree with shiny paint and insert an LED or a couple inside, then it will be much more beautiful and effective.
2. Christmas tree made of twine and beaded thread.
It is also easy to do. We wind a regular twine on a cone smeared with glue. Glue the ends carefully. Then we stick in the pins, hang a garland on them and everything is ready.

3. Instead of twine, you can take yarn or other thick threads and decorate the tree with sewn-on buttons and thread pom-poms, as in the following picture.

4. A cone-shaped tree made of threads and PVA glue.
We have already shown the principle of making homemade products from threads coated with PVA, so we take a cone of a suitable size (if necessary, we make it out of paper and fasten it with a stapler) green threads, PVA, diligently wind and smear. Next, paper snowflakes, beads, wait until it dries, take out the cone and that's it.
You can not wind the threads in spirals, but start them in straight sections from bottom to top at different angles, but this is much more difficult. Because you have to glue each end with tape. But for the sake of effect, what can you do ...

5. By the way, multi-colored threads can be used. After the PVZ has dried, you need to cut off the bottom of the cone, wrap it around the edge with tape and stab it with a stapler to hide the irregularities and strengthen the structure.
In both the first and second versions, you can embed light inside the cone tree for beauty.

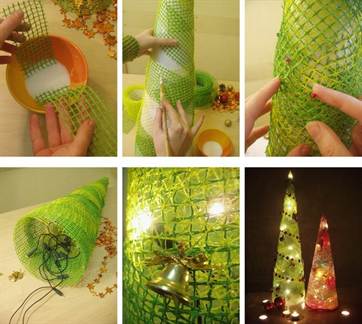
6. Christmas tree made of mesh in the shape of a cone.
Instead of threads, to make things go faster, the craftsmen came up with the idea of \u200b\u200busing a green mesh cut into ribbons or a ready-made mesh ribbon. We dip it in glue and wrap it up. You can take multi-colored ribbons, additionally coat the joints with glue and fasten with pins until dry. After drying, we decorate to taste.

7. Christmas tree made of wire.
Another Christmas tree that is not difficult to make. But it is made of metal wire twisted into spiral springs in the shape of a workpiece - a cone. Springs can be single, you can insert them into each other, use multi-colored wire without or with it. The tree turns out, of course, schematic, but who likes which style.

8. Fragrant trees made from coffee beans.

9. Creative tree made of sequins and beads.

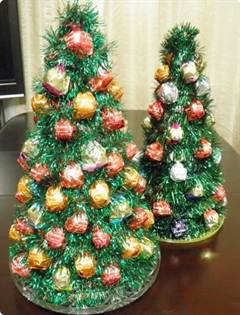
10. A cone-shaped Christmas tree made of sweets for a sweet tooth.

For the tree. All products are usually made on such a frame. Of course, you can buy a ready-made foam cone, but, firstly, this is not a very cheap option, and, secondly, you will be limited by the size of the product that you found. The best idea is to make the base yourself. Explore your options. Use the working method that suits you.
Manufacturing methods
If you are thinking about how to make a paper cone for a Christmas tree with your own hands, you can rejoice, since there are several possibilities for making a base for decorating:
- Roll up from the sheet according to the bag principle.
- Glue according to the pattern drawn on the basis of the circle.
- Make using the papier-mâché method using a volumetric blank.
In the following sections, you will learn more about how to make a paper cone for your Christmas tree. Photos will clearly illustrate the process of work and the result obtained. Each of the methods is quite simple to work with, and which is more convenient is up to you.

Tools and materials
Whichever manufacturing method you choose to make a paper cone for a Christmas tree, you will need the following:
- A sheet of whatman paper, cardboard or colored paper.
- Pencil.
- Compasses or stencil (plate, dish, basin).
- Scissors.
- Glue or heat gun (you can use double-sided tape or stapler).
This is all that is needed. In some cases, you will also need to use a knife.
How to roll a cone from a sheet
This method is simple and easy. The child can also complete the preparation. To understand how to make a paper cone for a Christmas tree in this way, it is enough to take a rectangular or square (which is available) sheet of thick paper and roll it up in the form of a bag. The more you wrap the workpiece, the narrower (slimmer) the cone will turn out.

To fix the product, you can glue the PVA seam, with a heat gun, fasten it with a stapler, use double-sided tape.
The next important step will be to trim the bottom, since when you twist a rectangular sheet at the bottom, you will not get an even edge, but with a corner on one side. Trim the part as carefully as possible, because this will determine how parallel the base of your tree will be in relation to the horizontal plane.
How to perform an even bottom
In the previous section, you learned how to twist a cone from paper for a Christmas tree from a rectangular blank. If you can't get a neat bottom just by cutting it off with scissors, and there are a lot of trees to make, you can make an alignment aid. It is a cardboard template with a round hole corresponding to the diameter of the cone base.

You can make such a tool like this:
- Take thick cardboard, for example, corrugated or glue a blank from several layers.
- Draw a circle with a compass or trace a suitable template (plate) along the contour.
- Cut a hole.
You need to use such a tool as follows:
- Insert the rolled cone from the sheet into the hole so that the contour of the tool circle matches the bottom of the cone.
- Take a sharp knife and cut off any excess paper.
Here is a finished cone with a neat bottom.
How to make a paper cone for a Christmas tree: step by step instructions
The base can be made in another way according to a previously prepared template. In this case, you do not have to align the lower part, as it will turn out neat. To work with this method, you need to follow these steps:

The neat cone is ready.
How to glue the base
In any of the presented methods of making a cone, the result is a hollow workpiece with a thickness equal to the selected sheet of paper or cardboard. If you are satisfied with this version of the Christmas tree, you can start decorating. However, most often, herringbone cones are not hollow, but have a solid base. It not only gives the blank a complete look, but also gives additional strength to the base, which is important, since the decor will be glued to it, which has a certain weight, and the structure should not fall apart under it.
The work options are as follows:
- If you rolled a cone out of a rectangle, circle the base on the prepared cardboard.
- If you have used a bottom leveling tool, use the hole in it as a stencil for the bottom.
- While working with the template, you can also trace the base of the cone made, or calculate the diameter of the circle using the formula by measuring the circumference (bottom of the cone).
As for the gluing of parts, it can be done with a heat gun without additional allowances for gluing, but simply end-to-end (connect the thickness of the cone wall to the base circle). If you use ordinary PVA, it is worth considering allowances for gluing, since the strength and setting speed of this composition is less than that of hot melt glue. Allowances can be made both on the base part and on the lower part of the cone. It is better to hide the allowances inside the bulk workpiece.
How to make a large paper cone for a Christmas tree with a photo
If you decide to make an interior Christmas tree that you plan to put on the floor to decorate the room, then you will have to work a little more with the creation of the frame than for the desktop version. The most important thing for such a cone is strength, therefore, in addition to the cardboard wall, it is worthwhile to provide for the frame elements. This can be a wire or a rod made of another material (a wooden stick, for example). It will go through the center of the cone, acting as an axis. It's good if you fix it firmly at the base.

It is also easy to make additional stiffeners in the form of circles of cardboard of the corresponding diameter, which will be glued along the entire height of the cone at an equal distance.
If you are going to make a cone for a large Christmas tree, a certain difficulty can be caused by drawing a circle of the appropriate diameter, which cannot be done with an ordinary office tool. In this case, you can choose one of the following methods:

Papier-mâché technique
This section will also teach you how to make a paper cone for your Christmas tree. Large or small you need the size, in this case it doesn't matter. The workpiece is strong and solid even without an additional frame. This option is suitable for those who do not have a single dense sheet for making a cone of the appropriate size.

To work with this method, any paper is suitable, even newsprint or from old magazines, however, a blank base is required. You can use a plastic cone from a children's designer (the original part will not deteriorate and will return to its place), plasticine, gypsum, foam. Using one template, you can make many papier-mâché blanks. Proceed like this:
- Cut or tear newspapers into small pieces.
- Wrap the prepared template with plastic wrap and coat with PVA.
- Apply a layer of paper pieces to the dry glue.
- Dry the first layer and then apply the second using the same technology.
- Work this way to the required workpiece thickness.
- Cut the resulting shell and remove the original piece.
- Install a skeleton rod if needed.
- Apply a few more coats to hold the halves together.
All is ready.
You have learned how to make a paper cone for a Christmas tree. Start by making a base, and then start decorating it.
An elegant Christmas tree in the house is the main guest of every New Year's holiday. But rarely does someone stop when preparing for the New Year at only one in the house. As a rule, owners strive to decorate every corner of their home. Moreover, many decorations are made by hand. A self-made Christmas tree from a cone will become not only a small symbol of the holiday, but also a source of pride for any "homemade". And, since imagination in this matter simply has no boundaries, the size, materials and appearance of conical Christmas trees will depend only on your taste, desire and skill. Therefore, stock up on materials, time and helpers, and we will tell you 17 ideas for making a Christmas tree from a cone:
Alternative Christmas tree

- To do this, it is enough to glue the cardboard in the shape of a cone and decorate it with ready-made, purchased balls and garlands.
- If there are no ready-made decorations, they can be easily done: by crumpling it into a ball and covering it with bright and shiny nail polish. So it will keep its shape and acquire the desired color.
Christmas tree with garland

- A cardboard cone of any color is decorated with a garland, for which we take a thread and glue triangles of paper or foil onto it.
- Bows may also work for this option, instead of triangle flags. A rectangle made of paper is folded with an accordion, and the center is tied with a thread. The bow is covered with glue, and while it dries, sprinkle with shiny sand (glitter).
A beautiful conical tree is made from cardboard with mother-of-pearl and glass balls
- Glasses are easily attached with a drop of super glue.
- If there is no beautiful cardboard, then you can glue it over with foil. Glass is easy to replace with rhinestones from unnecessary clothing.
Christmas trees made of glossy photo paper

- You can make Christmas trees from a cone in the style of abstraction with varnish stains. Choose colors at your discretion.
- Such a design can be made from ordinary cardboard and paints, covering it with a transparent varnish.
Snow-white Christmas tree decorated with cotton pads

- You can also use glitter or varnish here.
- If not at hand, they are replaced with fabric, cutting them out of soft fabric.
Volumetric tree made of thick foil

- Cut 2 herringbones of the same shape and size, and then cut one of them in the center, starting from the bottom base and not reaching the top. The remaining intact fragment is put on partially bifurcated.
- This option can be done with cardboard, decorating it to your own taste.
Fluffy cone tree
Made of ordinary sheets of paper folded obliquely, corner to corner, and decorated with glitter.
Cone herringbone with a foil star on a match

- Fabric design will be a great idea that even a child can bring to life.
- Even in this version, you can replace the fabric with velvet paper.
- Foil for decoration will also be appropriate here.
- Or you can use paints, glitter or varnishes.
Useful Tips
A paper cone is usually made for many interesting crafts. It is quite easy to make such a cone.
In addition to paper, you will need:
Compass
Glue, tape or stapler
Scissors.
* If you don't have a compass, you can replace it with a pencil and string. Measure the desired radius on the thread, tie or simply press the pencil against the thread with your finger. Use your other hand as the center of the circle. Next, just draw a circle around the center.
1. Cut a circle of any diameter.

2. You need to divide the circle into 4 parts. To do this, fold the circle in half horizontally and then also vertically. You have 4 folds.

3. Cut one of the four pieces.

4. Now your workpiece can be rolled into a cone and secured, for example, with tape, stapler or glue.

How to glue a paper cone
* If you decide to use glue, you can use clothespins to fasten the places where the two pieces stick together.
* The cone can be wide, but it can be adjusted - the sharper you want to make the cone, the more you need to cut from the circle (minimum 1 part, maximum 3 parts). It is not necessary to cut off a quarter, you can cut off one and a half pieces (1 quarter and half of the next quarter).
Paper cone. Scheme.
In this diagram, you can learn how to make a wide, medium and pointed cone.

How to make a paper cone. The bottom of the cone.
1. Place the resulting cone on a new sheet of paper and circle the bottom.

2. You need to add 1cm to the outer line of the bottom and draw another line (i.e. the radius of this circle will be 1cm larger than the previous one). Along this line, you need to cut a circle.
3. Make teeth, the top of which will abut against the outer circle (the one with a radius 1cm larger).

4. Bend the cloves up and brush with glue.
5. Insert the bottom inside the cone and glue.
Crafts from paper cones
Decorative tree

You can make such a beautiful Christmas tree from an ordinary paper cone that will decorate your home, room or even office. You can also present it to a friend or loved one.
Following the instructions above, you will make a cone, and then you will learn how to decorate it.
1. Cover the cone with tape or wrap with cling film.
2. Prepare thick threads and dip them in PVA glue. You can mix half a glass of glue with half a glass of water.
3. Wind the threads around the cone and let them dry.
4. Pull out your paper cone with the film through the bottom, leaving only the threads that have frozen in the shape of a cone.
5. Decorate the tree to your liking. You can use bows, beads, sequins, and even small decorative fruits.
Sweet gift

From an ordinary cone, you can make a beautiful gift wrap, and equip it with cookies and sweets. It will be a great gift for any child.
You will need:
Paper cone
Corrugated paper
Glue or double tape
Scissors
Ribbon
Sweets.
1. Cut a circle for the cone and cut a quarter from it (as shown).

2. Add double tape or glue to the edges of the cut quarter.

3. Cut a long piece of crepe paper and glue it to your future cone (the quarter you cut from the circle). While gluing, make small folds for beauty (see picture).
To create a festive atmosphere at home, you can use small Christmas trees made of cardboard cones, made using various techniques and materials. Whichever way you choose to decorate the forest beauty, you will need a foundation. You can read about how to make a cardboard cone for a Christmas tree in this article, everything is written step by step.
Such different Christmas trees
Beautiful handmade Christmas trees are an excellent solution for decorating your home for the holiday, as well as for a small gift for a loved one. It is so important to share your holiday mood with other people. There are a lot of options for such Christmas trees. A Christmas tree made of a cardboard cone can be offered to children. This activity will appeal to them and will help them realize their creativity.


Adult craftswomen make magnificent crafts from various paper, decorative elements, threads, tinsel, sweets and even feathers.


Inspired? Now take a close look at the photos of all these beautiful crafts. What do they have in common? Of course, this is a cone-shaped base. And each tree has its own. If the Christmas tree is intended as a floor or table arrangement, then the bottom can be omitted. But there are also such crafts in which the bottom of the cone must be closed. How to make cardboard cones for the base of such Christmas trees, read below.
Cones without bottom
The best material for making a base for Christmas trees is cardboard.
Since the decor sometimes weighs a lot, it is better not to take paper for the base. It is suitable only for making children's crafts or Christmas trees decorated with paper decor.
To make a tapered base, you will need:
- Cardboard;
- Scissors;
- Glue or tape;
- A compass or a round object that can be contoured (plate, bowl);
- Pencil;
- Ruler.
The thickness of the cardboard should be chosen depending on the weight of the chosen decor. If the decor is weighty enough, and the cardboard is thin, the base may not withstand, and the tree will turn out to be unstable, it will fall to one side.
There are several ways to make a paper cone. To implement the first, you need to fold the cardboard in the form of a bag, as in the figure:


Further, the excess cardboard from the bottom side is cut off with scissors. This must be done exactly, as in the diagram, otherwise the product will collapse. Glue the side edge of the cone with tape or glue. This method is convenient in that you can independently and without calculations adjust the height and width of the cone.
Bottom making
For products such as topiary or herringbone legs, as well as for herringbone in the sweet design technique, conical bases closed with a bottom are required. A small master class will clearly show you how to make a paper cone with a bottom.
To complete the work, you will need the same set of tools as for creating the cone itself.
And now, step by step, we will consider the manufacture of the bottom. Take the finished cone and measure the diameter of its base with a ruler.

As you know, if you divide the diameter in half, you get the radius. Make the necessary calculations and use a compass to draw a circle corresponding to the size of the base of your cone.

Try it on. The edges of the drawn circle and the edges of the cone must match in size.

To secure the bottom to the base of the cone, you need to add 1 to 2 cm. Draw a second circle and cut out.

Cut the distance from the edge of the outer circle to the edge of the inner circle with scissors (step is 5 mm).