Lessons (master classes) weaving from rubber bands for beginners: how to make a flower - a simple figure on a pencil or pen from rubber bands without a machine.
The fifth lesson from the series "Weaving from rubber bands".
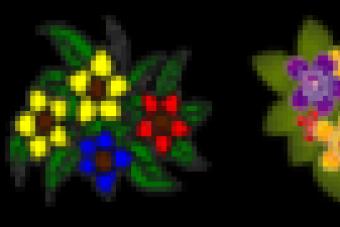
Figures from rubber bands for a pencil or pen
This time there will be a master class on a very simple figurine, making it easier than the simplest Chain bracelet. At the same time, such figures will be a very original decoration for pencils or pens. With them, pencils or pens will become bright, unusual, you can’t confuse them at school with the stationery of your desk mate.

These figures can be presented on September 1 to friends, relatives, acquaintances and even teachers. And of course, don't forget about yourself.
The pencil figures from this master class are shaggy and look like bright multi-colored flowers. They can be made from rubber bands of the same color or multi-color. Figures made of two-color elastic bands with a golden top layer, with a pearlescent or metallic finish, with a wavy edge look beautiful and unusual.

What you need to weave figures on a pencil from rubber bands
- rubber bands (about 50 pieces per figure)
- clasp
- hook

Stages of work
- Put elastic bands on the hook (50 pieces). For step-by-step photos for this master class, multi-colored translucent rubber bands glowing in the dark were used.

- Take another elastic band (it will be fixing), hook it with a hook and pull it to the side.

- Pass this elastic band through all the other elastic bands.

- Fasten both loops of the fixing elastic band with each other with a lock.

- Straighten and evenly distribute the gum.

- Pass the top of a pen or pencil into the middle of the craft.

Pens and pencils with such decorations turn into flowers, and in a pencil case they look like a bouquet.


A bouquet of pens or pencils as a gift for September 1
Such a bouquet of flowers from pens or pencils can be given on September 1 either one at a time or as a whole bouquet in a beautiful small vase or pencil case - it will be an unusual and always necessary gift to everyone who is somehow connected with the school.


Figurines made of rubber bands for a cocktail tube
The same figurines are an original decoration not only for writing instruments, but also for cocktail tubes. You will get a festive table decor made of rubber bands, for example, for celebrating a children's birthday. This decoration can then be presented as a souvenir to all children invited to the holiday.

All the very best to you! Especially for blog readers "MORE creative ideas for kids"(https: // site), with sincere respect, Yulia Sherstyuk
All the best! If the article was useful to you, please help the development of the site, share a link to it in social networks.
Placing site materials (images and text) on other resources without the written permission of the author is prohibited and punishable by law.
- Weaving from elastic bands - 4: bracelet “Fish…
- Weaving from rubber bands - 3: a simple bracelet ...
- Weaving from rubber bands - 8: spiders (figurine, ...
2. We remove the left part of the "eight" and leave this loop on the top rubber band. You can hook the elastic with your finger, but it is most convenient to do this with a crochet hook.
3. Similarly, remove the right side of the "eight" and we get such a loop.

4. The third elastic band (in the photo in red) is placed on top. As you may have guessed, we will alternate colors through one - red and green. In general, when you weave bracelets with your own hands, the main thing is to turn on your imagination. You can repeat colors 2 through 2 or 3 through 3. Or you can even weave a rainbow colored chain and wear it with almost any outfit.

5. Remove from one of the pencils part of the second gum and leave this loop on the third (top gum). Remove the elastic in the same way, but from the opposite side.

6. Dressing the next gum (green). We lower our design a little lower and continue weaving according to the above pattern. That is, now we should put a red loop on the top, green rubber band. And continue weaving further until we get a product of the length that we need.

7.Carefully remove our "chain" from the pencils. We put a clasp on the finished product (ring, bracelet or necklace).

Do-it-yourself rubber band bracelets: an interesting activity, a chic result
There are many ways to weave gum bracelets without a loom. Such a common, but still quite expensive device, like a machine, can replace ordinary pencils, table forks, and even your own fingers. All in your hands! With these hands you can create such masterpieces, which will compete with any expensive jewelry.
Rubber bracelets are fashionable, fun, stylish, no doubt about it! Appear on the net every now and then pictures of hollywood stars, on whose hands elegant "rubber" bracelets or rings flaunt. You can't even believe that such exclusive and at the same time such popular jewelry can be woven without any effort, literally without leaving your home! And when you master new weaving techniques, for example, such as “”, “”, “rain”, “”, “”, you will become a true professional in rubber weaving and will be able to create your own workshops.
In general, rubber bracelets are a great hobby, a great start for your own creative development and just very trendy. Such a decoration can be a great gift, made with your own hands and presented with all your heart.
Video tutorials: how to make rubber band bracelets on pencils?
I wonder how to weave a pencil out of rubber bands, but have you ever tried yourself in such needlework? Then this article will help you learn new things, educate and help. Very often, especially teenagers, I want to somehow express themselves and attract attention. Some time ago, among the types of needlework, a new type appeared - weaving with rubber bands. And, of course, the boys and girls swept away all the materials in different creative stores, monitored the appearance of master classes and tried to emphasize their individuality with intricate products. For example, there is an ordinary pencil, but how to make it real and amazing? To do this, there is a training lesson that will help, at least for a while, but become wizards.
The beginning of time
Rubber bands are officially called Rainbow loom. Translated from English, “rainbow” from such material not only cheers up, but also makes you develop creativity and imagination. It is easy to make key chains, bracelets, pendants, figurines, that is, various accessories from them. Let's try to experiment with colors and techniques.
Products can be made on the machine or without it. Everything depends on fantasy.
Let's take the following materials for work:
- pink - 49 pcs;
- white - 12 pcs;
- yellow - 20 pcs;
- blue - 174 pcs;
- red - 2 pcs;
- black - 1 pc;
- purple - 2 pcs;
- hook.
If you create a large pencil, then nothing will work without a machine.
- So, we take 6 pink rubber bands, we put them on the tool in the form of a star.
- Then wrap one pink around the column four times. We take the hook, place it in the central column, move the rubber band with it, which we wrapped four times. We take the upper rubber band, throw it on another column.

- Craftswomen advise using metal hooks, because they are of better quality and more durable.
- Then we put on new rubber bands, dropping 4 materials on each column.

- Weave two more rows in the same way. We made a beautiful eraser for our stationery.

- Take a white elastic band, wrap it in eights, as in the photo.

- We throw one row in a circle, without crossing. Grab the bottom row of whites with a crochet hook, throw it off from the outside.

- We introduce the hook into the column, move a few white ones. Let's grab all the pink ones, remove them from the columns on the hook. We throw off the white ones, and return the pink ones to their old places.

- Insert a hook into a column. We push the pink color, putting on a few blue ones. We will stretch them through all the pink ones. We return the blue ones to the columns.

- We take out the center of the product with a hook. We gradually throw blue ones in a circular motion, removing four from the columns from the outside. We repeat three times. As a result - several rows.

- The product will be "alive". Let's make him beautiful eyes: take one purple, wrap it around the hook four times. Throw on a few blue ones, throw purple on them. Let's make a second eye by pulling on the tool. Let's throw some blue materials on the columns.

- Weave a row of blue rubber bands, remove four blue ones. We form the cheeks, as well as the eyes. Weave another row. To make a mouth, take one black one, wind it twice. Let's grab all the blue ones of the first column (middle), throw them on the black one, and then put them back in place. Such a product is not created on a slingshot, because it has many processes.

- And so we weave 7 blue rows. This is the main part of the product. If you want, you can change the length by increasing or decreasing.

- Let's try to narrow down the product. Remove a few upper rubber bands from the edge of the middle row. We throw on the reverse column. We get four columns. Again we take four pairs of yellow, stretching in a circle with a rectangle. There we repeat two rows.

- We create a 3D stylus. Remove all the upper rubber bands, throw them on the opposite ones. We remove four from all columns.

- We throw on several pairs of yellow on both sides, removes the four lower ones. The rest we transfer to the hook. Then we wrap the blue around the finger twice, throw off the loops. Let's pull the product. Let's take a distant rubber band, throw it off.

- Thus fixed and received such beauty.

Video on the topic of the article
Summing up, we can say that such products are highly valued. They require a lot of time, work and effort. Needlewomen are advised to practice on lighter crafts before starting to work in order to “fill your hand”. Therefore, further work will go with pleasure and much easier.
Now there are many "additional" assistants - master classes, forums, books, etc. But craftswomen prefer high-quality videos, where they talk in detail not only about the materials, but also about the stages of work. If you look through audio assistants, then inspiration will come immediately and you will want to create something with your own hands.
3d PENCIL on the machine MONSTER TAIL from Rainbow Loom rubber bands. After watching this tutorial, you will learn how to weave a 3d PENCIL on a MONSTER TAIL loom from Rainbow Loom rubber bands. We will need: 3 black, 2 red, 41 pink, 66 blue and 14 orange rubber bands. Good luck! If you liked this lesson, then be sure to leave your opinion in the comments, as well as like and share with friends Subscribe to my channel to be the first to see new video tutorials: https://www.youtube.com/user/raduzki Here you will find many lessons in Russian on weaving from RAINBOW LOOM elastic bands (Loom Bands). Copyright 2015 © Rainbow Loom. After watching a few lessons on weaving from Rainbow Loom rubber bands, you will learn how to make not only bracelets, but also all kinds of toys, funny figurines, key chains and other very useful things. With the help of our master classes, you can weave them yourself and give them to your family, friends, teachers. What could be better than a handmade gift! I divided all my lessons into playlists: lumigurumi, funny figures, bracelets, without a loom, adventure time, etc. You can choose the lesson you are interested in from a specific playlist by clicking on this link: https://www.youtube.com/view_all_playlists☀ Subscribers of my channel Iris Rainbow Loom Vkontakte: http://vk.com/raduzki1 JOIN!!! ☀ Buy weaving kits: http://rainbowloombands.ru/☀We are on Odnoklassniki: http://www.odnoklassniki.ru/raduzhki☀Photo and video lessons you can also see on our website http://yrokirainbowloom.com/ e-mail: [email protected] yt:quality=high: THANK YOU for LIKE and SUBSCRIBE to OUR CHANNEL =) Previous video: https://youtu.be/6Z0W0Hh3mJM My collection of figurines and bracelets: https://youtu.be/LuYim6w_COA Subscribe to our channel to be the first to see new videos: https://www.youtube.com/user/raduzki?sub_confirmation=1 Ksyusha's channel: http://www.youtube.com/c/KsenyaJoy?sub_confirmation=1 Iridescents is a children's channel. Here you will find videos for children and about children, challenges, reviews of children's toys, delicious recipes, needlework workshops, DIY, unusual ideas, a blog about our life and much more. We try to upload new videos every day. Rainbows are you and me. Our subscribers take part in the creation of new videos: suggest in the comments a topic that interests you and we will definitely record a new video. If you want to wish your friends a happy birthday or say hello to classmates, leave your requests in the comments, we will definitely try to fulfill it =) I have distributed all the videos on the channel by topic into playlists. You can choose a video on a topic that interests you by clicking on this link.